NGENLA® Instructions for Use
(somatrogon-ghla)
Instructions for Use
NGENLA (en’ JEN-lah)
(somatrogon-ghla)
24 mg
injection, for subcutaneous use
Read this Instructions for Use before you start using NGENLA and each time you get a new refill. There may be new information. This information does not take the place of talking to your healthcare provider about your medical condition or treatment.
Important information about your NGENLA pen:
- •
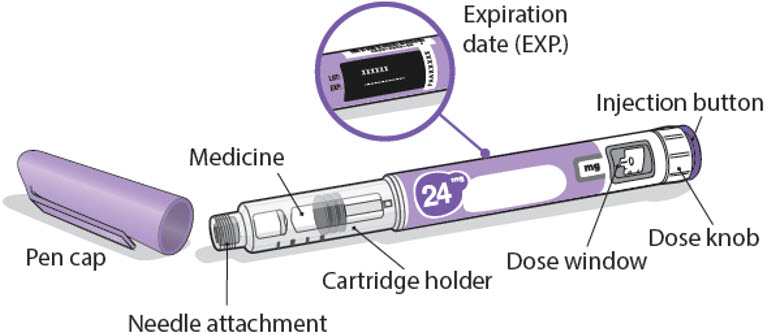
- The NGENLA pen for injection is a single-patient-use, disposable (throw away) prefilled pen containing 24 mg of medicine. You can give more than 1 dose from the pen.
- •
- NGENLA can be given by a patient, caregiver or healthcare provider. Do not try to inject NGENLA yourself until you are shown the right way to give the injections and read and understand the Instructions for Use. If your healthcare provider decides that you or a caregiver may be able to give your injections of NGENLA at home, you should receive training on the right way to prepare and inject NGENLA. It is important that you read, understand, and follow these instructions so that you inject NGENLA the right way.
- •
- It is important to talk to your healthcare provider to be sure you understand your NGENLA dosing instructions. To help you remember when to inject NGENLA, you can mark your calendar ahead of time. Call your healthcare provider if you or your caregiver have any questions about the right way to inject NGENLA, or call the helpline on 1-800-645-1280.
- •
- Do not share your pen with other people, even if the needle has been changed. You may give other people a serious infection or get a serious infection from them.
- •
- Each turn (click) of the dose knob dials 0.2 mg of medicine. You can give from 0.2 mg to 12 mg in a single injection. If your dose is more than 12 mg, you will need to give more than 1 injection.
- •
- A new pen may contain slightly more than 24 mg of medicine, this is normal.
- •
- Always use a new sterile needle for each injection. This will decrease the risk of contamination, infection, leakage of medicine, and blocked needles leading to the wrong dose.
- •
- Do not shake your pen. Shaking can damage the medicine.
- •
- The pen is not recommended for use by the blind or visually impaired without the assistance of a person trained in the proper use of the product.
Supplies you will need each time you inject
Included in the carton:
- •
- 1 NGENLA prefilled pen
Not included in the carton:
- •
- 1 new sterile needle for each injection
- •
- Alcohol swabs
- •
- Cotton balls or gauze pads
- •
- Adhesive bandage
- •
- 1 FDA-cleared sharps disposal container for disposal of pen needles and pens (See How should I dispose of the pen needles and pens?)
24 mg NGENLA pen:
Needles to use
Pen needles are not included with your NGENLA pen. You will need a prescription from your healthcare provider to get pen needles up to a length of 8 mm from your pharmacy. Talk with your healthcare provider about the right needle for you.
- •
- Needles to use with your NGENLA pen:
- o
- 32G (Novo Nordisk®, NovoFine® Plus)
- o
- 31G (Novo Nordisk®, NovoFine®)
- o
- 31G (Becton, Dickinson and Company, BD Ultra-Fine™ or BD Micro-Fine™)
- •
- Needles with safety shield to use with your NGENLA pen:
- o
- 30G (Becton, Dickinson and Company, AutoShield Duo™)
- o
- 30G (Novo Nordisk®, NovoFine® AutoCover®)
Sterile needle (example) not supplied:

Sterile needle with safety shield (example) not supplied:
Note: Needles with safety shield do not have an inner needle cap. Steps 5, 6 and 11 within these instructions relating to the inner needle cap may not apply when using a needle with safety shield. Refer to the safety shield needle manufacturer’s instructions for use (IFU) for more information on attaching and removing the safety needle. When using safety shield needles, priming is required only for the first use of a new pen; follow the NGENLA pen IFU for priming.
Caution: Never use a bent or damaged needle. Always handle pen needles with care to make sure you do not prick yourself (or anyone else) with the needle. Do not attach a new needle to your pen until you are ready to take your injection.
Preparing for your injection
Step 1 - Getting ready
- •
- Wash and dry your hands.
- •
- You can use your pen straight from the refrigerator. For a more comfortable injection, leave your pen at room temperature for up to 30 minutes.
- •
- Check the name, strength, and label of your pen to make sure it is the medicine your healthcare provider has prescribed for you.
- •
- Check the expiration date on the pen label. Do not use if the expiration date has passed.
- •
- Do not use your pen if:
- o
- it has been frozen or exposed to heat
- o
- it has been dropped
- o
- it looks broken or damaged
- o
- it has been more than 28 days after first use of the pen.
- •
- Do not remove the pen cap from your pen - until you are ready to inject.
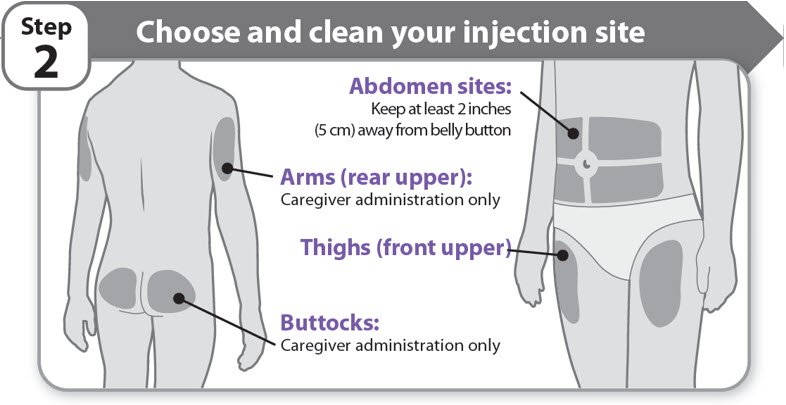
Step 2 - Choose and clean your injection site

- •
- NGENLA can be given in the abdomen, thighs, buttocks, or upper arms.
- •
- Choose the best place to inject, as recommended by your healthcare provider.
- •
- If more than 1 injection is needed to complete your full dose, each injection should be given in a different injection site.
- •
- Do not inject into bony areas, areas that are bruised, red, sore or hard, and areas that have scars or skin conditions.
- •
- Clean the injection site with an alcohol swab.
- •
- Allow the injection site to dry.
- •
- Do not touch injection site after cleaning.
Step 3 - Check medicine
- •
- Pull off the pen cap and keep it for after your injection.
- •
- Check the medicine inside the cartridge holder.
- •
- Make sure the medicine is colorless to slightly light yellow. Do not inject the medicine if it is cloudy or dark yellow.
- •
- Make sure the medicine is free of flakes or particles. Do not inject the medicine if it has flakes or particles.
Note: It is normal to see one or more bubbles in the medicine.
- •
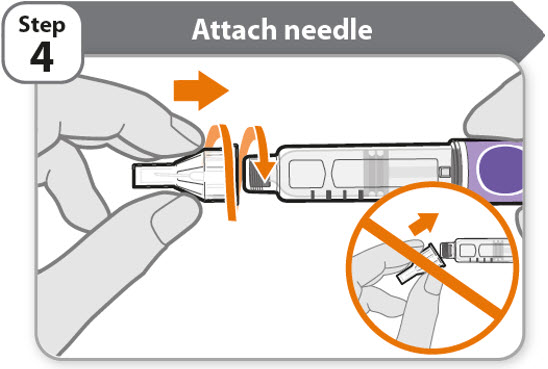
- Take a new needle and pull off the protective paper.
- •
- Line the needle up with your pen keeping them both straight.
- •
- Gently push and then screw the needle onto your pen.
Do not over tighten.
Note: Be careful not to attach the needle at an angle. This may cause the pen to leak.
Caution: Needles have sharp tips at both ends. Handle with care to make sure you do not prick yourself (or anyone else) with the needle.
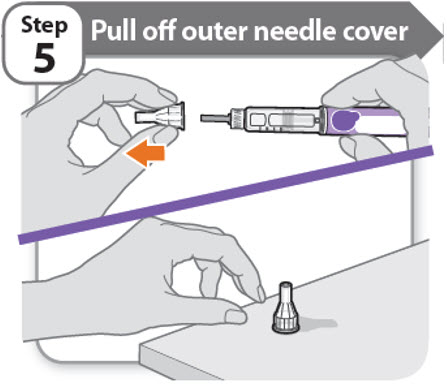
Step 5 - Pull off outer needle cover
- •
- Pull off the outer needle cover.
- •
- Make sure you keep the outer needle cover. You will need it later to remove the needle.
Note: You should see an inner needle cap after you have removed the outer cover. If you do not see this, try to attach the needle again.
Note: Needles with safety shield do not have an inner needle cap. Refer to the safety shield needle manufacturer’s IFU.
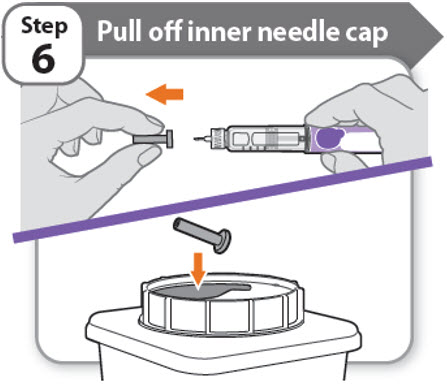
Step 6 - Pull off inner needle cap

- •
- Pull off the inner needle cap carefully to show the needle.
- •
- Throw away the inner needle cap in an FDA-cleared sharps container. It is not needed again.
Note: Needles with safety shield do not have an inner needle cap. Refer to the safety shield needle manufacturer’s IFU.
Find NGENLA® medical information:
Find NGENLA® medical information:
NGENLA® Quick Finder
Health Professional Information
Instructions for Use
Instructions for Use
NGENLA (en’ JEN-lah)
(somatrogon-ghla)
24 mg
injection, for subcutaneous use
Read this Instructions for Use before you start using NGENLA and each time you get a new refill. There may be new information. This information does not take the place of talking to your healthcare provider about your medical condition or treatment.
Important information about your NGENLA pen:
- •
- The NGENLA pen for injection is a single-patient-use, disposable (throw away) prefilled pen containing 24 mg of medicine. You can give more than 1 dose from the pen.
- •
- NGENLA can be given by a patient, caregiver or healthcare provider. Do not try to inject NGENLA yourself until you are shown the right way to give the injections and read and understand the Instructions for Use. If your healthcare provider decides that you or a caregiver may be able to give your injections of NGENLA at home, you should receive training on the right way to prepare and inject NGENLA. It is important that you read, understand, and follow these instructions so that you inject NGENLA the right way.
- •
- It is important to talk to your healthcare provider to be sure you understand your NGENLA dosing instructions. To help you remember when to inject NGENLA, you can mark your calendar ahead of time. Call your healthcare provider if you or your caregiver have any questions about the right way to inject NGENLA, or call the helpline on 1-800-645-1280.
- •
- Do not share your pen with other people, even if the needle has been changed. You may give other people a serious infection or get a serious infection from them.
- •
- Each turn (click) of the dose knob dials 0.2 mg of medicine. You can give from 0.2 mg to 12 mg in a single injection. If your dose is more than 12 mg, you will need to give more than 1 injection.
- •
- A new pen may contain slightly more than 24 mg of medicine, this is normal.
- •
- Always use a new sterile needle for each injection. This will decrease the risk of contamination, infection, leakage of medicine, and blocked needles leading to the wrong dose.
- •
- Do not shake your pen. Shaking can damage the medicine.
- •
- The pen is not recommended for use by the blind or visually impaired without the assistance of a person trained in the proper use of the product.
Supplies you will need each time you inject
Included in the carton:
- •
- 1 NGENLA prefilled pen
Not included in the carton:
- •
- 1 new sterile needle for each injection
- •
- Alcohol swabs
- •
- Cotton balls or gauze pads
- •
- Adhesive bandage
- •
- 1 FDA-cleared sharps disposal container for disposal of pen needles and pens (See How should I dispose of the pen needles and pens?)
24 mg NGENLA pen:
Needles to use
Pen needles are not included with your NGENLA pen. You will need a prescription from your healthcare provider to get pen needles up to a length of 8 mm from your pharmacy. Talk with your healthcare provider about the right needle for you.
- •
- Needles to use with your NGENLA pen:
- o
- 32G (Novo Nordisk®, NovoFine® Plus)
- o
- 31G (Novo Nordisk®, NovoFine®)
- o
- 31G (Becton, Dickinson and Company, BD Ultra-Fine™ or BD Micro-Fine™)
- •
- Needles with safety shield to use with your NGENLA pen:
- o
- 30G (Becton, Dickinson and Company, AutoShield Duo™)
- o
- 30G (Novo Nordisk®, NovoFine® AutoCover®)
Sterile needle (example) not supplied:
Sterile needle with safety shield (example) not supplied:
Note: Needles with safety shield do not have an inner needle cap. Steps 5, 6 and 11 within these instructions relating to the inner needle cap may not apply when using a needle with safety shield. Refer to the safety shield needle manufacturer’s instructions for use (IFU) for more information on attaching and removing the safety needle. When using safety shield needles, priming is required only for the first use of a new pen; follow the NGENLA pen IFU for priming.
Caution: Never use a bent or damaged needle. Always handle pen needles with care to make sure you do not prick yourself (or anyone else) with the needle. Do not attach a new needle to your pen until you are ready to take your injection.
Preparing for your injection
Step 1 - Getting ready
- •
- Wash and dry your hands.
- •
- You can use your pen straight from the refrigerator. For a more comfortable injection, leave your pen at room temperature for up to 30 minutes.
- •
- Check the name, strength, and label of your pen to make sure it is the medicine your healthcare provider has prescribed for you.
- •
- Check the expiration date on the pen label. Do not use if the expiration date has passed.
- •
- Do not use your pen if:
- o
- it has been frozen or exposed to heat
- o
- it has been dropped
- o
- it looks broken or damaged
- o
- it has been more than 28 days after first use of the pen.
- •
- Do not remove the pen cap from your pen - until you are ready to inject.
Step 2 - Choose and clean your injection site
- •
- NGENLA can be given in the abdomen, thighs, buttocks, or upper arms.
- •
- Choose the best place to inject, as recommended by your healthcare provider.
- •
- If more than 1 injection is needed to complete your full dose, each injection should be given in a different injection site.
- •
- Do not inject into bony areas, areas that are bruised, red, sore or hard, and areas that have scars or skin conditions.
- •
- Clean the injection site with an alcohol swab.
- •
- Allow the injection site to dry.
- •
- Do not touch injection site after cleaning.
Step 3 - Check medicine
- •
- Pull off the pen cap and keep it for after your injection.
- •
- Check the medicine inside the cartridge holder.
- •
- Make sure the medicine is colorless to slightly light yellow. Do not inject the medicine if it is cloudy or dark yellow.
- •
- Make sure the medicine is free of flakes or particles. Do not inject the medicine if it has flakes or particles.
Note: It is normal to see one or more bubbles in the medicine.
- •
- Take a new needle and pull off the protective paper.
- •
- Line the needle up with your pen keeping them both straight.
- •
- Gently push and then screw the needle onto your pen.
Do not over tighten.
Note: Be careful not to attach the needle at an angle. This may cause the pen to leak.
Caution: Needles have sharp tips at both ends. Handle with care to make sure you do not prick yourself (or anyone else) with the needle.
Step 5 - Pull off outer needle cover
- •
- Pull off the outer needle cover.
- •
- Make sure you keep the outer needle cover. You will need it later to remove the needle.
Note: You should see an inner needle cap after you have removed the outer cover. If you do not see this, try to attach the needle again.
Note: Needles with safety shield do not have an inner needle cap. Refer to the safety shield needle manufacturer’s IFU.
Step 6 - Pull off inner needle cap
- •
- Pull off the inner needle cap carefully to show the needle.
- •
- Throw away the inner needle cap in an FDA-cleared sharps container. It is not needed again.
Note: Needles with safety shield do not have an inner needle cap. Refer to the safety shield needle manufacturer’s IFU.
Resources
Didn’t find what you were looking for? Contact us.
Chat online with Pfizer Medical Information regarding your inquiry on a Pfizer medicine.
*Contact Medical Information.9AM-5PM ET Monday to Friday; excluding holidays.
Report Adverse Event
Pfizer Safety
To report an adverse event related to the Pfizer-BioNTech COVID-19 Vaccine, and you are not part of a clinical trial* for this product, click the link below to submit your information:
Pfizer Safety Reporting Site*If you are involved in a clinical trial for this product, adverse events should be reported to your coordinating study site.
If you cannot use the above website, or would like to report an adverse event related to a different Pfizer product, please call Pfizer Safety at (800) 438-1985.
FDA Medwatch
You may also contact the U.S. Food and Drug Administration (FDA) directly to report adverse events or product quality concerns either online at www.fda.gov/medwatch or call (800) 822-7967.