NGENLA® Full Patient Information
(somatrogon-ghla)
Full Patient Information
17 PATIENT COUNSELING INFORMATION
Advise the patient and/or caregiver to read the FDA-approved patient labeling (Patient Information and Instructions for Use).
- •
- Hypersensitivity Reactions
Advise patients and caregivers that serious systemic hypersensitivity reactions (anaphylaxis and angioedema) are possible and that prompt medical attention should be sought if an allergic reaction occurs [see Warnings and Precautions (5.2)].
- •
- Neoplasm
Advise childhood cancer survivors and caregivers that individuals treated with radiation to the head are at increased risk of secondary neoplasms and, as a precaution, need to be monitored for recurrence. Advise patients to report marked changes in skin pigmentation or changes in the appearance of preexisting nevi [see Warnings and Precautions (5.3)].
- •
- Glucose Intolerance/Diabetes Mellitus
Advise patients and caregivers that new onset of insulin resistance and hyperglycemia may occur and monitoring of blood glucose during treatment with NGENLA in patients with glucose intolerance or who have risk factors for diabetes, may be needed [see Warnings and Precautions (5.4)].
- •
- Intracranial Hypertension
Advise patients and caregivers to report to their healthcare provider any visual changes, headache, and nausea and/or vomiting [see Warnings and Precautions (5.5)].
- •
- Fluid Retention
Advise patients and caregivers that fluid retention during NGENLA therapy may occur. Inform patients of the clinical manifestations of fluid retention (e.g. edema, arthralgia, myalgia, nerve compression syndromes including carpal tunnel syndrome/paresthesia) and to report to their healthcare provider if any of these signs or symptoms occur during treatment with NGENLA.
- •
- Hypoadrenalism
Advise patients and caregivers who have or who are at risk for corticotropin deficiency that hypoadrenalism may develop and to report to their healthcare provider if extreme fatigue, dizziness, weakness, vomiting, dehydration or weight loss is experienced during treatment with NGENLA [see Warnings and Precautions (5.7)].
- •
- Hypothyroidism
Advise patients and caregivers that undiagnosed/untreated hypothyroidism may prevent an optimal response to NGENLA. Advise patients and caregivers they may require periodic thyroid function tests during treatment with NGENLA [see Warnings and Precautions (5.8)].
- •
- Pancreatitis
Advise patients and caregivers that pancreatitis may develop and to report to their healthcare provider any new onset persistent severe abdominal pain.
- •
- Lipoatrophy
Advise patients and caregivers that lipoatrophy may occur if NGENLA is administered subcutaneously at the same site over a long period of time. Advise patients to rotate injection sites when administering NGENLA to reduce this risk.
| This Patient Information has been approved by the U.S. Food and Drug Administration. Issued: 6/2023 |
PATIENT INFORMATION (somatrogon-ghla) injection, for subcutaneous use |
What is NGENLA? |
Do not use NGENLA if:
|
Before using NGENLA, tell your child’s healthcare provider about all of your child’s medical conditions, including if your child:
Tell your child’s healthcare provider about all the medicines your child takes, including prescription and over-the-counter medicines, vitamins, and herbal supplements. NGENLA may affect how other medicines work, and other medicines may affect how NGENLA works. |
How should I use NGENLA?
|
What are the possible side effects of NGENLA? NGENLA may cause serious side effects, including:
The most common side effects of NGENLA include:
These are not all the possible side effects of NGENLA. You should tell your child’s healthcare provider if your child has any side effect that bothers them or that does not go away. |
How should I store NGENLA?
Before you use NGENLA pens for the first time (unused pens):
After you use NGENLA pens and there is still medicine left (up to 28 days of use):
Keep NGENLA and all medicines out of the reach of children. |
General information about the safe and effective use of NGENLA. Medicines are sometimes prescribed for purposes other than those listed in a Patient Information leaflet. Do not use NGENLA for a condition for which it was not prescribed. Do not give NGENLA to other people, even if they have the same symptoms because it may harm them. You can ask your pharmacist or healthcare provider for information about NGENLA that is written for health professionals. |
What are the ingredients in NGENLA? Active ingredient: somatrogon-ghla
|

Instructions for Use
NGENLA (en’ JEN-lah)
(somatrogon-ghla)
24 mg
injection, for subcutaneous use
Read this Instructions for Use before you start using NGENLA and each time you get a new refill. There may be new information. This information does not take the place of talking to your healthcare provider about your medical condition or treatment.
Important information about your NGENLA pen:
- •
- The NGENLA pen for injection is a single-patient-use, disposable (throw away) prefilled pen containing 24 mg of medicine. You can give more than 1 dose from the pen.
- •
- NGENLA can be given by a patient, caregiver or healthcare provider. Do not try to inject NGENLA yourself until you are shown the right way to give the injections and read and understand the Instructions for Use. If your healthcare provider decides that you or a caregiver may be able to give your injections of NGENLA at home, you should receive training on the right way to prepare and inject NGENLA. It is important that you read, understand, and follow these instructions so that you inject NGENLA the right way.
- •
- It is important to talk to your healthcare provider to be sure you understand your NGENLA dosing instructions. To help you remember when to inject NGENLA, you can mark your calendar ahead of time. Call your healthcare provider if you or your caregiver have any questions about the right way to inject NGENLA, or call the helpline on 1-800-645-1280.
- •
- Do not share your pen with other people, even if the needle has been changed. You may give other people a serious infection or get a serious infection from them.
- •
- Each turn (click) of the dose knob dials 0.2 mg of medicine. You can give from 0.2 mg to 12 mg in a single injection. If your dose is more than 12 mg, you will need to give more than 1 injection.
- •
- A new pen may contain slightly more than 24 mg of medicine, this is normal.
- •
- Always use a new sterile needle for each injection. This will decrease the risk of contamination, infection, leakage of medicine, and blocked needles leading to the wrong dose.
- •
- Do not shake your pen. Shaking can damage the medicine.
- •
- The pen is not recommended for use by the blind or visually impaired without the assistance of a person trained in the proper use of the product.
Supplies you will need each time you inject
Included in the carton:
- •
- 1 NGENLA prefilled pen
Not included in the carton:
- •
- 1 new sterile needle for each injection
- •
- Alcohol swabs
- •
- Cotton balls or gauze pads
- •
- Adhesive bandage
- •
- 1 FDA-cleared sharps disposal container for disposal of pen needles and pens (See How should I dispose of the pen needles and pens?)
24 mg NGENLA pen:
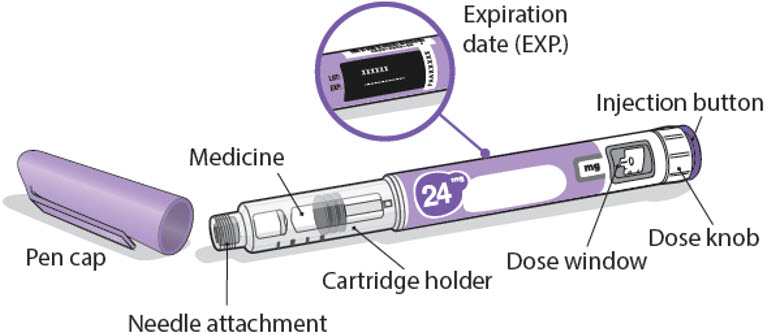
Needles to use
Pen needles are not included with your NGENLA pen. You will need a prescription from your healthcare provider to get pen needles up to a length of 8 mm from your pharmacy. Talk with your healthcare provider about the right needle for you.
- •
- Needles to use with your NGENLA pen:
- o
- 32G (Novo Nordisk®, NovoFine® Plus)
- o
- 31G (Novo Nordisk®, NovoFine®)
- o
- 31G (Becton, Dickinson and Company, BD Ultra-Fine™ or BD Micro-Fine™)
- •
- Needles with safety shield to use with your NGENLA pen:
- o
- 30G (Becton, Dickinson and Company, AutoShield Duo™)
- o
- 30G (Novo Nordisk®, NovoFine® AutoCover®)
Sterile needle (example) not supplied:

Sterile needle with safety shield (example) not supplied:
Note: Needles with safety shield do not have an inner needle cap. Steps 5, 6 and 11 within these instructions relating to the inner needle cap may not apply when using a needle with safety shield. Refer to the safety shield needle manufacturer’s instructions for use (IFU) for more information on attaching and removing the safety needle. When using safety shield needles, priming is required only for the first use of a new pen; follow the NGENLA pen IFU for priming.
Caution: Never use a bent or damaged needle. Always handle pen needles with care to make sure you do not prick yourself (or anyone else) with the needle. Do not attach a new needle to your pen until you are ready to take your injection.
Preparing for your injection
Step 1 - Getting ready
- •
- Wash and dry your hands.
- •
- You can use your pen straight from the refrigerator. For a more comfortable injection, leave your pen at room temperature for up to 30 minutes.
- •
- Check the name, strength, and label of your pen to make sure it is the medicine your healthcare provider has prescribed for you.
- •
- Check the expiration date on the pen label. Do not use if the expiration date has passed.
- •
- Do not use your pen if:
- o
- it has been frozen or exposed to heat
- o
- it has been dropped
- o
- it looks broken or damaged
- o
- it has been more than 28 days after first use of the pen.
- •
- Do not remove the pen cap from your pen - until you are ready to inject.
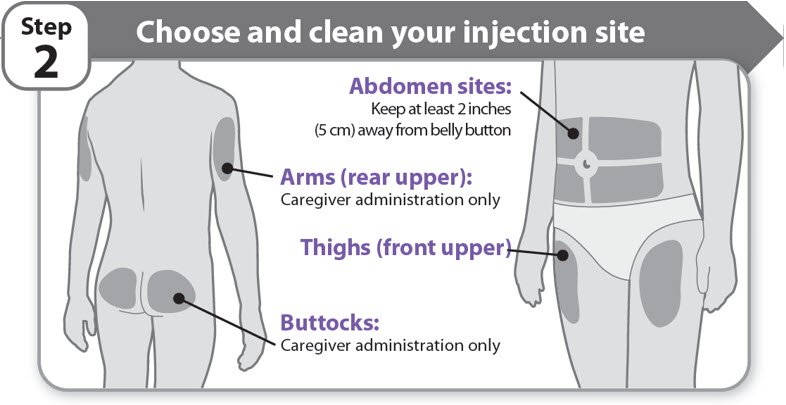
Step 2 - Choose and clean your injection site

- •
- NGENLA can be given in the abdomen, thighs, buttocks, or upper arms.
- •
- Choose the best place to inject, as recommended by your healthcare provider.
- •
- If more than 1 injection is needed to complete your full dose, each injection should be given in a different injection site.
- •
- Do not inject into bony areas, areas that are bruised, red, sore or hard, and areas that have scars or skin conditions.
- •
- Clean the injection site with an alcohol swab.
- •
- Allow the injection site to dry.
- •
- Do not touch injection site after cleaning.
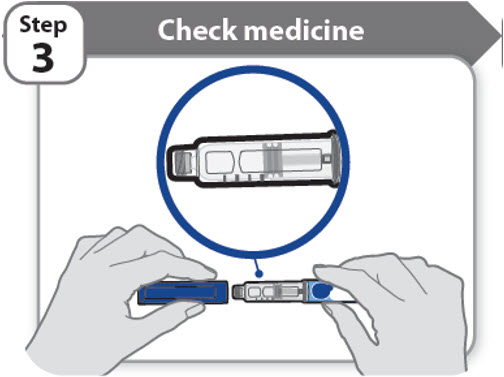
Step 3 - Check medicine
- •
- Pull off the pen cap and keep it for after your injection.
- •
- Check the medicine inside the cartridge holder.
- •
- Make sure the medicine is colorless to slightly light yellow. Do not inject the medicine if it is cloudy or dark yellow.
- •
- Make sure the medicine is free of flakes or particles. Do not inject the medicine if it has flakes or particles.
Note: It is normal to see one or more bubbles in the medicine.
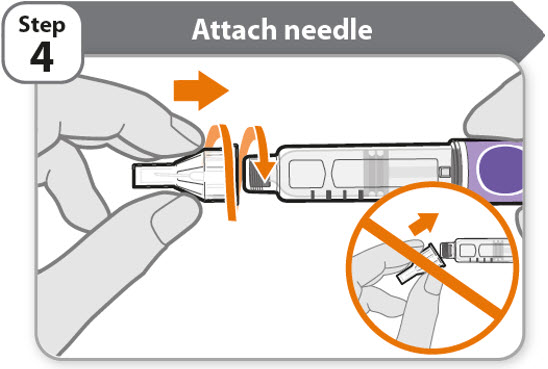
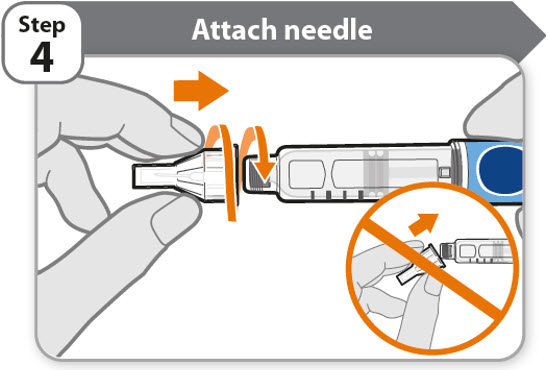
- •
- Take a new needle and pull off the protective paper.
- •
- Line the needle up with your pen keeping them both straight.
- •
- Gently push and then screw the needle onto your pen.
Do not over tighten.
Note: Be careful not to attach the needle at an angle. This may cause the pen to leak.
Caution: Needles have sharp tips at both ends. Handle with care to make sure you do not prick yourself (or anyone else) with the needle.
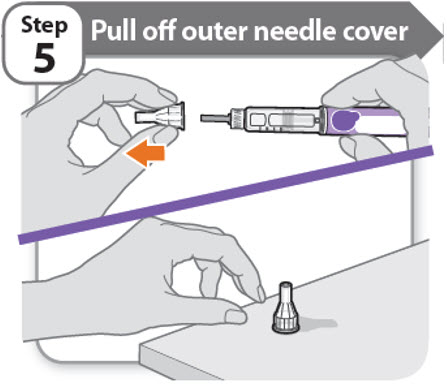
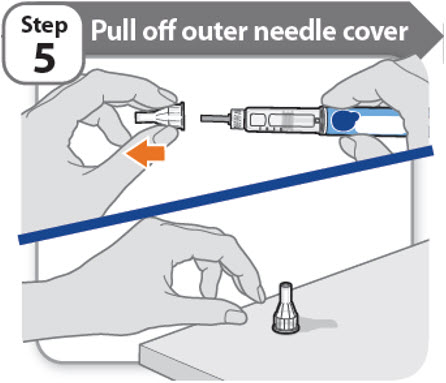
Step 5 - Pull off outer needle cover
- •
- Pull off the outer needle cover.
- •
- Make sure you keep the outer needle cover. You will need it later to remove the needle.
Note: You should see an inner needle cap after you have removed the outer cover. If you do not see this, try to attach the needle again.
Note: Needles with safety shield do not have an inner needle cap. Refer to the safety shield needle manufacturer’s IFU.
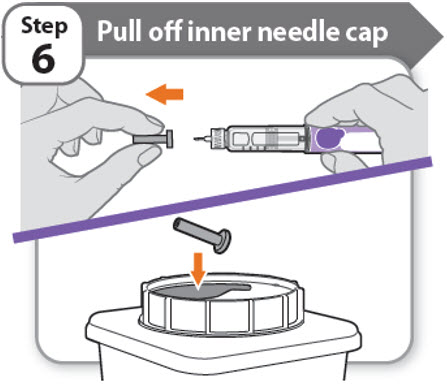
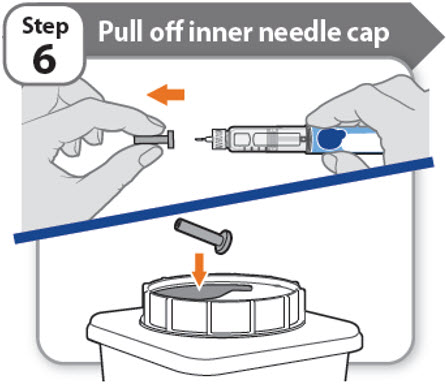
Step 6 - Pull off inner needle cap

- •
- Pull off the inner needle cap carefully to show the needle.
- •
- Throw away the inner needle cap in an FDA-cleared sharps container. It is not needed again.
Note: Needles with safety shield do not have an inner needle cap. Refer to the safety shield needle manufacturer’s IFU.
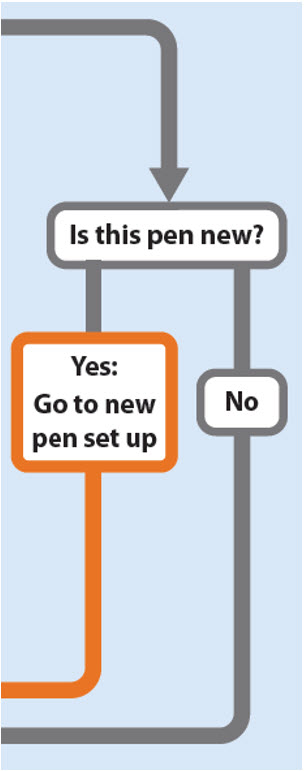
Is this pen new?
Yes: Go to new pen set up (arrow directing to “New pen set up (priming) - for the first use of a new pen only”)
No (arrow directing to “Setting your prescribed dose”)
New pen set up (priming) – for the first use of a new pen only
You must set up each new pen (priming) before using it for the first time
- •
- New pen set up is done before each new pen is used for the first time.
- •
- The purpose of setting up a new pen is to remove air bubbles and make sure you get the correct dose.
Important: Skip Step-A through to Step-C if you have already set up your pen.
Note: Needles with safety shield should be primed once with first use of a new pen.
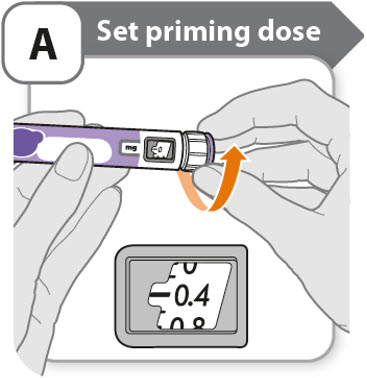
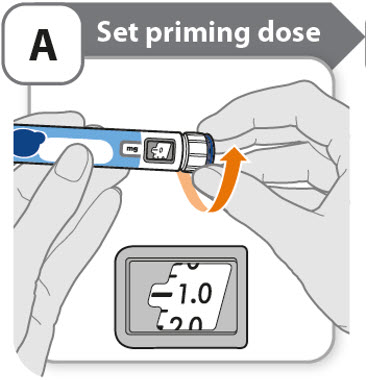
A - Set priming dose
- •
- Turn the dose knob to 0.4.
- o
- This is the amount to prime the pen.
- Note: If you turn the dose knob too far, you can turn it back.
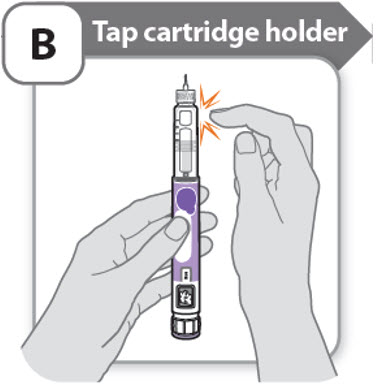
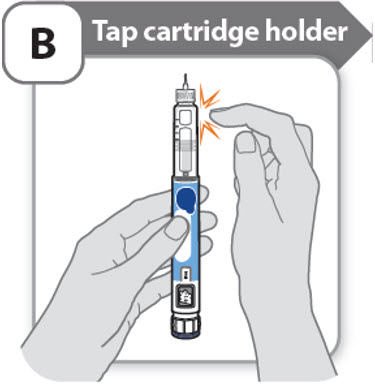
B - Tap cartridge holder
- •
- Hold the pen with the needle pointing up so that the air bubbles can rise.
- •
- Tap the cartridge holder gently to float any air bubbles to the top.
Important: Follow Step-B even if you do not see air bubbles.
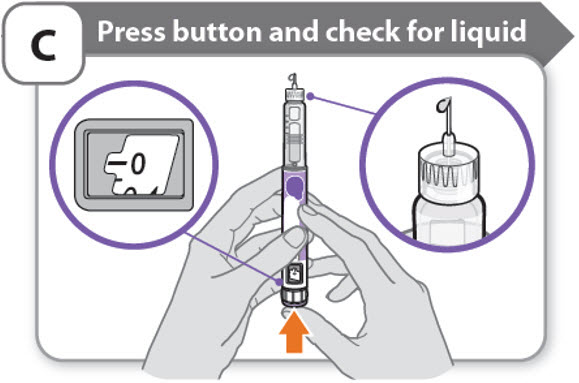
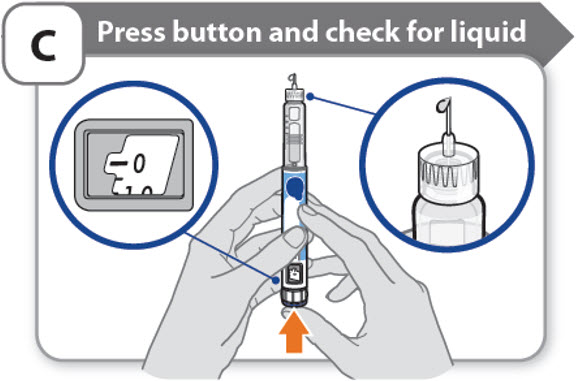
C - Press button and check for liquid
- •
- Press the injection button until it cannot go any further and "0" is shown in the dose window.
- •
- Check for liquid at the needle tip. If liquid appears, your pen is set up.
- •
- Always make sure that a drop of liquid appears before you inject. If liquid has not appeared, repeat Step-A through to Step-C.
- o
- If liquid does not appear after you have repeated Step-A through Step-C five (5) times, attach a new needle and try 1 more time. Do not use the pen if a drop of liquid still does not appear. Contact your healthcare provider or pharmacist and use a new pen.
Setting your prescribed dose
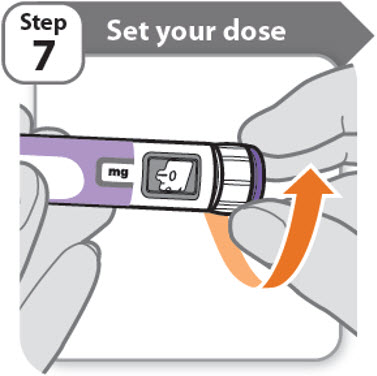
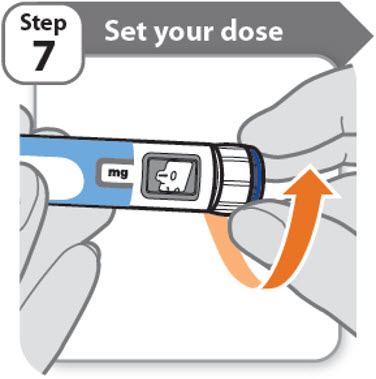
Step 7 - Set your dose
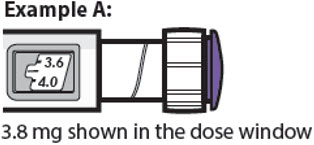
3.8 mg shown in the dose window
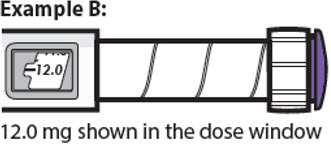
12.0 mg shown in the dose window
- •
- Turn the dose knob to set your dose.
- o
- The dose can be increased or decreased by turning the dose knob in either direction.
- o
- The dose knob turns 0.2 mg at a time.
- o
- Your pen contains 24 mg of medicine but you can only set a dose of up to 12 mg for a single injection.
- o
- The dose window shows the dose in mg. See Examples A and B.
- •
- Always check the dose window to make sure you have set the correct dose.
Important: Do not press the injection button while setting your dose.
What should I do if I cannot set the dose I need?
- •
- If your dose is more than 12 mg you will need to split your dose into more than 1 injection.
- •
- You can give from 0.2 mg to 12 mg in a single injection.
- o
- Use a new needle for each injection (See Step 4: Attach needle).
- o
- If you normally need to give 2 injections for your full dose, be sure to give your second dose.
What should I do if I do not have enough medicine left in my pen?
- •
- If your pen contains less than 12 mg of medicine, the dose knob will stop with the remaining amount of medicine shown in the dose window.
- •
- If there is not enough medicine left in your pen for your full dose, you may either:
- o
- Inject the amount left in your pen, then prepare a new pen to complete your dose in full. Remember to subtract the dose you have already received. For example, if the dose is 3.8 mg and you can only set the dose knob to 1.8 mg, you should inject another 2.0 mg with a new pen.
- o
- Or get a new pen and inject the full dose.
Only split your dose if you have been trained or told by your healthcare provider on how to do this.
Injecting your dose
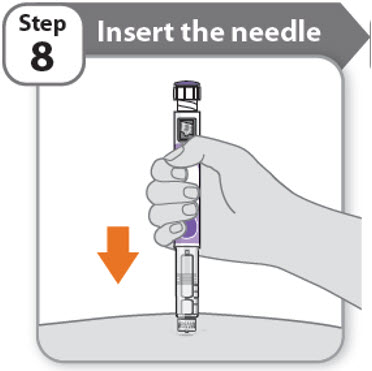
Step 8 - Insert the needle

- •
- Hold your pen so you can see the numbers in the dose window.
- •
- Insert the needle straight into your skin.
Note: If using needles with safety shield, you may wish to stretch or pinch the skin at the injection site to make the injection easier.
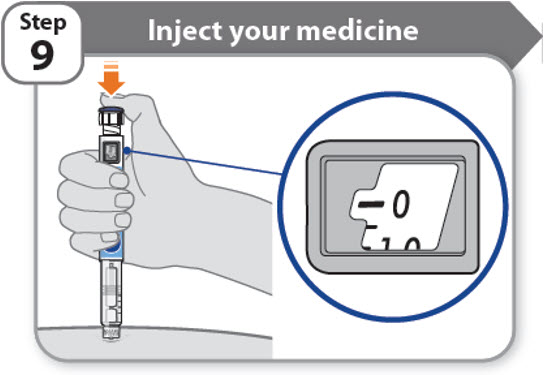
Step 9 - Inject your medicine
- •
- Keep holding the needle in the same position in your skin.
- •
- Press the injection button until it cannot go any further and "0" is shown in the dose window.
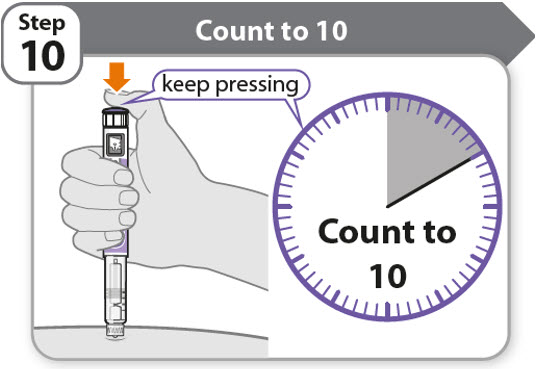
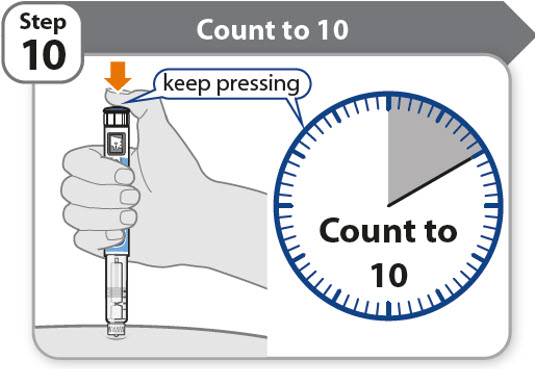
Step 10 - Count to 10
- •
- Continue to press the injection button while counting to 10. Counting to 10 will allow the full dose of medicine to be given.
- •
- After counting to 10, let go of the injection button and slowly remove the pen from the injection site by pulling the needle straight out.
Note: You may see a drop of medicine at the needle tip. This is normal and does not affect the dose you just received.
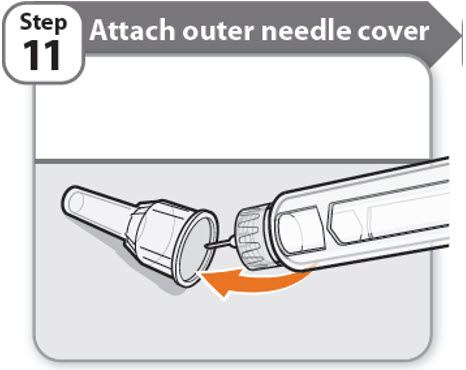
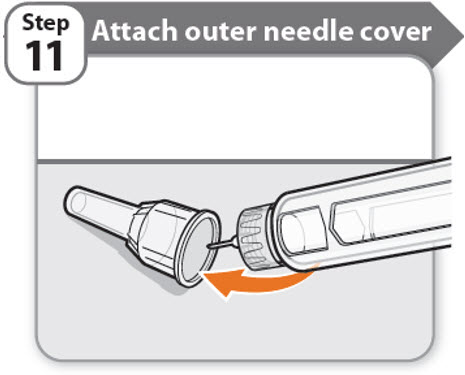
Step 11 - Attach outer needle cover
- •
- Carefully place the outer needle cover back on the needle.
- •
- Press on the outer needle cover until it is secure.
Caution: Never try to put the inner needle cap back on the needle. You may prick yourself with the needle.
Note: If using needle with safety shield, refer to the safety shield needle manufacturer’s IFU.
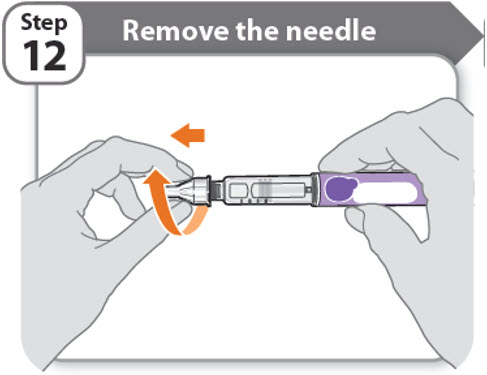
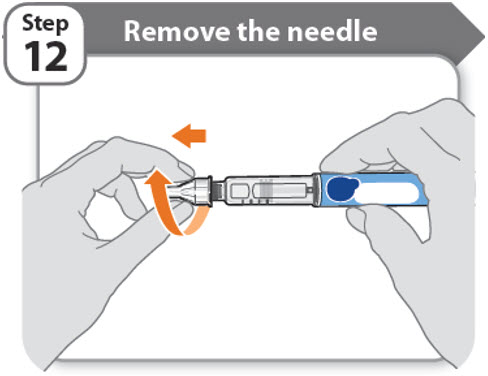
Step 12 - Remove the needle
- •
- Unscrew the needle from the pen.
- •
- Gently pull until the needle comes off.
Note: If the needle is still on, replace the outer needle cover and try again. Be sure to apply pressure when unscrewing the needle. - •
- Throw away the needle in an FDA-cleared sharps container (See How should I dispose of the pen needles and pens?).
- •
- Important: Always remove and throw away used needles. Do not reuse needles.
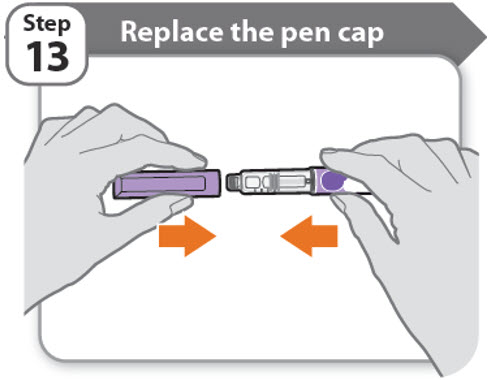
Step 13 - Replace the pen cap
- •
- Replace the pen cap back onto your pen.
- •
- Do not recap the pen with a needle attached.
- •
- If there is any medicine left in your pen, store in the refrigerator between uses (See How should I store my pen?).
Step 14 - After your injection
- •
- Press lightly on the injection site with a clean cotton ball or gauze pad, and hold for a few seconds.
- •
- Do not rub the injection site. You may have slight bleeding. This is normal.
- •
- You may cover the injection site with a small adhesive bandage, if needed.
- •
- If your pen is empty or it has been more than 28 days after first use, throw it away even if it contains unused medicine. See Storage and disposal on the right side of this leaflet.
Storage and disposal:
- •
- Do not freeze your pen or expose it to heat.
- •
- Do not use your pen if it has been frozen or stored in direct sunlight.
- •
- Do not use after the expiration date printed on the label has passed or if it has been more than 28 days after first use.
- •
- Keep NGENLA and all medicines out of the reach of children.
Before first use (unused pens):
- •
- Store in the original carton.
- •
- Store your pens in the refrigerator between 36°F to 46°F (2°C to 8°C).
- •
- Unused pens may be used until the expiration date printed on the label, only if the pen has been kept in the refrigerator.
After first use (up to 28 days of use):
- •
- Store your pen in the refrigerator between 36°F to 46°F (2°C to 8°C) and away from direct sunlight.
- •
- Keep the pen cap on your pen when it is not in use.
- •
- Do not store the pen with a needle attached.
- •
- If your pen is empty or it has been more than 28 days after first use, throw it away even if it contains unused medicine.
- •
- To help you remember when to dispose of your pen you can write the date of first use on the pen label and below:
Date of first use ______ / ______ / ______
How should I dispose of the pen needles and pens?
- •
- Throw away your pen, and pen needles into an FDA-cleared sharps disposal container or puncture resistant container.
- •
- If you do not have an FDA-cleared sharps disposal container, you may use a household container that:
- o
- is made of heavy-duty plastic
- o
- can be closed with a tight-fitting, puncture resistant lid, without sharps being able to come out
- o
- is upright and stable during use
- o
- is leak-resistant, and properly labeled to warn of hazardous waste inside the container.
- •
- When your sharps disposal container is almost full, you will need to follow your community guidelines for the right way to dispose of your sharps disposal container. There may be state or local laws about how you should throw away used needles, syringes, and prefilled syringes.
- •
- For more information about safe sharps disposal, and for specific information about sharps disposal in the state that you live in, go to the FDA's website at: https://www.fda.gov/safesharpsdisposal
- •
- Do not throw away your used sharps disposal container in your household trash unless your community guidelines permit this.
- •
- Keep the sharps container out of the reach of children.
Manufactured by:
Pfizer Ireland Pharmaceuticals
Ringaskiddy,
Cork,
Ireland
US License No: 2060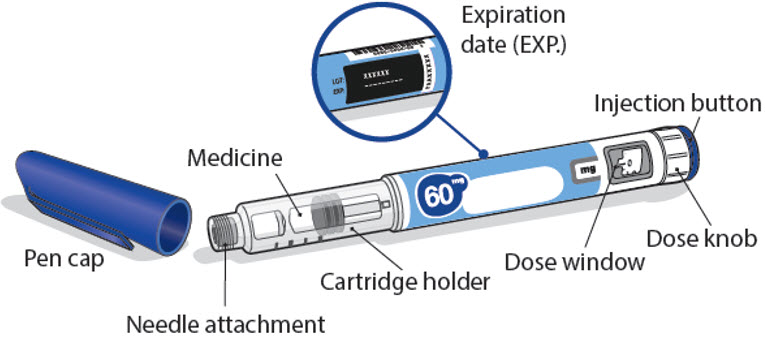
LAB-1452-2.0
This Instructions for Use has been approved by the U.S. Food and Drug Administration. Revised: 7/2024
Instructions for Use
NGENLA (en’ JEN-lah)
(somatrogon-ghla)
60 mg
injection, for subcutaneous use
Read this Instructions for Use before you start using NGENLA and each time you get a new refill. There may be new information. This information does not take the place of talking to your healthcare provider about your medical condition or treatment.
Important information about your NGENLA pen:
- •
- The NGENLA pen for injection is a single-patient-use, disposable (throw away) prefilled pen containing 60 mg of medicine. You can give more than 1 dose from the pen.
- •
- NGENLA can be given by a patient, caregiver or healthcare provider. Do not try to inject NGENLA yourself until you are shown the right way to give the injections and read and understand the Instructions for Use. If your healthcare provider decides that you or a caregiver may be able to give your injections of NGENLA at home, you should receive training on the right way to prepare and inject NGENLA. It is important that you read, understand, and follow these instructions so that you inject NGENLA the right way.
- •
- It is important to talk to your healthcare provider to be sure you understand your NGENLA dosing instructions. To help you remember when to inject NGENLA, you can mark your calendar ahead of time. Call your healthcare provider if you or your caregiver have any questions about the right way to inject NGENLA, or call the helpline on 1-800-645-1280.
- •
- Do not share your pen with other people, even if the needle has been changed. You may give other people a serious infection or get a serious infection from them.
- •
- Each turn (click) of the dose knob dials 0.5 mg of medicine. You can give from 0.5 mg to 30 mg in a single injection. If your dose is more than 30 mg, you will need to give more than 1 injection.
- •
- A new pen may contain slightly more than 60 mg of medicine, this is normal.
- •
- Always use a new sterile needle for each injection. This will decrease the risk of contamination, infection, leakage of medicine, and blocked needles leading to the wrong dose.
- •
- Do not shake your pen. Shaking can damage the medicine.
- •
- The pen is not recommended for use by the blind or visually impaired without the assistance of a person trained in the proper use of the product.
Supplies you will need each time you inject
Included in the carton:
- •
- 1 NGENLA prefilled pen
Not included in the carton:
- •
- 1 new sterile needle for each injection
- •
- Alcohol swabs
- •
- Cotton balls or gauze pads
- •
- Adhesive bandage
- •
- 1 FDA-cleared sharps disposal container for disposal of pen needles and pens (See How should I dispose of the pen needles and pens?)
60 mg NGENLA pen:

Needles to use
Pen needles are not included with your NGENLA pen. You will need a prescription from your healthcare provider to get pen needles up to a length of 8 mm from your pharmacy. Talk with your healthcare provider about the right needle for you.
- •
- Needles to use with your NGENLA pen:
- o
- 32G (Novo Nordisk®, NovoFine® Plus)
- o
- 31G (Novo Nordisk®, NovoFine®)
- o
- 31G (Becton, Dickinson and Company, BD Ultra-Fine™ or BD Micro-Fine™)
- •
- Needles with safety shield to use with your NGENLA pen:
- o
- 30G (Becton, Dickinson and Company, AutoShield Duo™)
- o
- 30G (Novo Nordisk®, NovoFine® AutoCover®)
Sterile needle (example) not supplied:

Sterile needle with safety shield (example) not supplied:
Note: Needles with safety shield do not have an inner needle cap. Steps 5, 6 and 11 within these instructions relating to the inner needle cap may not apply when using a needle with safety shield. Refer to the safety shield needle manufacturer’s instructions for use (IFU) for more information on attaching and removing the safety needle. When using safety shield needles, priming is required only for the first use of a new pen; follow the NGENLA pen IFU for priming.
Caution: Never use a bent or damaged needle. Always handle pen needles with care to make sure you do not prick yourself (or anyone else) with the needle. Do not attach a new needle to your pen until you are ready to take your injection.
Preparing for your injection
Step 1 - Getting ready
- •
- Wash and dry your hands.
- •
- You can use your pen straight from the refrigerator. For a more comfortable injection, leave your pen at room temperature for up to 30 minutes.
- •
- Check the name, strength, and label of your pen to make sure it is the medicine your healthcare provider has prescribed for you.
- •
- Check the expiration date on the pen label. Do not use if the expiration date has passed.
- •
- Do not use your pen if:
- o
- it has been frozen or exposed to heat
- o
- it has been dropped
- o
- it looks broken or damaged
- o
- it has been more than 28 days after first use of the pen.
- •
- Do not remove the pen cap from your pen - until you are ready to inject.
Step 2 - Choose and clean your injection site
- •
- NGENLA can be given in the abdomen, thighs, buttocks, or upper arms.
- •
- Choose the best place to inject, as recommended by your healthcare provider.
- •
- If more than 1 injection is needed to complete your full dose, each injection should be given in a different injection site.
- •
- Do not inject into bony areas, areas that are bruised, red, sore or hard, and areas that have scars or skin conditions.
- •
- Clean the injection site with an alcohol swab.
- •
- Allow the injection site to dry.
- •
- Do not touch injection site after cleaning.
Step 3 - Check medicine
- •
- Pull off the pen cap and keep it for after your injection.
- •
- Check the medicine inside the cartridge holder.
- •
- Make sure the medicine is colorless to slightly light yellow. Do not inject the medicine if it is cloudy or dark yellow.
- •
- Make sure the medicine is free of flakes or particles. Do not inject the medicine if it has flakes or particles.
Note: It is normal to see one or more bubbles in the medicine.
- •
- Take a new needle and pull off the protective paper.
- •
- Line the needle up with your pen keeping them both straight.
- •
- Gently push and then screw the needle onto your pen.
Do not over tighten.
Note: Be careful not to attach the needle at an angle. This may cause the pen to leak.
Caution: Needles have sharp tips at both ends. Handle with care to make sure you do not prick yourself (or anyone else) with the needle.
Step 5 - Pull off outer needle cover
- •
- Pull off the outer needle cover.
- •
- Make sure you keep the outer needle cover. You will need it later to remove the needle.
Note: You should see an inner needle cap after you have removed the outer cover. If you do not see this, try to attach the needle again.
Note: Needles with safety shield do not have an inner needle cap. Refer to the safety shield needle manufacturer’s IFU.
Step 6 - Pull off inner needle cap
- •
- Pull off the inner needle cap carefully to show the needle.
- •
- Throw away the inner needle cap in an FDA-cleared sharps container. It is not needed again.
Note: Needles with safety shield do not have an inner needle cap. Refer to the safety shield needle manufacturer’s IFU.
Is this pen new?
Yes: Go to new pen set up (arrow directing to “New pen set up (priming) - for the first use of a new pen only”)
No (arrow directing to “Setting your prescribed dose”)
New pen set up (priming) – for the first use of a new pen only
You must set up each new pen (priming) before using it for the first time
- •
- New pen set up is done before each new pen is used for the first time.
- •
- The purpose of setting up a new pen is to remove air bubbles and make sure you get the correct dose.
Important: Skip Step-A through to Step-C if you have already set up your pen.
Note: Needles with safety shield should be primed once with first use of a new pen.
A - Set priming dose
- •
- Turn the dose knob to 1.0.
- o
- This is the amount to prime the pen.
- Note: If you turn the dose knob too far, you can turn it back.
B - Tap cartridge holder
- •
- Hold the pen with the needle pointing up so that the air bubbles can rise.
- •
- Tap the cartridge holder gently to float any air bubbles to the top.
Important: Follow Step-B even if you do not see air bubbles.
C - Press button and check for liquid
- •
- Press the injection button until it cannot go any further and "0" is shown in the dose window.
- •
- Check for liquid at the needle tip. If liquid appears, your pen is set up.
- •
- Always make sure that a drop of liquid appears before you inject. If liquid has not appeared, repeat Step-A through to Step-C.
- o
- If liquid does not appear after you have repeated Step-A through Step-C five (5) times, attach a new needle and try 1 more time. Do not use the pen if a drop of liquid still does not appear. Contact your healthcare provider or pharmacist and use a new pen.
Setting your prescribed dose
Step 7 - Set your dose
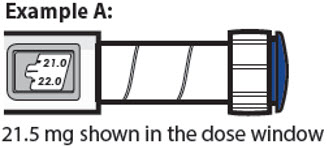
21.5 mg shown in the dose window

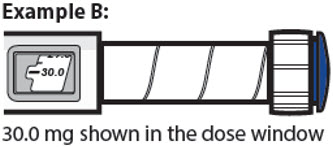
30.0 mg shown in the dose window
- •
- Turn the dose knob to set your dose.
- o
- The dose can be increased or decreased by turning the dose knob in either direction.
- o
- The dose knob turns 0.5 mg at a time.
- o
- Your pen contains 60 mg of medicine but you can only set a dose of up to 30 mg for a single injection.
- o
- The dose window shows the dose in mg. See Examples A and B.
- •
- Always check the dose window to make sure you have set the correct dose.
Important: Do not press the injection button while setting your dose.
What should I do if I cannot set the dose I need?
- •
- If your dose is more than 30 mg you will need to split your dose into more than 1 injection.
- •
- You can give from 0.5 mg to 30 mg in a single injection.
- o
- Use a new needle for each injection (See Step 4: Attach needle).
- o
- If you normally need to give 2 injections for your full dose, be sure to give your second dose.
What should I do if I do not have enough medicine left in my pen?
- •
- If your pen contains less than 30 mg of medicine, the dose knob will stop with the remaining amount of medicine shown in the dose window.
- •
- If there is not enough medicine left in your pen for your full dose, you may either:
- o
- Inject the amount left in your pen, then prepare a new pen to complete your dose in full. Remember to subtract the dose you have already received. For example, if the dose is 21.5 mg and you can only set the dose knob to 17 mg, you should inject another 4.5 mg with a new pen.
- o
- Or get a new pen and inject the full dose.
Only split your dose if you have been trained or told by your healthcare provider on how to do this.
Injecting your dose
Step 8 - Insert the needle
- •
- Hold your pen so you can see the numbers in the dose window.
- •
- Insert the needle straight into your skin.
Note: If using needles with safety shield, you may wish to stretch or pinch the skin at the injection site to make the injection easier.
Step 9 - Inject your medicine
- •
- Keep holding the needle in the same position in your skin.
- •
- Press the injection button until it cannot go any further and "0" is shown in the dose window.
Step 10 - Count to 10
- •
- Continue to press the injection button while counting to 10. Counting to 10 will allow the full dose of medicine to be given.
- •
- After counting to 10, let go of the injection button and slowly remove the pen from the injection site by pulling the needle straight out.
Note: You may see a drop of medicine at the needle tip. This is normal and does not affect the dose you just received.
Step 11 - Attach outer needle cover

- •
- Carefully place the outer needle cover back on the needle.
- •
- Press on the outer needle cover until it is secure.
Caution: Never try to put the inner needle cap back on the needle. You may prick yourself with the needle.
Note: If using needle with safety shield, refer to the safety shield needle manufacturer’s IFU.
Step 12 - Remove the needle
- •
- Unscrew the needle from the pen.
- •
- Gently pull until the needle comes off.
Note: If the needle is still on, replace the outer needle cover and try again. Be sure to apply pressure when unscrewing the needle. - •
- Throw away the needle in an FDA-cleared sharps container (See How should I dispose of the pen needles and pens?).
- •
- Important: Always remove and throw away used needles. Do not reuse needles.
Step 13 - Replace the pen cap

- •
- Replace the pen cap back onto your pen.
- •
- Do not recap the pen with a needle attached.
- •
- If there is any medicine left in your pen, store in the refrigerator between uses (See How should I store my pen?).
Step 14 - After your injection
- •
- Press lightly on the injection site with a clean cotton ball or gauze pad, and hold for a few seconds.
- •
- Do not rub the injection site. You may have slight bleeding. This is normal.
- •
- You may cover the injection site with a small adhesive bandage, if needed.
- •
- If your pen is empty or it has been more than 28 days after first use, throw it away even if it contains unused medicine. See Storage and disposal on the right side of this leaflet.
Storage and disposal:
- •
- Do not freeze your pen or expose it to heat.
- •
- Do not use your pen if it has been frozen or stored in direct sunlight.
- •
- Do not use after the expiration date printed on the label has passed or if it has been more than 28 days after first use.
- •
- Keep NGENLA and all medicines out of the reach of children.
Before first use (unused pens):
- •
- Store in the original carton.
- •
- Store your pens in the refrigerator between 36°F to 46°F (2°C to 8°C).
- •
- Unused pens may be used until the expiration date printed on the label, only if the pen has been kept in the refrigerator.
After first use (up to 28 days of use):
- •
- Store your pen in the refrigerator between 36°F to 46°F (2°C to 8°C) and away from direct sunlight.
- •
- Keep the pen cap on your pen when it is not in use.
- •
- Do not store the pen with a needle attached.
- •
- If your pen is empty or it has been more than 28 days after first use, throw it away even if it contains unused medicine.
- •
- To help you remember when to dispose of your pen you can write the date of first use on the pen label and below:
Date of first use ______ / ______ / ______
How should I dispose of the pen needles and pens?
- •
- Throw away your pen, and pen needles into an FDA-cleared sharps disposal container or puncture resistant container.
- •
- If you do not have an FDA-cleared sharps disposal container, you may use a household container that:
- o
- is made of heavy-duty plastic
- o
- can be closed with a tight-fitting, puncture resistant lid, without sharps being able to come out
- o
- is upright and stable during use
- o
- is leak-resistant, and properly labeled to warn of hazardous waste inside the container.
- •
- When your sharps disposal container is almost full, you will need to follow your community guidelines for the right way to dispose of your sharps disposal container. There may be state or local laws about how you should throw away used needles, syringes, and prefilled syringes.
- •
- For more information about safe sharps disposal, and for specific information about sharps disposal in the state that you live in, go to the FDA’s website at: https://www.fda.gov/safesharpsdisposal
- •
- Do not throw away your used sharps disposal container in your household trash unless your community guidelines permit this.
- •
- Keep the sharps container out of the reach of children.
Manufactured by:
Pfizer Ireland Pharmaceuticals
Ringaskiddy,
Cork,
Ireland
US License No: 2060
LAB-1454-2.0
This Instructions for Use has been approved by the U.S. Food and Drug Administration. Revised: 7/2024
Find NGENLA® medical information:
Find NGENLA® medical information:
NGENLA® Quick Finder
Health Professional Information
Full Patient Information
Full Patient Information
17 PATIENT COUNSELING INFORMATION
Advise the patient and/or caregiver to read the FDA-approved patient labeling (Patient Information and Instructions for Use).
- •
- Hypersensitivity Reactions
Advise patients and caregivers that serious systemic hypersensitivity reactions (anaphylaxis and angioedema) are possible and that prompt medical attention should be sought if an allergic reaction occurs [see Warnings and Precautions (5.2)].
- •
- Neoplasm
Advise childhood cancer survivors and caregivers that individuals treated with radiation to the head are at increased risk of secondary neoplasms and, as a precaution, need to be monitored for recurrence. Advise patients to report marked changes in skin pigmentation or changes in the appearance of preexisting nevi [see Warnings and Precautions (5.3)].
- •
- Glucose Intolerance/Diabetes Mellitus
Advise patients and caregivers that new onset of insulin resistance and hyperglycemia may occur and monitoring of blood glucose during treatment with NGENLA in patients with glucose intolerance or who have risk factors for diabetes, may be needed [see Warnings and Precautions (5.4)].
- •
- Intracranial Hypertension
Advise patients and caregivers to report to their healthcare provider any visual changes, headache, and nausea and/or vomiting [see Warnings and Precautions (5.5)].
- •
- Fluid Retention
Advise patients and caregivers that fluid retention during NGENLA therapy may occur. Inform patients of the clinical manifestations of fluid retention (e.g. edema, arthralgia, myalgia, nerve compression syndromes including carpal tunnel syndrome/paresthesia) and to report to their healthcare provider if any of these signs or symptoms occur during treatment with NGENLA.
- •
- Hypoadrenalism
Advise patients and caregivers who have or who are at risk for corticotropin deficiency that hypoadrenalism may develop and to report to their healthcare provider if extreme fatigue, dizziness, weakness, vomiting, dehydration or weight loss is experienced during treatment with NGENLA [see Warnings and Precautions (5.7)].
- •
- Hypothyroidism
Advise patients and caregivers that undiagnosed/untreated hypothyroidism may prevent an optimal response to NGENLA. Advise patients and caregivers they may require periodic thyroid function tests during treatment with NGENLA [see Warnings and Precautions (5.8)].
- •
- Pancreatitis
Advise patients and caregivers that pancreatitis may develop and to report to their healthcare provider any new onset persistent severe abdominal pain.
- •
- Lipoatrophy
Advise patients and caregivers that lipoatrophy may occur if NGENLA is administered subcutaneously at the same site over a long period of time. Advise patients to rotate injection sites when administering NGENLA to reduce this risk.
| This Patient Information has been approved by the U.S. Food and Drug Administration. Issued: 6/2023 |
PATIENT INFORMATION (somatrogon-ghla) injection, for subcutaneous use |
What is NGENLA? |
Do not use NGENLA if:
|
Before using NGENLA, tell your child’s healthcare provider about all of your child’s medical conditions, including if your child:
Tell your child’s healthcare provider about all the medicines your child takes, including prescription and over-the-counter medicines, vitamins, and herbal supplements. NGENLA may affect how other medicines work, and other medicines may affect how NGENLA works. |
How should I use NGENLA?
|
What are the possible side effects of NGENLA? NGENLA may cause serious side effects, including:
The most common side effects of NGENLA include:
These are not all the possible side effects of NGENLA. You should tell your child’s healthcare provider if your child has any side effect that bothers them or that does not go away. |
How should I store NGENLA?
Before you use NGENLA pens for the first time (unused pens):
After you use NGENLA pens and there is still medicine left (up to 28 days of use):
Keep NGENLA and all medicines out of the reach of children. |
General information about the safe and effective use of NGENLA. Medicines are sometimes prescribed for purposes other than those listed in a Patient Information leaflet. Do not use NGENLA for a condition for which it was not prescribed. Do not give NGENLA to other people, even if they have the same symptoms because it may harm them. You can ask your pharmacist or healthcare provider for information about NGENLA that is written for health professionals. |
What are the ingredients in NGENLA? Active ingredient: somatrogon-ghla
|
Instructions for Use
NGENLA (en’ JEN-lah)
(somatrogon-ghla)
24 mg
injection, for subcutaneous use
Read this Instructions for Use before you start using NGENLA and each time you get a new refill. There may be new information. This information does not take the place of talking to your healthcare provider about your medical condition or treatment.
Important information about your NGENLA pen:
- •
- The NGENLA pen for injection is a single-patient-use, disposable (throw away) prefilled pen containing 24 mg of medicine. You can give more than 1 dose from the pen.
- •
- NGENLA can be given by a patient, caregiver or healthcare provider. Do not try to inject NGENLA yourself until you are shown the right way to give the injections and read and understand the Instructions for Use. If your healthcare provider decides that you or a caregiver may be able to give your injections of NGENLA at home, you should receive training on the right way to prepare and inject NGENLA. It is important that you read, understand, and follow these instructions so that you inject NGENLA the right way.
- •
- It is important to talk to your healthcare provider to be sure you understand your NGENLA dosing instructions. To help you remember when to inject NGENLA, you can mark your calendar ahead of time. Call your healthcare provider if you or your caregiver have any questions about the right way to inject NGENLA, or call the helpline on 1-800-645-1280.
- •
- Do not share your pen with other people, even if the needle has been changed. You may give other people a serious infection or get a serious infection from them.
- •
- Each turn (click) of the dose knob dials 0.2 mg of medicine. You can give from 0.2 mg to 12 mg in a single injection. If your dose is more than 12 mg, you will need to give more than 1 injection.
- •
- A new pen may contain slightly more than 24 mg of medicine, this is normal.
- •
- Always use a new sterile needle for each injection. This will decrease the risk of contamination, infection, leakage of medicine, and blocked needles leading to the wrong dose.
- •
- Do not shake your pen. Shaking can damage the medicine.
- •
- The pen is not recommended for use by the blind or visually impaired without the assistance of a person trained in the proper use of the product.
Supplies you will need each time you inject
Included in the carton:
- •
- 1 NGENLA prefilled pen
Not included in the carton:
- •
- 1 new sterile needle for each injection
- •
- Alcohol swabs
- •
- Cotton balls or gauze pads
- •
- Adhesive bandage
- •
- 1 FDA-cleared sharps disposal container for disposal of pen needles and pens (See How should I dispose of the pen needles and pens?)
24 mg NGENLA pen:
Needles to use
Pen needles are not included with your NGENLA pen. You will need a prescription from your healthcare provider to get pen needles up to a length of 8 mm from your pharmacy. Talk with your healthcare provider about the right needle for you.
- •
- Needles to use with your NGENLA pen:
- o
- 32G (Novo Nordisk®, NovoFine® Plus)
- o
- 31G (Novo Nordisk®, NovoFine®)
- o
- 31G (Becton, Dickinson and Company, BD Ultra-Fine™ or BD Micro-Fine™)
- •
- Needles with safety shield to use with your NGENLA pen:
- o
- 30G (Becton, Dickinson and Company, AutoShield Duo™)
- o
- 30G (Novo Nordisk®, NovoFine® AutoCover®)
Sterile needle (example) not supplied:
Sterile needle with safety shield (example) not supplied:
Note: Needles with safety shield do not have an inner needle cap. Steps 5, 6 and 11 within these instructions relating to the inner needle cap may not apply when using a needle with safety shield. Refer to the safety shield needle manufacturer’s instructions for use (IFU) for more information on attaching and removing the safety needle. When using safety shield needles, priming is required only for the first use of a new pen; follow the NGENLA pen IFU for priming.
Caution: Never use a bent or damaged needle. Always handle pen needles with care to make sure you do not prick yourself (or anyone else) with the needle. Do not attach a new needle to your pen until you are ready to take your injection.
Preparing for your injection
Step 1 - Getting ready
- •
- Wash and dry your hands.
- •
- You can use your pen straight from the refrigerator. For a more comfortable injection, leave your pen at room temperature for up to 30 minutes.
- •
- Check the name, strength, and label of your pen to make sure it is the medicine your healthcare provider has prescribed for you.
- •
- Check the expiration date on the pen label. Do not use if the expiration date has passed.
- •
- Do not use your pen if:
- o
- it has been frozen or exposed to heat
- o
- it has been dropped
- o
- it looks broken or damaged
- o
- it has been more than 28 days after first use of the pen.
- •
- Do not remove the pen cap from your pen - until you are ready to inject.
Step 2 - Choose and clean your injection site
- •
- NGENLA can be given in the abdomen, thighs, buttocks, or upper arms.
- •
- Choose the best place to inject, as recommended by your healthcare provider.
- •
- If more than 1 injection is needed to complete your full dose, each injection should be given in a different injection site.
- •
- Do not inject into bony areas, areas that are bruised, red, sore or hard, and areas that have scars or skin conditions.
- •
- Clean the injection site with an alcohol swab.
- •
- Allow the injection site to dry.
- •
- Do not touch injection site after cleaning.
Step 3 - Check medicine
- •
- Pull off the pen cap and keep it for after your injection.
- •
- Check the medicine inside the cartridge holder.
- •
- Make sure the medicine is colorless to slightly light yellow. Do not inject the medicine if it is cloudy or dark yellow.
- •
- Make sure the medicine is free of flakes or particles. Do not inject the medicine if it has flakes or particles.
Note: It is normal to see one or more bubbles in the medicine.
- •
- Take a new needle and pull off the protective paper.
- •
- Line the needle up with your pen keeping them both straight.
- •
- Gently push and then screw the needle onto your pen.
Do not over tighten.
Note: Be careful not to attach the needle at an angle. This may cause the pen to leak.
Caution: Needles have sharp tips at both ends. Handle with care to make sure you do not prick yourself (or anyone else) with the needle.
Step 5 - Pull off outer needle cover
- •
- Pull off the outer needle cover.
- •
- Make sure you keep the outer needle cover. You will need it later to remove the needle.
Note: You should see an inner needle cap after you have removed the outer cover. If you do not see this, try to attach the needle again.
Note: Needles with safety shield do not have an inner needle cap. Refer to the safety shield needle manufacturer’s IFU.
Step 6 - Pull off inner needle cap
- •
- Pull off the inner needle cap carefully to show the needle.
- •
- Throw away the inner needle cap in an FDA-cleared sharps container. It is not needed again.
Note: Needles with safety shield do not have an inner needle cap. Refer to the safety shield needle manufacturer’s IFU.
Is this pen new?
Yes: Go to new pen set up (arrow directing to “New pen set up (priming) - for the first use of a new pen only”)
No (arrow directing to “Setting your prescribed dose”)
New pen set up (priming) – for the first use of a new pen only
You must set up each new pen (priming) before using it for the first time
- •
- New pen set up is done before each new pen is used for the first time.
- •
- The purpose of setting up a new pen is to remove air bubbles and make sure you get the correct dose.
Important: Skip Step-A through to Step-C if you have already set up your pen.
Note: Needles with safety shield should be primed once with first use of a new pen.
A - Set priming dose
- •
- Turn the dose knob to 0.4.
- o
- This is the amount to prime the pen.
- Note: If you turn the dose knob too far, you can turn it back.
B - Tap cartridge holder
- •
- Hold the pen with the needle pointing up so that the air bubbles can rise.
- •
- Tap the cartridge holder gently to float any air bubbles to the top.
Important: Follow Step-B even if you do not see air bubbles.
C - Press button and check for liquid
- •
- Press the injection button until it cannot go any further and "0" is shown in the dose window.
- •
- Check for liquid at the needle tip. If liquid appears, your pen is set up.
- •
- Always make sure that a drop of liquid appears before you inject. If liquid has not appeared, repeat Step-A through to Step-C.
- o
- If liquid does not appear after you have repeated Step-A through Step-C five (5) times, attach a new needle and try 1 more time. Do not use the pen if a drop of liquid still does not appear. Contact your healthcare provider or pharmacist and use a new pen.
Setting your prescribed dose
Step 7 - Set your dose
3.8 mg shown in the dose window
12.0 mg shown in the dose window
- •
- Turn the dose knob to set your dose.
- o
- The dose can be increased or decreased by turning the dose knob in either direction.
- o
- The dose knob turns 0.2 mg at a time.
- o
- Your pen contains 24 mg of medicine but you can only set a dose of up to 12 mg for a single injection.
- o
- The dose window shows the dose in mg. See Examples A and B.
- •
- Always check the dose window to make sure you have set the correct dose.
Important: Do not press the injection button while setting your dose.
What should I do if I cannot set the dose I need?
- •
- If your dose is more than 12 mg you will need to split your dose into more than 1 injection.
- •
- You can give from 0.2 mg to 12 mg in a single injection.
- o
- Use a new needle for each injection (See Step 4: Attach needle).
- o
- If you normally need to give 2 injections for your full dose, be sure to give your second dose.
What should I do if I do not have enough medicine left in my pen?
- •
- If your pen contains less than 12 mg of medicine, the dose knob will stop with the remaining amount of medicine shown in the dose window.
- •
- If there is not enough medicine left in your pen for your full dose, you may either:
- o
- Inject the amount left in your pen, then prepare a new pen to complete your dose in full. Remember to subtract the dose you have already received. For example, if the dose is 3.8 mg and you can only set the dose knob to 1.8 mg, you should inject another 2.0 mg with a new pen.
- o
- Or get a new pen and inject the full dose.
Only split your dose if you have been trained or told by your healthcare provider on how to do this.
Injecting your dose
Step 8 - Insert the needle
- •
- Hold your pen so you can see the numbers in the dose window.
- •
- Insert the needle straight into your skin.
Note: If using needles with safety shield, you may wish to stretch or pinch the skin at the injection site to make the injection easier.
Step 9 - Inject your medicine
- •
- Keep holding the needle in the same position in your skin.
- •
- Press the injection button until it cannot go any further and "0" is shown in the dose window.
Step 10 - Count to 10
- •
- Continue to press the injection button while counting to 10. Counting to 10 will allow the full dose of medicine to be given.
- •
- After counting to 10, let go of the injection button and slowly remove the pen from the injection site by pulling the needle straight out.
Note: You may see a drop of medicine at the needle tip. This is normal and does not affect the dose you just received.
Step 11 - Attach outer needle cover
- •
- Carefully place the outer needle cover back on the needle.
- •
- Press on the outer needle cover until it is secure.
Caution: Never try to put the inner needle cap back on the needle. You may prick yourself with the needle.
Note: If using needle with safety shield, refer to the safety shield needle manufacturer’s IFU.
Step 12 - Remove the needle
- •
- Unscrew the needle from the pen.
- •
- Gently pull until the needle comes off.
Note: If the needle is still on, replace the outer needle cover and try again. Be sure to apply pressure when unscrewing the needle. - •
- Throw away the needle in an FDA-cleared sharps container (See How should I dispose of the pen needles and pens?).
- •
- Important: Always remove and throw away used needles. Do not reuse needles.
Step 13 - Replace the pen cap
- •
- Replace the pen cap back onto your pen.
- •
- Do not recap the pen with a needle attached.
- •
- If there is any medicine left in your pen, store in the refrigerator between uses (See How should I store my pen?).
Step 14 - After your injection
- •
- Press lightly on the injection site with a clean cotton ball or gauze pad, and hold for a few seconds.
- •
- Do not rub the injection site. You may have slight bleeding. This is normal.
- •
- You may cover the injection site with a small adhesive bandage, if needed.
- •
- If your pen is empty or it has been more than 28 days after first use, throw it away even if it contains unused medicine. See Storage and disposal on the right side of this leaflet.
Storage and disposal:
- •
- Do not freeze your pen or expose it to heat.
- •
- Do not use your pen if it has been frozen or stored in direct sunlight.
- •
- Do not use after the expiration date printed on the label has passed or if it has been more than 28 days after first use.
- •
- Keep NGENLA and all medicines out of the reach of children.
Before first use (unused pens):
- •
- Store in the original carton.
- •
- Store your pens in the refrigerator between 36°F to 46°F (2°C to 8°C).
- •
- Unused pens may be used until the expiration date printed on the label, only if the pen has been kept in the refrigerator.
After first use (up to 28 days of use):
- •
- Store your pen in the refrigerator between 36°F to 46°F (2°C to 8°C) and away from direct sunlight.
- •
- Keep the pen cap on your pen when it is not in use.
- •
- Do not store the pen with a needle attached.
- •
- If your pen is empty or it has been more than 28 days after first use, throw it away even if it contains unused medicine.
- •
- To help you remember when to dispose of your pen you can write the date of first use on the pen label and below:
Date of first use ______ / ______ / ______
How should I dispose of the pen needles and pens?
- •
- Throw away your pen, and pen needles into an FDA-cleared sharps disposal container or puncture resistant container.
- •
- If you do not have an FDA-cleared sharps disposal container, you may use a household container that:
- o
- is made of heavy-duty plastic
- o
- can be closed with a tight-fitting, puncture resistant lid, without sharps being able to come out
- o
- is upright and stable during use
- o
- is leak-resistant, and properly labeled to warn of hazardous waste inside the container.
- •
- When your sharps disposal container is almost full, you will need to follow your community guidelines for the right way to dispose of your sharps disposal container. There may be state or local laws about how you should throw away used needles, syringes, and prefilled syringes.
- •
- For more information about safe sharps disposal, and for specific information about sharps disposal in the state that you live in, go to the FDA's website at: https://www.fda.gov/safesharpsdisposal
- •
- Do not throw away your used sharps disposal container in your household trash unless your community guidelines permit this.
- •
- Keep the sharps container out of the reach of children.
Manufactured by:
Pfizer Ireland Pharmaceuticals
Ringaskiddy,
Cork,
Ireland
US License No: 2060
LAB-1452-2.0
This Instructions for Use has been approved by the U.S. Food and Drug Administration. Revised: 7/2024
Instructions for Use
NGENLA (en’ JEN-lah)
(somatrogon-ghla)
60 mg
injection, for subcutaneous use
Read this Instructions for Use before you start using NGENLA and each time you get a new refill. There may be new information. This information does not take the place of talking to your healthcare provider about your medical condition or treatment.
Important information about your NGENLA pen:
- •
- The NGENLA pen for injection is a single-patient-use, disposable (throw away) prefilled pen containing 60 mg of medicine. You can give more than 1 dose from the pen.
- •
- NGENLA can be given by a patient, caregiver or healthcare provider. Do not try to inject NGENLA yourself until you are shown the right way to give the injections and read and understand the Instructions for Use. If your healthcare provider decides that you or a caregiver may be able to give your injections of NGENLA at home, you should receive training on the right way to prepare and inject NGENLA. It is important that you read, understand, and follow these instructions so that you inject NGENLA the right way.
- •
- It is important to talk to your healthcare provider to be sure you understand your NGENLA dosing instructions. To help you remember when to inject NGENLA, you can mark your calendar ahead of time. Call your healthcare provider if you or your caregiver have any questions about the right way to inject NGENLA, or call the helpline on 1-800-645-1280.
- •
- Do not share your pen with other people, even if the needle has been changed. You may give other people a serious infection or get a serious infection from them.
- •
- Each turn (click) of the dose knob dials 0.5 mg of medicine. You can give from 0.5 mg to 30 mg in a single injection. If your dose is more than 30 mg, you will need to give more than 1 injection.
- •
- A new pen may contain slightly more than 60 mg of medicine, this is normal.
- •
- Always use a new sterile needle for each injection. This will decrease the risk of contamination, infection, leakage of medicine, and blocked needles leading to the wrong dose.
- •
- Do not shake your pen. Shaking can damage the medicine.
- •
- The pen is not recommended for use by the blind or visually impaired without the assistance of a person trained in the proper use of the product.
Supplies you will need each time you inject
Included in the carton:
- •
- 1 NGENLA prefilled pen
Not included in the carton:
- •
- 1 new sterile needle for each injection
- •
- Alcohol swabs
- •
- Cotton balls or gauze pads
- •
- Adhesive bandage
- •
- 1 FDA-cleared sharps disposal container for disposal of pen needles and pens (See How should I dispose of the pen needles and pens?)
60 mg NGENLA pen:
Needles to use
Pen needles are not included with your NGENLA pen. You will need a prescription from your healthcare provider to get pen needles up to a length of 8 mm from your pharmacy. Talk with your healthcare provider about the right needle for you.
- •
- Needles to use with your NGENLA pen:
- o
- 32G (Novo Nordisk®, NovoFine® Plus)
- o
- 31G (Novo Nordisk®, NovoFine®)
- o
- 31G (Becton, Dickinson and Company, BD Ultra-Fine™ or BD Micro-Fine™)
- •
- Needles with safety shield to use with your NGENLA pen:
- o
- 30G (Becton, Dickinson and Company, AutoShield Duo™)
- o
- 30G (Novo Nordisk®, NovoFine® AutoCover®)
Sterile needle (example) not supplied:
Sterile needle with safety shield (example) not supplied:
Note: Needles with safety shield do not have an inner needle cap. Steps 5, 6 and 11 within these instructions relating to the inner needle cap may not apply when using a needle with safety shield. Refer to the safety shield needle manufacturer’s instructions for use (IFU) for more information on attaching and removing the safety needle. When using safety shield needles, priming is required only for the first use of a new pen; follow the NGENLA pen IFU for priming.
Caution: Never use a bent or damaged needle. Always handle pen needles with care to make sure you do not prick yourself (or anyone else) with the needle. Do not attach a new needle to your pen until you are ready to take your injection.
Preparing for your injection
Step 1 - Getting ready
- •
- Wash and dry your hands.
- •
- You can use your pen straight from the refrigerator. For a more comfortable injection, leave your pen at room temperature for up to 30 minutes.
- •
- Check the name, strength, and label of your pen to make sure it is the medicine your healthcare provider has prescribed for you.
- •
- Check the expiration date on the pen label. Do not use if the expiration date has passed.
- •
- Do not use your pen if:
- o
- it has been frozen or exposed to heat
- o
- it has been dropped
- o
- it looks broken or damaged
- o
- it has been more than 28 days after first use of the pen.
- •
- Do not remove the pen cap from your pen - until you are ready to inject.
Step 2 - Choose and clean your injection site
- •
- NGENLA can be given in the abdomen, thighs, buttocks, or upper arms.
- •
- Choose the best place to inject, as recommended by your healthcare provider.
- •
- If more than 1 injection is needed to complete your full dose, each injection should be given in a different injection site.
- •
- Do not inject into bony areas, areas that are bruised, red, sore or hard, and areas that have scars or skin conditions.
- •
- Clean the injection site with an alcohol swab.
- •
- Allow the injection site to dry.
- •
- Do not touch injection site after cleaning.
Step 3 - Check medicine
- •
- Pull off the pen cap and keep it for after your injection.
- •
- Check the medicine inside the cartridge holder.
- •
- Make sure the medicine is colorless to slightly light yellow. Do not inject the medicine if it is cloudy or dark yellow.
- •
- Make sure the medicine is free of flakes or particles. Do not inject the medicine if it has flakes or particles.
Note: It is normal to see one or more bubbles in the medicine.
- •
- Take a new needle and pull off the protective paper.
- •
- Line the needle up with your pen keeping them both straight.
- •
- Gently push and then screw the needle onto your pen.
Do not over tighten.
Note: Be careful not to attach the needle at an angle. This may cause the pen to leak.
Caution: Needles have sharp tips at both ends. Handle with care to make sure you do not prick yourself (or anyone else) with the needle.
Step 5 - Pull off outer needle cover
- •
- Pull off the outer needle cover.
- •
- Make sure you keep the outer needle cover. You will need it later to remove the needle.
Note: You should see an inner needle cap after you have removed the outer cover. If you do not see this, try to attach the needle again.
Note: Needles with safety shield do not have an inner needle cap. Refer to the safety shield needle manufacturer’s IFU.
Step 6 - Pull off inner needle cap
- •
- Pull off the inner needle cap carefully to show the needle.
- •
- Throw away the inner needle cap in an FDA-cleared sharps container. It is not needed again.
Note: Needles with safety shield do not have an inner needle cap. Refer to the safety shield needle manufacturer’s IFU.
Is this pen new?
Yes: Go to new pen set up (arrow directing to “New pen set up (priming) - for the first use of a new pen only”)
No (arrow directing to “Setting your prescribed dose”)
New pen set up (priming) – for the first use of a new pen only
You must set up each new pen (priming) before using it for the first time
- •
- New pen set up is done before each new pen is used for the first time.
- •
- The purpose of setting up a new pen is to remove air bubbles and make sure you get the correct dose.
Important: Skip Step-A through to Step-C if you have already set up your pen.
Note: Needles with safety shield should be primed once with first use of a new pen.
A - Set priming dose
- •
- Turn the dose knob to 1.0.
- o
- This is the amount to prime the pen.
- Note: If you turn the dose knob too far, you can turn it back.
B - Tap cartridge holder
- •
- Hold the pen with the needle pointing up so that the air bubbles can rise.
- •
- Tap the cartridge holder gently to float any air bubbles to the top.
Important: Follow Step-B even if you do not see air bubbles.
C - Press button and check for liquid
- •
- Press the injection button until it cannot go any further and "0" is shown in the dose window.
- •
- Check for liquid at the needle tip. If liquid appears, your pen is set up.
- •
- Always make sure that a drop of liquid appears before you inject. If liquid has not appeared, repeat Step-A through to Step-C.
- o
- If liquid does not appear after you have repeated Step-A through Step-C five (5) times, attach a new needle and try 1 more time. Do not use the pen if a drop of liquid still does not appear. Contact your healthcare provider or pharmacist and use a new pen.
Setting your prescribed dose
Step 7 - Set your dose
21.5 mg shown in the dose window
30.0 mg shown in the dose window
- •
- Turn the dose knob to set your dose.
- o
- The dose can be increased or decreased by turning the dose knob in either direction.
- o
- The dose knob turns 0.5 mg at a time.
- o
- Your pen contains 60 mg of medicine but you can only set a dose of up to 30 mg for a single injection.
- o
- The dose window shows the dose in mg. See Examples A and B.
- •
- Always check the dose window to make sure you have set the correct dose.
Important: Do not press the injection button while setting your dose.
What should I do if I cannot set the dose I need?
- •
- If your dose is more than 30 mg you will need to split your dose into more than 1 injection.
- •
- You can give from 0.5 mg to 30 mg in a single injection.
- o
- Use a new needle for each injection (See Step 4: Attach needle).
- o
- If you normally need to give 2 injections for your full dose, be sure to give your second dose.
What should I do if I do not have enough medicine left in my pen?
- •
- If your pen contains less than 30 mg of medicine, the dose knob will stop with the remaining amount of medicine shown in the dose window.
- •
- If there is not enough medicine left in your pen for your full dose, you may either:
- o
- Inject the amount left in your pen, then prepare a new pen to complete your dose in full. Remember to subtract the dose you have already received. For example, if the dose is 21.5 mg and you can only set the dose knob to 17 mg, you should inject another 4.5 mg with a new pen.
- o
- Or get a new pen and inject the full dose.
Only split your dose if you have been trained or told by your healthcare provider on how to do this.
Injecting your dose
Step 8 - Insert the needle
- •
- Hold your pen so you can see the numbers in the dose window.
- •
- Insert the needle straight into your skin.
Note: If using needles with safety shield, you may wish to stretch or pinch the skin at the injection site to make the injection easier.
Step 9 - Inject your medicine
- •
- Keep holding the needle in the same position in your skin.
- •
- Press the injection button until it cannot go any further and "0" is shown in the dose window.
Step 10 - Count to 10
- •
- Continue to press the injection button while counting to 10. Counting to 10 will allow the full dose of medicine to be given.
- •
- After counting to 10, let go of the injection button and slowly remove the pen from the injection site by pulling the needle straight out.
Note: You may see a drop of medicine at the needle tip. This is normal and does not affect the dose you just received.
Step 11 - Attach outer needle cover
- •
- Carefully place the outer needle cover back on the needle.
- •
- Press on the outer needle cover until it is secure.
Caution: Never try to put the inner needle cap back on the needle. You may prick yourself with the needle.
Note: If using needle with safety shield, refer to the safety shield needle manufacturer’s IFU.
Step 12 - Remove the needle
- •
- Unscrew the needle from the pen.
- •
- Gently pull until the needle comes off.
Note: If the needle is still on, replace the outer needle cover and try again. Be sure to apply pressure when unscrewing the needle. - •
- Throw away the needle in an FDA-cleared sharps container (See How should I dispose of the pen needles and pens?).
- •
- Important: Always remove and throw away used needles. Do not reuse needles.
Step 13 - Replace the pen cap
- •
- Replace the pen cap back onto your pen.
- •
- Do not recap the pen with a needle attached.
- •
- If there is any medicine left in your pen, store in the refrigerator between uses (See How should I store my pen?).
Step 14 - After your injection
- •
- Press lightly on the injection site with a clean cotton ball or gauze pad, and hold for a few seconds.
- •
- Do not rub the injection site. You may have slight bleeding. This is normal.
- •
- You may cover the injection site with a small adhesive bandage, if needed.
- •
- If your pen is empty or it has been more than 28 days after first use, throw it away even if it contains unused medicine. See Storage and disposal on the right side of this leaflet.
Storage and disposal:
- •
- Do not freeze your pen or expose it to heat.
- •
- Do not use your pen if it has been frozen or stored in direct sunlight.
- •
- Do not use after the expiration date printed on the label has passed or if it has been more than 28 days after first use.
- •
- Keep NGENLA and all medicines out of the reach of children.
Before first use (unused pens):
- •
- Store in the original carton.
- •
- Store your pens in the refrigerator between 36°F to 46°F (2°C to 8°C).
- •
- Unused pens may be used until the expiration date printed on the label, only if the pen has been kept in the refrigerator.
After first use (up to 28 days of use):
- •
- Store your pen in the refrigerator between 36°F to 46°F (2°C to 8°C) and away from direct sunlight.
- •
- Keep the pen cap on your pen when it is not in use.
- •
- Do not store the pen with a needle attached.
- •
- If your pen is empty or it has been more than 28 days after first use, throw it away even if it contains unused medicine.
- •
- To help you remember when to dispose of your pen you can write the date of first use on the pen label and below:
Date of first use ______ / ______ / ______
How should I dispose of the pen needles and pens?
- •
- Throw away your pen, and pen needles into an FDA-cleared sharps disposal container or puncture resistant container.
- •
- If you do not have an FDA-cleared sharps disposal container, you may use a household container that:
- o
- is made of heavy-duty plastic
- o
- can be closed with a tight-fitting, puncture resistant lid, without sharps being able to come out
- o
- is upright and stable during use
- o
- is leak-resistant, and properly labeled to warn of hazardous waste inside the container.
- •
- When your sharps disposal container is almost full, you will need to follow your community guidelines for the right way to dispose of your sharps disposal container. There may be state or local laws about how you should throw away used needles, syringes, and prefilled syringes.
- •
- For more information about safe sharps disposal, and for specific information about sharps disposal in the state that you live in, go to the FDA’s website at: https://www.fda.gov/safesharpsdisposal
- •
- Do not throw away your used sharps disposal container in your household trash unless your community guidelines permit this.
- •
- Keep the sharps container out of the reach of children.
Manufactured by:
Pfizer Ireland Pharmaceuticals
Ringaskiddy,
Cork,
Ireland
US License No: 2060
LAB-1454-2.0
This Instructions for Use has been approved by the U.S. Food and Drug Administration. Revised: 7/2024
Resources
Didn’t find what you were looking for? Contact us.
Chat online with Pfizer Medical Information regarding your inquiry on a Pfizer medicine.
*Contact Medical Information.9AM-5PM ET Monday to Friday; excluding holidays.
Report Adverse Event
Pfizer Safety
To report an adverse event related to the Pfizer-BioNTech COVID-19 Vaccine, and you are not part of a clinical trial* for this product, click the link below to submit your information:
Pfizer Safety Reporting Site*If you are involved in a clinical trial for this product, adverse events should be reported to your coordinating study site.
If you cannot use the above website, or would like to report an adverse event related to a different Pfizer product, please call Pfizer Safety at (800) 438-1985.
FDA Medwatch
You may also contact the U.S. Food and Drug Administration (FDA) directly to report adverse events or product quality concerns either online at www.fda.gov/medwatch or call (800) 822-7967.