XYNTHA® Solofuse Lyophilized Powder for Solution in Prefilled Dual-chamber Syringe Dosage and Administration
(antihemophilic factor [Recombinant])
2 DOSAGE AND ADMINISTRATION
For intravenous use after reconstitution only.
2.1 Dose
- Dosage and duration of treatment depend on the severity of the factor VIII deficiency, the location and extent of bleeding, and the patient's clinical condition. Titrate the administered doses to the patient's clinical response.
- One International Unit (IU) of factor VIII activity corresponds approximately to the quantity of factor VIII in one milliliter of normal human plasma. The calculation of the required dosage of factor VIII is based upon the empirical finding that, on average, 1 IU of factor VIII per kg body weight raises the plasma factor VIII activity by approximately 2 IU/dL.2
The expected in vivo peak increase in factor VIII level expressed as IU/dL (or % of normal) can be estimated using the following formulas:
Dosage (International Units) = body weight (kg) × desired factor VIII rise (IU/dL or % of normal) × 0.5 (IU/kg per IU/dL)
or
IU/dL (or % of normal) = Total Dose (IU)/body weight (kg) × 2 [IU/dL]/[IU/kg]
On-demand treatment and Control of Bleeding Episodes
A guide for dosing XYNTHA for on-demand treatment and control of bleeding episodes is provided in Table 1. Maintain the plasma factor VIII activity at or above the levels (in % of normal or in IU/dL) outlined in Table 1 for the indicated period.
| Type of Bleeding Episode | Factor VIII Level Required (IU/dL or % of normal) | Frequency of Doses (hours) | Duration of Therapy |
|---|---|---|---|
| Minor | |||
| Early hemarthrosis, minor muscle or oral bleeds. | 20–40 | 12–24 | At least 1 day, depending upon the severity of the bleeding episode. |
| Moderate | |||
| Bleeding into muscles. Mild head trauma. Bleeding into the oral cavity. | 30–60 | 12–24 | 3–4 days or until adequate local hemostasis is achieved. |
| Major | |||
| Gastrointestinal bleeding. Intracranial, intra-abdominal or intrathoracic bleeding. Fractures. | 60–100 | 8–24 | Until bleeding is resolved. |
Perioperative Management
A guide for dosing XYNTHA during surgery (perioperative management) is provided in Table 2. Maintain the plasma factor VIII activity level at or above the level (in % of normal or in IU/dL) outlined in Table 2 for the indicated period. Monitor the replacement therapy by means of plasma factor VIII activity.
| Type of Surgery | Factor VIII Level Required (IU/dL or % of normal) | Frequency of Doses (hours) | Duration of Therapy (days) |
|---|---|---|---|
| Minor | |||
| Minor operations, including tooth extraction. | 30–60 | 12–24 | 3–4 days or until adequate local hemostasis is achieved. For tooth extraction, a single infusion plus oral antifibrinolytic therapy within 1 hour may be sufficient. |
| Major | |||
| Major operations. | 60–100 | 8–24 | Until threat is resolved, or in the case of surgery, until adequate local hemostasis and wound healing are achieved. |
Routine Prophylaxis
- Adults and adolescents (≥12 years): The recommended starting regimen is 30 IU/kg of XYNTHA administered 3 times weekly.
- Children (<12 years): The recommended starting regimen is 25 IU/kg of XYNTHA administered every other day. More frequent or higher doses may be required in children <12 years of age to account for the higher clearance in this age group [see Clinical Pharmacology (12.3)].
- Adjust the dosing regimen (dose or frequency) based on the patient's clinical response.
2.2 Preparation and Reconstitution
Preparation
- Always wash hands before performing the following procedures.
- Use aseptic technique during the reconstitution procedures.
- Use all components for the reconstitution and administration of this product as soon as possible after opening their sterile containers to minimize unnecessary exposure to the atmosphere.
Note:- If the patient uses one vial of XYNTHA with one XYNTHA SOLOFUSE for the infusion, reconstitute the vial and the syringe according to the instructions for that respective product kit. Use a separate 10 milliliter or larger luer lock syringe (not included in this kit) to draw back the reconstituted contents of the vial and the syringe. [see Dosage and Administration (2.4)]
- If the patient uses multiple XYNTHA SOLOFUSE syringes for the infusion, reconstitute each syringe according to the instructions below. Use a separate 10 milliliter or larger luer lock syringe (not included in this kit) to draw back the reconstituted contents of each syringe. [see Dosage and Administration (2.5)]
Reconstitution
- Allow the XYNTHA SOLOFUSE Kit to reach room temperature.
- Remove the contents of the XYNTHA SOLOFUSE Kit and place on a clean surface, making sure you have all the supplies you will need.
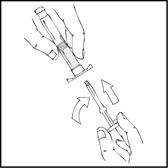
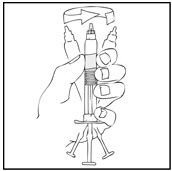
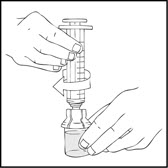
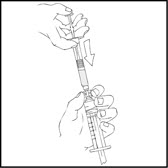
- Grasp the plunger rod as shown in the following diagram. Avoid contact with the shaft of the plunger rod. Screw the plunger rod firmly into the opening in the finger rest of the XYNTHA SOLOFUSE by pushing and turning firmly until resistance is felt (approximately 2 turns).
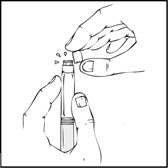
Note: Once the white tamper-evident seal is removed it is important to keep the XYNTHA SOLOFUSE in the upright position throughout the reconstitution process to prevent possible leakage. - Holding the XYNTHA SOLOFUSE upright, remove the white tamper-evident seal by bending the seal right to left (or a gentle rocking motion) to break the perforation of the cap and expose the grey rubber tip cap of the XYNTHA SOLOFUSE.
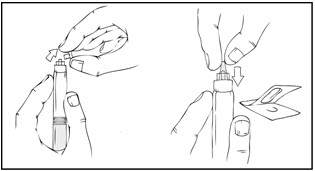
- Remove the protective blue vented sterile cap from its package. While holding the XYNTHA SOLOFUSE upright, remove the grey rubber tip cap and replace it with the protective blue vented cap (prevents pressure build-up). Avoid touching the open end of both the syringe and the protective blue vented cap.
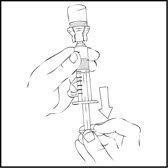
- Gently and slowly advance the plunger rod by pushing until the two stoppers inside the XYNTHA SOLOFUSE meet, and all of the diluent is transferred to the chamber containing the XYNTHA powder.
Note: To prevent the escape of fluid from the tip of the syringe, the plunger rod should not be pushed with excessive force.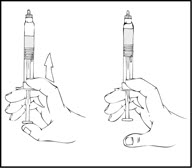
- With the XYNTHA SOLOFUSE remaining upright, swirl gently several times until the powder is dissolved.
Note: The final solution should be inspected visually for particulate matter before administration. The solution should be clear to slightly opalescent and colorless. If it is not, discard the solution and use a new kit. - Holding the XYNTHA SOLOFUSE in an upright position, slowly advance the plunger rod until most, but not all, of the air is removed from the drug product chamber.

Note:- If the solution is not to be used immediately, store the syringe upright, leaving the protective blue vent cap on the XYNTHA SOLOFUSE until ready to infuse.
- Store the reconstituted solution at room temperature prior to administration, but use within 3 hours after reconstitution or after removal of the grey rubber tip cap.
- XYNTHA, when reconstituted, contains polysorbate 80, which is known to increase the rate of di-(2-ethylhexyl) phthalate (DEHP) extraction from polyvinyl chloride (PVC). This should be considered during the preparation and administration of XYNTHA, including storage time elapsed in a PVC container following reconstitution. The tubing of the infusion set included with this kit does not contain DEHP.
2.3 Administration
For intravenous infusion after reconstitution only.
Inspect the final XYNTHA solution visually for particulate matter and discoloration prior to administration. The solution should be clear to slightly opalescent and colorless. If it is not, discard the solution and use a new kit.
Administer XYNTHA solution using the infusion set included in the kit. Do not administer reconstituted XYNTHA in the same tubing or container with other medicinal products.
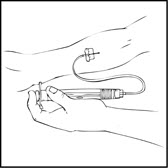
- After removing the protective blue vented cap, firmly attach the intravenous infusion set provided in the kit onto the XYNTHA SOLOFUSE.

- Apply a tourniquet and prepare the injection site by wiping the skin well with an alcohol swab provided in the kit.
- Remove the protective needle cover and perform venipuncture. Insert the needle on the infusion set tubing into the vein, and remove the tourniquet. Verify proper needle placement.
- Inject the reconstituted XYNTHA intravenously over several minutes. The rate of administration should be determined by the patient's comfort level.
- After infusing XYNTHA, remove and discard the infusion set. The amount of drug product left in the infusion set will not affect treatment.
Note: Dispose of all unused solution, the empty XYNTHA SOLOFUSE, and other used medical supplies in an appropriate container.
2.4 Use of a XYNTHA Vial Kit with a XYNTHA SOLOFUSE Kit
These instructions are for the use of only one XYNTHA vial kit with one XYNTHA SOLOFUSE Kit.
- 1.
- Reconstitute the XYNTHA vial using the instructions included with the product kit.
- 2.
- Detach the empty diluent syringe from the vial adapter by gently turning and pulling the syringe counterclockwise, leaving the contents in the vial and the vial adapter in place.

- 3.
- Reconstitute the XYNTHA SOLOFUSE using the instructions described in Preparation and Reconstitution [see Dosage and Administration (2.2)]. Remember to remove most, but not all, of the air from the drug product chamber.

- 4.
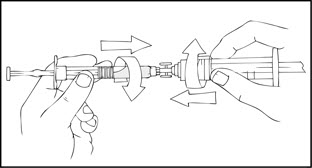
- After removing the protective blue vented cap, connect the XYNTHA SOLOFUSE to the vial adapter by inserting the tip into the adapter opening while firmly pushing and turning the syringe clockwise until secured.
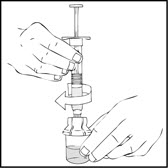
- 5.
- Slowly depress the plunger rod of the XYNTHA SOLOFUSE until the contents empty into the XYNTHA vial. The plunger rod may move back slightly after release.
- 6.
- Detach and discard the empty XYNTHA SOLOFUSE from the vial adapter.
Note: If the syringe turns without detaching from the vial adapter, grasp the white collar and turn.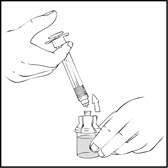
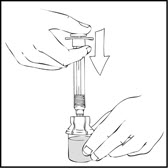
- 7.
- Connect a sterile 10 milliliter or larger luer lock syringe to the vial adapter. Inject some air into the vial to make withdrawing the vial contents easier.
- 8.
- Invert the vial and slowly draw the solution into the large luer lock syringe.
- 9.
- Detach the syringe from the vial adapter by gently turning and pulling the syringe counterclockwise. Discard the empty XYNTHA vial with the adapter attached.
- 10
- Attach the infusion set to the large luer lock syringe as directed [see Dosage and Administration (2.3)].
2.5 Use of Multiple XYNTHA SOLOFUSE Kits
The instructions below are for the use of multiple XYNTHA SOLOFUSE kits with a 10 milliliter or larger luer lock syringe. For further information, please contact the Medical Information Department at Wyeth Pharmaceuticals, 1-800-438-1985.
Note: Luer-to-luer syringe connectors are not provided in these kits. Instruct patients to contact their XYNTHA supplier to order.
- Reconstitute all XYNTHA SOLOFUSE according to instructions described in Preparation and Reconstitution [see Dosage and Administration (2.2)].
- Holding the XYNTHA SOLOFUSE in an upright position, slowly advance the plunger rod until most, but not all, of the air is removed from the drug product chamber.

- Remove the luer-to-luer syringe connector from its package.
- After removing the protective blue vented cap, connect a sterile 10 milliliter or larger luer lock syringe to one opening (port) in the syringe connector and the XYNTHA SOLOFUSE to the remaining open port on the opposite end.
- With the XYNTHA SOLOFUSE on top, slowly depress the plunger rod until the contents empty into the large luer lock syringe.
- Remove the empty XYNTHA SOLOFUSE and repeat procedures 3 and 4 above for any additional reconstituted XYNTHA SOLOFUSE.
- Remove the luer-to-luer syringe connector from the large luer lock syringe and attach the infusion set as directed [see Dosage and Administration (2.3)].
Find XYNTHA® Solofuse Lyophilized Powder for Solution in Prefilled Dual-chamber Syringe medical information:
Find XYNTHA® Solofuse Lyophilized Powder for Solution in Prefilled Dual-chamber Syringe medical information:
XYNTHA® Solofuse Lyophilized Powder for Solution in Prefilled Dual-chamber Syringe Quick Finder
Health Professional Information
Dosage and Administration
2 DOSAGE AND ADMINISTRATION
For intravenous use after reconstitution only.
2.1 Dose
- Dosage and duration of treatment depend on the severity of the factor VIII deficiency, the location and extent of bleeding, and the patient's clinical condition. Titrate the administered doses to the patient's clinical response.
- One International Unit (IU) of factor VIII activity corresponds approximately to the quantity of factor VIII in one milliliter of normal human plasma. The calculation of the required dosage of factor VIII is based upon the empirical finding that, on average, 1 IU of factor VIII per kg body weight raises the plasma factor VIII activity by approximately 2 IU/dL.2
The expected in vivo peak increase in factor VIII level expressed as IU/dL (or % of normal) can be estimated using the following formulas:
Dosage (International Units) = body weight (kg) × desired factor VIII rise (IU/dL or % of normal) × 0.5 (IU/kg per IU/dL)
or
IU/dL (or % of normal) = Total Dose (IU)/body weight (kg) × 2 [IU/dL]/[IU/kg]
On-demand treatment and Control of Bleeding Episodes
A guide for dosing XYNTHA for on-demand treatment and control of bleeding episodes is provided in Table 1. Maintain the plasma factor VIII activity at or above the levels (in % of normal or in IU/dL) outlined in Table 1 for the indicated period.
| Type of Bleeding Episode | Factor VIII Level Required (IU/dL or % of normal) | Frequency of Doses (hours) | Duration of Therapy |
|---|---|---|---|
| Minor | |||
| Early hemarthrosis, minor muscle or oral bleeds. | 20–40 | 12–24 | At least 1 day, depending upon the severity of the bleeding episode. |
| Moderate | |||
| Bleeding into muscles. Mild head trauma. Bleeding into the oral cavity. | 30–60 | 12–24 | 3–4 days or until adequate local hemostasis is achieved. |
| Major | |||
| Gastrointestinal bleeding. Intracranial, intra-abdominal or intrathoracic bleeding. Fractures. | 60–100 | 8–24 | Until bleeding is resolved. |
Perioperative Management
A guide for dosing XYNTHA during surgery (perioperative management) is provided in Table 2. Maintain the plasma factor VIII activity level at or above the level (in % of normal or in IU/dL) outlined in Table 2 for the indicated period. Monitor the replacement therapy by means of plasma factor VIII activity.
| Type of Surgery | Factor VIII Level Required (IU/dL or % of normal) | Frequency of Doses (hours) | Duration of Therapy (days) |
|---|---|---|---|
| Minor | |||
| Minor operations, including tooth extraction. | 30–60 | 12–24 | 3–4 days or until adequate local hemostasis is achieved. For tooth extraction, a single infusion plus oral antifibrinolytic therapy within 1 hour may be sufficient. |
| Major | |||
| Major operations. | 60–100 | 8–24 | Until threat is resolved, or in the case of surgery, until adequate local hemostasis and wound healing are achieved. |
Routine Prophylaxis
- Adults and adolescents (≥12 years): The recommended starting regimen is 30 IU/kg of XYNTHA administered 3 times weekly.
- Children (<12 years): The recommended starting regimen is 25 IU/kg of XYNTHA administered every other day. More frequent or higher doses may be required in children <12 years of age to account for the higher clearance in this age group [see Clinical Pharmacology (12.3)].
- Adjust the dosing regimen (dose or frequency) based on the patient's clinical response.
2.2 Preparation and Reconstitution
Preparation
- Always wash hands before performing the following procedures.
- Use aseptic technique during the reconstitution procedures.
- Use all components for the reconstitution and administration of this product as soon as possible after opening their sterile containers to minimize unnecessary exposure to the atmosphere.
Note:- If the patient uses one vial of XYNTHA with one XYNTHA SOLOFUSE for the infusion, reconstitute the vial and the syringe according to the instructions for that respective product kit. Use a separate 10 milliliter or larger luer lock syringe (not included in this kit) to draw back the reconstituted contents of the vial and the syringe. [see Dosage and Administration (2.4)]
- If the patient uses multiple XYNTHA SOLOFUSE syringes for the infusion, reconstitute each syringe according to the instructions below. Use a separate 10 milliliter or larger luer lock syringe (not included in this kit) to draw back the reconstituted contents of each syringe. [see Dosage and Administration (2.5)]
Reconstitution
- Allow the XYNTHA SOLOFUSE Kit to reach room temperature.
- Remove the contents of the XYNTHA SOLOFUSE Kit and place on a clean surface, making sure you have all the supplies you will need.
- Grasp the plunger rod as shown in the following diagram. Avoid contact with the shaft of the plunger rod. Screw the plunger rod firmly into the opening in the finger rest of the XYNTHA SOLOFUSE by pushing and turning firmly until resistance is felt (approximately 2 turns).
Note: Once the white tamper-evident seal is removed it is important to keep the XYNTHA SOLOFUSE in the upright position throughout the reconstitution process to prevent possible leakage. - Holding the XYNTHA SOLOFUSE upright, remove the white tamper-evident seal by bending the seal right to left (or a gentle rocking motion) to break the perforation of the cap and expose the grey rubber tip cap of the XYNTHA SOLOFUSE.
- Remove the protective blue vented sterile cap from its package. While holding the XYNTHA SOLOFUSE upright, remove the grey rubber tip cap and replace it with the protective blue vented cap (prevents pressure build-up). Avoid touching the open end of both the syringe and the protective blue vented cap.
- Gently and slowly advance the plunger rod by pushing until the two stoppers inside the XYNTHA SOLOFUSE meet, and all of the diluent is transferred to the chamber containing the XYNTHA powder.
Note: To prevent the escape of fluid from the tip of the syringe, the plunger rod should not be pushed with excessive force. - With the XYNTHA SOLOFUSE remaining upright, swirl gently several times until the powder is dissolved.
Note: The final solution should be inspected visually for particulate matter before administration. The solution should be clear to slightly opalescent and colorless. If it is not, discard the solution and use a new kit. - Holding the XYNTHA SOLOFUSE in an upright position, slowly advance the plunger rod until most, but not all, of the air is removed from the drug product chamber.
Note:- If the solution is not to be used immediately, store the syringe upright, leaving the protective blue vent cap on the XYNTHA SOLOFUSE until ready to infuse.
- Store the reconstituted solution at room temperature prior to administration, but use within 3 hours after reconstitution or after removal of the grey rubber tip cap.
- XYNTHA, when reconstituted, contains polysorbate 80, which is known to increase the rate of di-(2-ethylhexyl) phthalate (DEHP) extraction from polyvinyl chloride (PVC). This should be considered during the preparation and administration of XYNTHA, including storage time elapsed in a PVC container following reconstitution. The tubing of the infusion set included with this kit does not contain DEHP.
2.3 Administration
For intravenous infusion after reconstitution only.
Inspect the final XYNTHA solution visually for particulate matter and discoloration prior to administration. The solution should be clear to slightly opalescent and colorless. If it is not, discard the solution and use a new kit.
Administer XYNTHA solution using the infusion set included in the kit. Do not administer reconstituted XYNTHA in the same tubing or container with other medicinal products.
- After removing the protective blue vented cap, firmly attach the intravenous infusion set provided in the kit onto the XYNTHA SOLOFUSE.
- Apply a tourniquet and prepare the injection site by wiping the skin well with an alcohol swab provided in the kit.
- Remove the protective needle cover and perform venipuncture. Insert the needle on the infusion set tubing into the vein, and remove the tourniquet. Verify proper needle placement.
- Inject the reconstituted XYNTHA intravenously over several minutes. The rate of administration should be determined by the patient's comfort level.
- After infusing XYNTHA, remove and discard the infusion set. The amount of drug product left in the infusion set will not affect treatment.
Note: Dispose of all unused solution, the empty XYNTHA SOLOFUSE, and other used medical supplies in an appropriate container.
2.4 Use of a XYNTHA Vial Kit with a XYNTHA SOLOFUSE Kit
These instructions are for the use of only one XYNTHA vial kit with one XYNTHA SOLOFUSE Kit.
- 1.
- Reconstitute the XYNTHA vial using the instructions included with the product kit.
- 2.
- Detach the empty diluent syringe from the vial adapter by gently turning and pulling the syringe counterclockwise, leaving the contents in the vial and the vial adapter in place.
- 3.
- Reconstitute the XYNTHA SOLOFUSE using the instructions described in Preparation and Reconstitution [see Dosage and Administration (2.2)]. Remember to remove most, but not all, of the air from the drug product chamber.
- 4.
- After removing the protective blue vented cap, connect the XYNTHA SOLOFUSE to the vial adapter by inserting the tip into the adapter opening while firmly pushing and turning the syringe clockwise until secured.
- 5.
- Slowly depress the plunger rod of the XYNTHA SOLOFUSE until the contents empty into the XYNTHA vial. The plunger rod may move back slightly after release.
- 6.
- Detach and discard the empty XYNTHA SOLOFUSE from the vial adapter.
Note: If the syringe turns without detaching from the vial adapter, grasp the white collar and turn. - 7.
- Connect a sterile 10 milliliter or larger luer lock syringe to the vial adapter. Inject some air into the vial to make withdrawing the vial contents easier.
- 8.
- Invert the vial and slowly draw the solution into the large luer lock syringe.
- 9.
- Detach the syringe from the vial adapter by gently turning and pulling the syringe counterclockwise. Discard the empty XYNTHA vial with the adapter attached.
- 10
- Attach the infusion set to the large luer lock syringe as directed [see Dosage and Administration (2.3)].
2.5 Use of Multiple XYNTHA SOLOFUSE Kits
The instructions below are for the use of multiple XYNTHA SOLOFUSE kits with a 10 milliliter or larger luer lock syringe. For further information, please contact the Medical Information Department at Wyeth Pharmaceuticals, 1-800-438-1985.
Note: Luer-to-luer syringe connectors are not provided in these kits. Instruct patients to contact their XYNTHA supplier to order.
- Reconstitute all XYNTHA SOLOFUSE according to instructions described in Preparation and Reconstitution [see Dosage and Administration (2.2)].
- Holding the XYNTHA SOLOFUSE in an upright position, slowly advance the plunger rod until most, but not all, of the air is removed from the drug product chamber.
- Remove the luer-to-luer syringe connector from its package.
- After removing the protective blue vented cap, connect a sterile 10 milliliter or larger luer lock syringe to one opening (port) in the syringe connector and the XYNTHA SOLOFUSE to the remaining open port on the opposite end.
- With the XYNTHA SOLOFUSE on top, slowly depress the plunger rod until the contents empty into the large luer lock syringe.
- Remove the empty XYNTHA SOLOFUSE and repeat procedures 3 and 4 above for any additional reconstituted XYNTHA SOLOFUSE.
- Remove the luer-to-luer syringe connector from the large luer lock syringe and attach the infusion set as directed [see Dosage and Administration (2.3)].
Resources
Didn’t find what you were looking for? Contact us.
Chat online with Pfizer Medical Information regarding your inquiry on a Pfizer medicine.
*Contact Medical Information.9AM-5PM ET Monday to Friday; excluding holidays.
Report Adverse Event
To report an adverse event related to the Pfizer-BioNTech COVID-19 Vaccine, and you are not part of a clinical trial* for this product, click the link below to submit your information:
Pfizer Safety Reporting Site*If you are involved in a clinical trial for this product, adverse events should be reported to your coordinating study site.
If you cannot use the above website, or would like to report an adverse event related to a different Pfizer product, please call Pfizer Safety at (800) 438-1985.
You may also contact the U.S. Food and Drug Administration (FDA) directly to report adverse events or product quality concerns either online at www.fda.gov/medwatch or call (800) 822-7967.