XYNTHA® Lyophilized Powder Instructions For Use
(antihemophilic factor [Recombinant])
Instructions for Use
XYNTHA® /ZIN-tha/
[Antihemophilic Factor (Recombinant)]
XYNTHA is supplied as a lyophilized powder. Before you can infuse it (intravenous injection), you must reconstitute the powder by mixing it with the liquid diluent supplied. The liquid diluent is 0.9% sodium chloride.
Reconstitute and infuse XYNTHA using the infusion set, diluent, syringe, and adapter provided in this kit. Please follow the directions below for the proper use of this product.
PREPARATION AND RECONSTITUTION OF XYNTHA
Preparation
- Always wash your hands before doing the following steps.
- Keep everything clean and germ-free while you are reconstituting XYNTHA.
- Once the vials are open, finish reconstituting XYNTHA as soon as possible. This will help to keep them germ-free.
- For additional instructions on the use of a XYNTHA Vial Kit and a XYNTHA SOLOFUSE kit, see detailed information provided after the INFUSION OF XYNTHA section.
Reconstitution
Note: If you use more than one vial of XYNTHA for each infusion, reconstitute each vial according to steps 1 through 11.
- Let the XYNTHA vial and the prefilled diluent syringe reach room temperature.
- Remove the plastic flip-top cap from the XYNTHA vial to show the center part of the rubber stopper.
- Wipe the top of the vial with the alcohol swab provided, or use another antiseptic solution, and allow to dry. After cleaning, do not touch the rubber stopper with your hand or allow it to touch any surface.
- Peel back the cover from the clear plastic vial adapter package. Do not remove the adapter from the package.
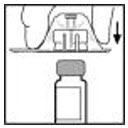
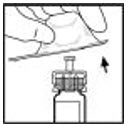
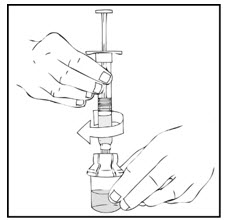
- Place the XYNTHA vial on a flat surface. While holding the adapter in the package, place the vial adapter over the XYNTHA vial. Press down firmly on the package until the adapter snaps into place on top of the vial, with the adapter spike going into the vial stopper.
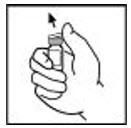
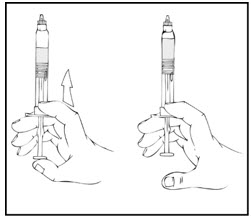
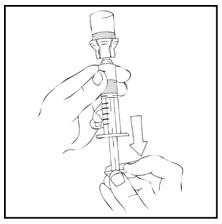
- Grasp the plunger rod as shown in the picture below. Do not touch the shaft of the plunger rod. Attach the threaded end of the plunger rod to the diluent syringe plunger by pushing and turning firmly.
- Break off the tamper-resistant, plastic tip cap from the diluent syringe by snapping the perforation of the cap. Do not touch the inside of the cap or the syringe tip. The diluent syringe may need to be recapped (if reconstituted XYNTHA is not used immediately), so place the cap on its top on a clean surface in a spot where it will stay clean.
- Lift the package cover away from the adapter and throw the package away.
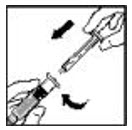
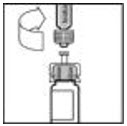
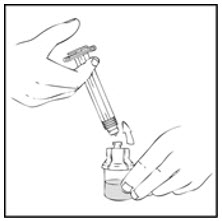
- Place the XYNTHA vial on a flat surface. Connect the diluent syringe to the vial adapter by inserting the tip of the syringe into the adapter opening while firmly pushing and turning the syringe clockwise until the connection is secured.
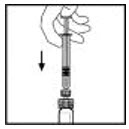
- Slowly push the plunger rod to inject all the diluent into the XYNTHA vial.
- With the syringe still connected to the adapter, gently swirl the contents of the vial until the powder is dissolved.
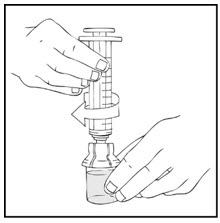
Look carefully at the final solution. The solution should be clear to slightly opalescent and colorless. If it is not, throw away the solution and use a new kit. - Make sure the syringe plunger rod is still fully pressed down, then turn over the XYNTHA vial. Slowly pull the solution into the syringe. Turn the syringe upward again and remove any air bubbles by gently tapping the syringe with your finger and slowly pushing air out of the syringe.
If you reconstituted more than one vial of XYNTHA, remove the diluent syringe from the vial adapter and leave the vial adapter attached to the XYNTHA vial. Quickly attach a separate large luer lock syringe and pull the reconstituted solution as instructed above. Repeat this procedure with each vial in turn. Do not detach the diluent syringe or the large luer lock syringe until you are ready to attach the large luer lock syringe to the next vial adapter.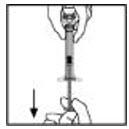
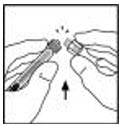
- Remove the syringe from the vial adapter by gently pulling and turning the syringe counterclockwise. Throw away the empty XYNTHA vial with the adapter attached.
Note:
- If you are not using the solution right away, carefully replace the syringe cap. Do not touch the syringe tip or the inside of the cap.
- Infuse XYNTHA solution within 3 hours after reconstitution. The reconstituted solution may be kept at room temperature for up to 3 hours prior to infusion. If you have not used it in 3 hours, throw it away.
INFUSION OF XYNTHA
Your healthcare provider will teach you how to infuse XYNTHA yourself. Once you learn how to do this, you can follow the instructions in this insert.
Before XYNTHA can be infused, you must reconstitute it as instructed above in the PREPARATION AND RECONSTITUTION OF XYNTHA section.
After reconstitution, be sure to look carefully at the XYNTHA solution. The solution should be clear to slightly opalescent and colorless. If it is not, throw away the solution and use a new kit.
Use the infusion set included in the kit to infuse XYNTHA. Do not infuse XYNTHA in the same tubing or container with other medicines.
- Attach the syringe to the luer end of the provided infusion set tubing.
- Apply a tourniquet and prepare the injection site by wiping the skin well with an alcohol swab provided in the kit.
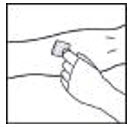
- Remove the protective needle cover and insert the butterfly needle of the infusion set tubing into your vein as instructed by your healthcare provider. Remove the tourniquet. Verify proper needle placement.
- Infuse the reconstituted XYNTHA product over several minutes. Your comfort level should determine the rate of infusion.
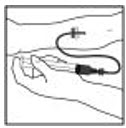
- After infusing XYNTHA, remove the infusion set and throw it away. The amount of liquid left in the infusion set will not affect your treatment.
Note:
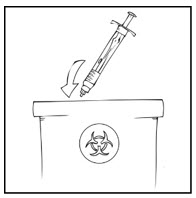
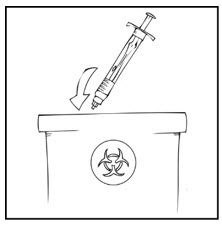
- Dispose of all unused solution, the empty vial(s), and other used medical supplies in an appropriate container.
- It is a good idea to record the lot number from the XYNTHA vial label every time you use XYNTHA. You can use the peel-off label found on the vial to record the lot number.
ADDITIONAL INSTRUCTIONS
XYNTHA is also supplied in kits that have both the XYNTHA powder and the diluent within single-use prefilled dual-chamber syringes, called XYNTHA SOLOFUSE.
If you use one XYNTHA vial and one of XYNTHA SOLOFUSE for the infusion, reconstitute the XYNTHA vial and the XYNTHA SOLOFUSE according to the specific directions for that respective product kit. Use a separate 10 milliliter or larger luer lock syringe (not included in this kit) to draw back the reconstituted contents of the XYNTHA vial and XYNTHA SOLOFUSE.
Use of a XYNTHA Vial Kit with a XYNTHA SOLOFUSE Kit
These instructions are for the use of only one XYNTHA vial kit and one XYNTHA SOLOFUSE Kit. For further information, please contact your healthcare provider or call the Medical Information Department at Wyeth Pharmaceuticals, 1-800-438-1985.
- Reconstitute the XYNTHA vial using the instructions described in PREPARATION AND RECONSTITUTION OF XYNTHA section. Detach the empty diluent syringe from the vial adapter by gently turning and pulling the syringe counterclockwise, leaving the contents in the XYNTHA vial with the vial adapter in place.
- Reconstitute the XYNTHA SOLOFUSE using the instructions included with the kit, remembering to remove most, but not all, of the air from the syringe.
- After removing the protective blue vented cap, connect the XYNTHA SOLOFUSE to the vial adapter by inserting the tip into the adapter opening while firmly pushing and turning the syringe clockwise until secured.
- Slowly depress the plunger rod of the XYNTHA SOLOFUSE until the contents empty into the XYNTHA vial. The plunger rod may move back slightly after release.

- Detach the empty XYNTHA SOLOFUSE from the vial adapter and throw it away.
If the syringe turns without detaching from the vial adapter, grasp the white collar and turn.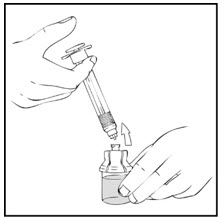
- Connect a sterile 10 milliliter or larger luer lock syringe to the vial adapter. You may want to inject some air into the XYNTHA vial to make withdrawing the vial contents easier.
- Invert the XYNTHA vial and slowly draw the solution into the large luer lock syringe.
- Detach the large luer lock syringe from the vial adapter by gently turning and pulling the syringe counterclockwise. Throw away the empty XYNTHA vial with the adapter attached.
- Attach the infusion set to the large luer lock syringe as directed in the INFUSION OF XYNTHA section.
Note: Dispose of all unused solution and other used medical supplies in an appropriate container.
This product's labeling may have been updated. For the most recent prescribing information, please visit www.pfizer.com.

License no: 3
LAB-0516-9.0
Find XYNTHA® Lyophilized Powder medical information:
Find XYNTHA® Lyophilized Powder medical information:
XYNTHA® Lyophilized Powder Quick Finder
Health Professional Information
Instructions For Use
Instructions for Use
XYNTHA® /ZIN-tha/
[Antihemophilic Factor (Recombinant)]
XYNTHA is supplied as a lyophilized powder. Before you can infuse it (intravenous injection), you must reconstitute the powder by mixing it with the liquid diluent supplied. The liquid diluent is 0.9% sodium chloride.
Reconstitute and infuse XYNTHA using the infusion set, diluent, syringe, and adapter provided in this kit. Please follow the directions below for the proper use of this product.
PREPARATION AND RECONSTITUTION OF XYNTHA
Preparation
- Always wash your hands before doing the following steps.
- Keep everything clean and germ-free while you are reconstituting XYNTHA.
- Once the vials are open, finish reconstituting XYNTHA as soon as possible. This will help to keep them germ-free.
- For additional instructions on the use of a XYNTHA Vial Kit and a XYNTHA SOLOFUSE kit, see detailed information provided after the INFUSION OF XYNTHA section.
Reconstitution
Note: If you use more than one vial of XYNTHA for each infusion, reconstitute each vial according to steps 1 through 11.
- Let the XYNTHA vial and the prefilled diluent syringe reach room temperature.
- Remove the plastic flip-top cap from the XYNTHA vial to show the center part of the rubber stopper.
- Wipe the top of the vial with the alcohol swab provided, or use another antiseptic solution, and allow to dry. After cleaning, do not touch the rubber stopper with your hand or allow it to touch any surface.
- Peel back the cover from the clear plastic vial adapter package. Do not remove the adapter from the package.
- Place the XYNTHA vial on a flat surface. While holding the adapter in the package, place the vial adapter over the XYNTHA vial. Press down firmly on the package until the adapter snaps into place on top of the vial, with the adapter spike going into the vial stopper.
- Grasp the plunger rod as shown in the picture below. Do not touch the shaft of the plunger rod. Attach the threaded end of the plunger rod to the diluent syringe plunger by pushing and turning firmly.
- Break off the tamper-resistant, plastic tip cap from the diluent syringe by snapping the perforation of the cap. Do not touch the inside of the cap or the syringe tip. The diluent syringe may need to be recapped (if reconstituted XYNTHA is not used immediately), so place the cap on its top on a clean surface in a spot where it will stay clean.
- Lift the package cover away from the adapter and throw the package away.
- Place the XYNTHA vial on a flat surface. Connect the diluent syringe to the vial adapter by inserting the tip of the syringe into the adapter opening while firmly pushing and turning the syringe clockwise until the connection is secured.
- Slowly push the plunger rod to inject all the diluent into the XYNTHA vial.
- With the syringe still connected to the adapter, gently swirl the contents of the vial until the powder is dissolved.
Look carefully at the final solution. The solution should be clear to slightly opalescent and colorless. If it is not, throw away the solution and use a new kit. - Make sure the syringe plunger rod is still fully pressed down, then turn over the XYNTHA vial. Slowly pull the solution into the syringe. Turn the syringe upward again and remove any air bubbles by gently tapping the syringe with your finger and slowly pushing air out of the syringe.
If you reconstituted more than one vial of XYNTHA, remove the diluent syringe from the vial adapter and leave the vial adapter attached to the XYNTHA vial. Quickly attach a separate large luer lock syringe and pull the reconstituted solution as instructed above. Repeat this procedure with each vial in turn. Do not detach the diluent syringe or the large luer lock syringe until you are ready to attach the large luer lock syringe to the next vial adapter. - Remove the syringe from the vial adapter by gently pulling and turning the syringe counterclockwise. Throw away the empty XYNTHA vial with the adapter attached.
Note:
- If you are not using the solution right away, carefully replace the syringe cap. Do not touch the syringe tip or the inside of the cap.
- Infuse XYNTHA solution within 3 hours after reconstitution. The reconstituted solution may be kept at room temperature for up to 3 hours prior to infusion. If you have not used it in 3 hours, throw it away.
INFUSION OF XYNTHA
Your healthcare provider will teach you how to infuse XYNTHA yourself. Once you learn how to do this, you can follow the instructions in this insert.
Before XYNTHA can be infused, you must reconstitute it as instructed above in the PREPARATION AND RECONSTITUTION OF XYNTHA section.
After reconstitution, be sure to look carefully at the XYNTHA solution. The solution should be clear to slightly opalescent and colorless. If it is not, throw away the solution and use a new kit.
Use the infusion set included in the kit to infuse XYNTHA. Do not infuse XYNTHA in the same tubing or container with other medicines.
- Attach the syringe to the luer end of the provided infusion set tubing.
- Apply a tourniquet and prepare the injection site by wiping the skin well with an alcohol swab provided in the kit.
- Remove the protective needle cover and insert the butterfly needle of the infusion set tubing into your vein as instructed by your healthcare provider. Remove the tourniquet. Verify proper needle placement.
- Infuse the reconstituted XYNTHA product over several minutes. Your comfort level should determine the rate of infusion.
- After infusing XYNTHA, remove the infusion set and throw it away. The amount of liquid left in the infusion set will not affect your treatment.
Note:
- Dispose of all unused solution, the empty vial(s), and other used medical supplies in an appropriate container.
- It is a good idea to record the lot number from the XYNTHA vial label every time you use XYNTHA. You can use the peel-off label found on the vial to record the lot number.
ADDITIONAL INSTRUCTIONS
XYNTHA is also supplied in kits that have both the XYNTHA powder and the diluent within single-use prefilled dual-chamber syringes, called XYNTHA SOLOFUSE.
If you use one XYNTHA vial and one of XYNTHA SOLOFUSE for the infusion, reconstitute the XYNTHA vial and the XYNTHA SOLOFUSE according to the specific directions for that respective product kit. Use a separate 10 milliliter or larger luer lock syringe (not included in this kit) to draw back the reconstituted contents of the XYNTHA vial and XYNTHA SOLOFUSE.
Use of a XYNTHA Vial Kit with a XYNTHA SOLOFUSE Kit
These instructions are for the use of only one XYNTHA vial kit and one XYNTHA SOLOFUSE Kit. For further information, please contact your healthcare provider or call the Medical Information Department at Wyeth Pharmaceuticals, 1-800-438-1985.
- Reconstitute the XYNTHA vial using the instructions described in PREPARATION AND RECONSTITUTION OF XYNTHA section. Detach the empty diluent syringe from the vial adapter by gently turning and pulling the syringe counterclockwise, leaving the contents in the XYNTHA vial with the vial adapter in place.
- Reconstitute the XYNTHA SOLOFUSE using the instructions included with the kit, remembering to remove most, but not all, of the air from the syringe.
- After removing the protective blue vented cap, connect the XYNTHA SOLOFUSE to the vial adapter by inserting the tip into the adapter opening while firmly pushing and turning the syringe clockwise until secured.
- Slowly depress the plunger rod of the XYNTHA SOLOFUSE until the contents empty into the XYNTHA vial. The plunger rod may move back slightly after release.
- Detach the empty XYNTHA SOLOFUSE from the vial adapter and throw it away.
If the syringe turns without detaching from the vial adapter, grasp the white collar and turn. - Connect a sterile 10 milliliter or larger luer lock syringe to the vial adapter. You may want to inject some air into the XYNTHA vial to make withdrawing the vial contents easier.
- Invert the XYNTHA vial and slowly draw the solution into the large luer lock syringe.
- Detach the large luer lock syringe from the vial adapter by gently turning and pulling the syringe counterclockwise. Throw away the empty XYNTHA vial with the adapter attached.
- Attach the infusion set to the large luer lock syringe as directed in the INFUSION OF XYNTHA section.
Note: Dispose of all unused solution and other used medical supplies in an appropriate container.
This product's labeling may have been updated. For the most recent prescribing information, please visit www.pfizer.com.
License no: 3
LAB-0516-9.0
Resources
Didn’t find what you were looking for? Contact us.
Chat online with Pfizer Medical Information regarding your inquiry on a Pfizer medicine.
*Contact Medical Information.9AM-5PM ET Monday to Friday; excluding holidays.
Report Adverse Event
To report an adverse event related to the Pfizer-BioNTech COVID-19 Vaccine, and you are not part of a clinical trial* for this product, click the link below to submit your information:
Pfizer Safety Reporting Site*If you are involved in a clinical trial for this product, adverse events should be reported to your coordinating study site.
If you cannot use the above website, or would like to report an adverse event related to a different Pfizer product, please call Pfizer Safety at (800) 438-1985.
You may also contact the U.S. Food and Drug Administration (FDA) directly to report adverse events or product quality concerns either online at www.fda.gov/medwatch or call (800) 822-7967.