NIVESTYM™ Instructions For Use
(filgrastim-aafi)
Instructions for Use
NIVESTYM (Neye-ves-tim)
(filgrastim-aafi)
injection
Single-Dose Prefilled Syringe
Important
Read the Patient Information for important information you need to know about NIVESTYM before using this Instructions for Use.
Before you use a NIVESTYM prefilled syringe, read this important information.
Storing your prefilled syringe |
- •
- Store the NIVESTYM prefilled syringe in the refrigerator between 36˚F to 46˚F (2˚C to 8˚C).
- •
- Do not freeze.
- •
- Keep the NIVESTYM prefilled syringe in the original carton to protect from light or physical damage.
- •
- Take the prefilled syringe out of the refrigerator 30 minutes before use and allow it to reach room temperature before preparing an injection.
- •
- The NIVESTYM prefilled syringe may be allowed to reach room temperature for up to 24 hours. Throw away (dispose of) any NIVESTYM prefilled syringe that has been left at room temperature for longer than 24 hours.
- •
- After you inject your dose, throw away (dispose of) any unused NIVESTYM left in the prefilled syringe. Do not save unused NIVESTYM in the prefilled syringe for later use.
- •
- Keep NIVESTYM and all medicines out of the reach of children.
Using your prefilled syringe |
- •
- It is important that you do not try to give the injection unless you or your caregiver has received training from your healthcare provider.
- •
- You should not inject a dose of NIVESTYM less than 0.3 mL (180 mcg) from a NIVESTYM prefilled syringe. A dose less than 0.3 mL cannot be accurately measured using the NIVESTYM prefilled syringe.
- •
- Make sure the name NIVESTYM appears on the carton and prefilled syringe label.
- •
- Do not use a NIVESTYM prefilled syringe after the expiration date on the label.
- •
- Do not shake the NIVESTYM prefilled syringe.
- •
- The prefilled syringe has a needle guard that needs to be activated to cover the needle after the injection is given. The needle guard will help prevent needle stick injuries to anyone who handles the prefilled syringe.
- •
- Do not remove the needle cover from the prefilled syringe until you are ready to inject.
- •
- Do not use the NIVESTYM prefilled syringe if the needle cover is missing.
- •
- Do not use the prefilled syringe if the carton is open or damaged.
- •
- Do not use a prefilled syringe if it has been dropped on a hard surface. The prefilled syringe may be broken even if you cannot see the break. Use a new prefilled syringe.
Call your healthcare provider if you have any questions.
About the NIVESTYM prefilled syringe | |
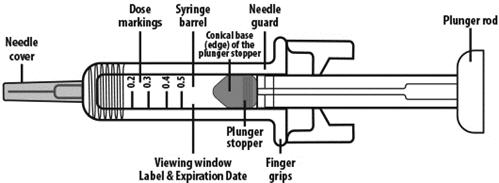
NIVESTYM prefilled syringe parts (see Figure A). NIVESTYM 300 mcg/0.5 mL prefilled syringe is shown as an example. | |
Figure A | |
What you need for your injection | |
Included in the carton:
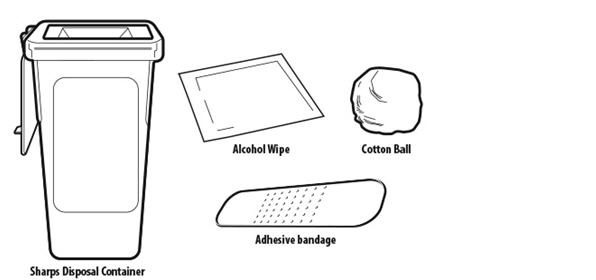
Not included in the carton (see Figure B)
| |
Figure B | |
Preparing the NIVESTYM prefilled syringe | |
Step 1: | Find a clean, well-lit flat work surface. |
Step 2: | Take the carton containing the NIVESTYM prefilled syringe out of the refrigerator and leave it unopened on your work surface for at least 30 minutes so that it reaches room temperature. Put the original carton with any unused prefilled syringes back in the refrigerator.
|
Step 3: | Wash your hands with soap and water. |
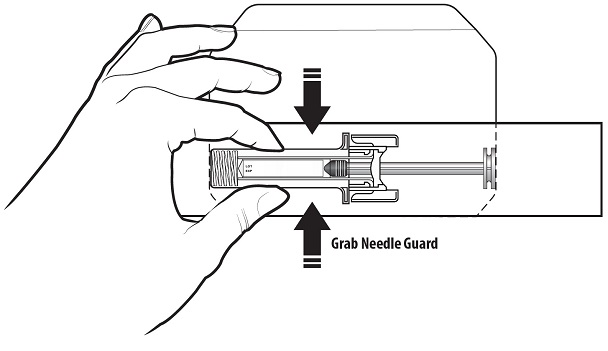
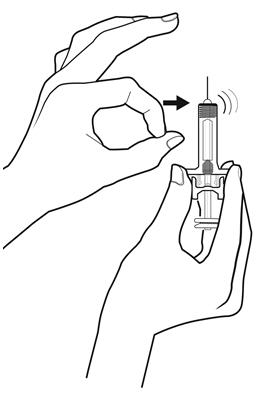
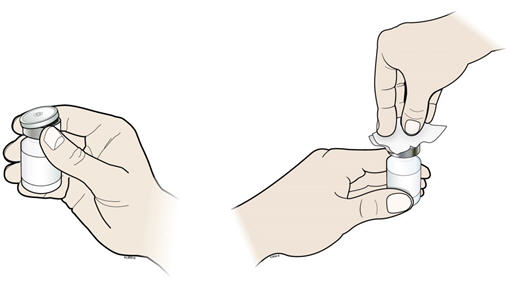
Step 4: | Remove the prefilled syringe from the carton by the needle guard only. Do not remove the prefilled syringe by its plunger or needle cover. See Figure C. Check to make sure that the needle guard is covering the barrel of the prefilled syringe. |
Figure C | |
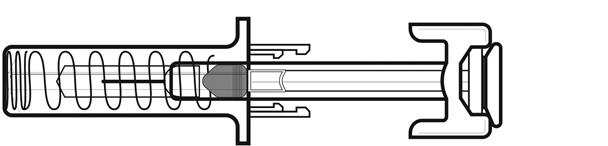
Do not push the needle guard over the needle cover before the injection. This may activate or lock the needle guard. See Figure D that shows a needle guard that has not yet been activated. This is how the prefilled syringe looks before use. | |
Figure D | |
If the needle guard is covering the needle that means it has been activated. See Figure E that shows a needle guard that has been activated. This is how the prefilled syringe looks after use. Do not use the NIVESTYM prefilled syringe. Get another prefilled syringe that has not been activated and is ready to use. | |
Figure E | |
Step 5: | Check the expiration date on the NIVESTYM prefilled syringe. Do not use the NIVESTYM prefilled syringe if the expiration date has passed. |
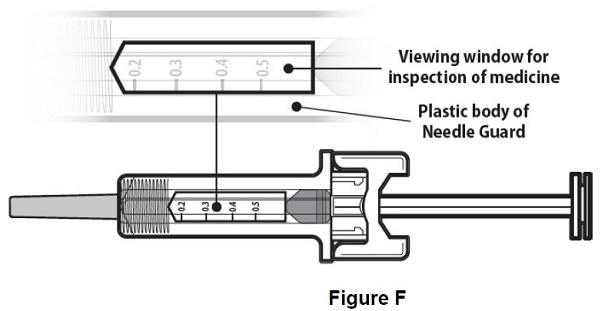
Step 6: | Inspect the medicine and prefilled syringe. Turn the prefilled syringe so you can see the medicine and markings in the window. Make sure that you look at the medicine only through the viewing window on the prefilled syringe (see Figure F). Do not inspect the medicine through the plastic of the needle guard. Make sure the medicine in the prefilled syringe is clear and colorless. |
Figure F | |
| |
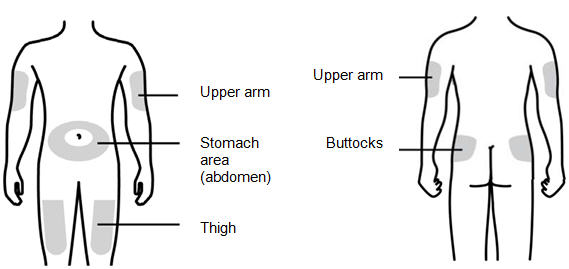
Step 7: | Choose the injection site
|
Figure G | |
| |
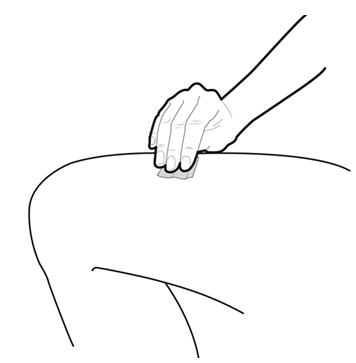
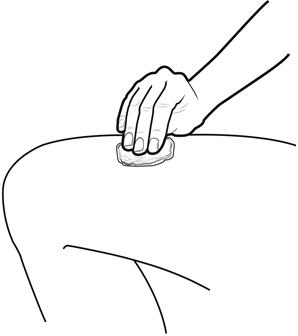
Step 8: | Clean your injection site with an alcohol wipe. See Figure H.
|
Figure H | |
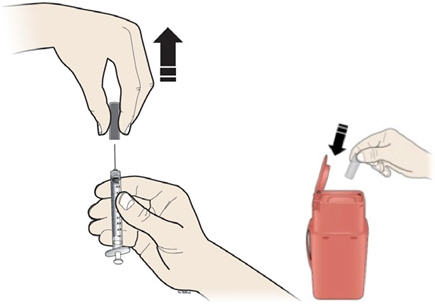
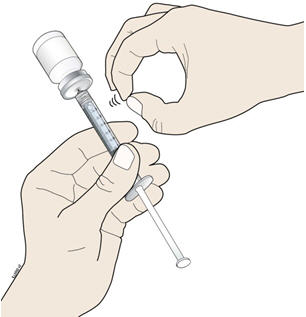
Step 9: | Hold the prefilled syringe by the needle guard with the needle cover pointing up. Carefully pull the needle cover straight off and away from your body. Throw away the needle cover. Do not recap the needle. See Figure I. |
Figure I | |
Your healthcare provider has prescribed either a "full" syringe dose or a "partial" syringe dose.
| |
Partial dosing | |
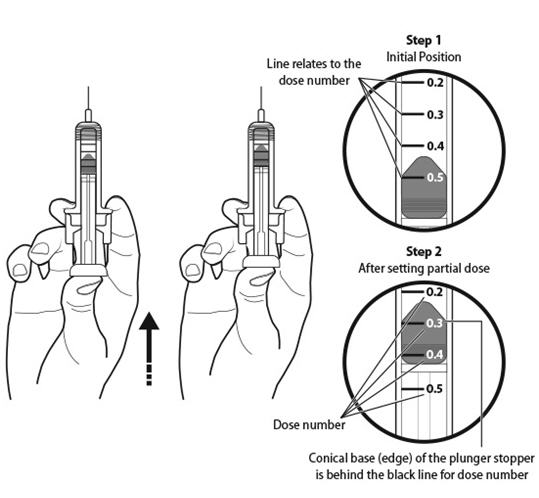
Step 10: | Point the needle up and tap gently until the air rises to the top. See Figure J. |
Figure J | |
Step 11: | Holding the prefilled syringe as shown, slowly push up on the plunger rod to push out the extra air and medicine until the end of the conical base (edge) of the plunger stopper lines up with the syringe marking for your prescribed dose. See Figure K for an example of a dose of 0.3 mL. Your dose may be different than the example shown. |
Figure K | |
Giving the NIVESTYM prefilled syringe injection | |
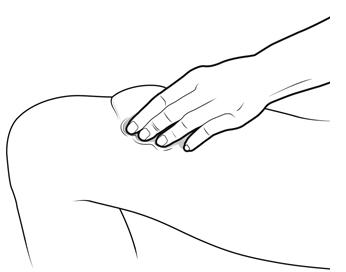
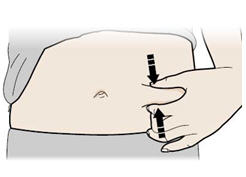
Step 12: | With one hand, gently pinch a fold of skin at the injection site. Hold the pinch. See Figure L. |
Figure L | |
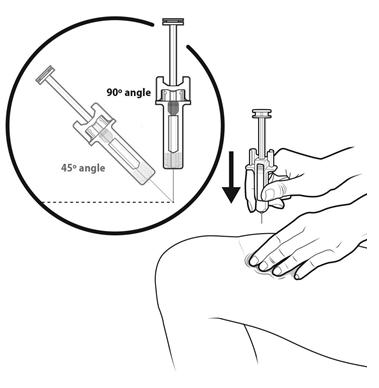
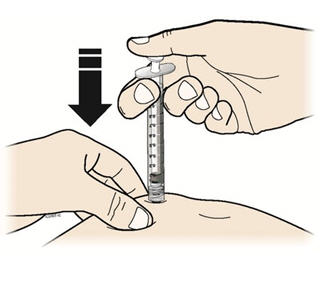
Step 13: | With your other hand, hold the prefilled syringe like you would hold a pencil. Use a quick "dart-like" motion to insert the needle at a 45 to 90 degree angle into the skin as shown. See Figure M. |
Figure M | |
Step 14: | Using slow and constant pressure, press down on the plunger rod until it reaches the bottom. See Figure N. |
Figure N | |
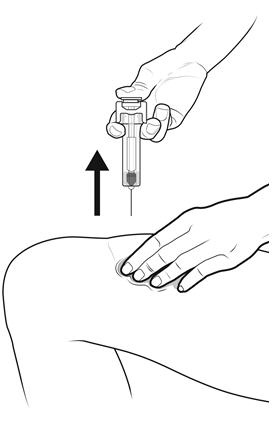
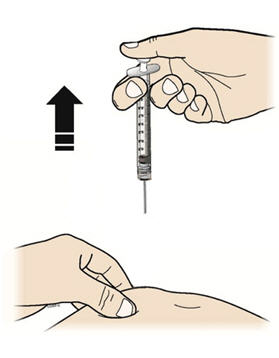
Step 15: | Keep the plunger rod fully pressed down while you carefully pull the needle straight out from the injection site. See Figure O. |
Figure O | |
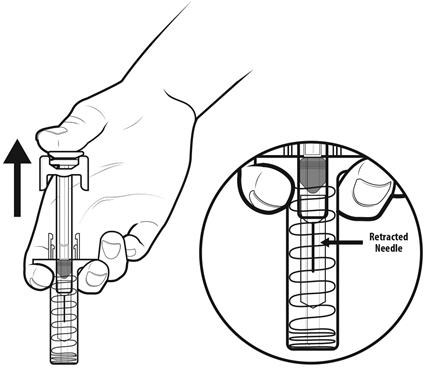
Step 16: | As you let go of the plunger rod, the needle guard will automatically slide over the needle until the needle is completely covered and the needle guard locks into place. Do not recap the needle. See Figure P. |
Figure P | |
Step 17: | There may be a small amount of blood at the injection site. You can press a cotton ball or gauze over the injection site and hold it for 10 seconds. Do not rub the injection site. You may cover the injection site with a small adhesive bandage, if needed. See Figure Q. |
Figure Q | |
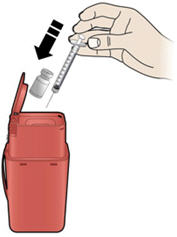
Step 18: | Throw away (dispose of) the syringe as instructed by your healthcare provider or by following the instructions below. See Figure R. |
Figure R | |
Disposing of (throw away) used NIVESTYM prefilled syringes | |

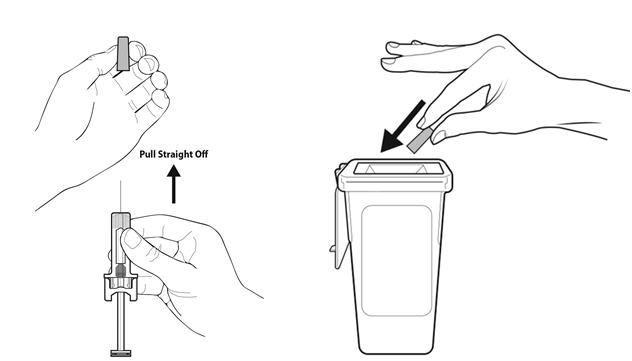


- •
- Put the used prefilled syringe in a FDA-cleared sharps disposal container right away after use. Do not throw away (dispose of) prefilled syringes in your household trash.
- •
- If you do not have a FDA-cleared sharps disposal container, you may use a household container that is:
- o
- made of a heavy-duty plastic,
- o
- can be closed with a tight-fitting, puncture-resistant lid, without sharps being able to come out,
- o
- upright and stable during use,
- o
- leak-resistant, and
- o
- properly labeled to warn of hazardous waste inside the container.
- •
- When your sharps disposal container is almost full, you will need to follow your community guidelines for the right way to dispose of your sharps disposal container. There may be state or local laws about how you should throw away used needles and syringes. For more information about safe sharps disposal, and for specific information about sharps disposal in the state that you live in, go to the FDA's website at: http://www.fda.gov/safesharpsdisposal.
- •
- Do not dispose of your used sharps container in your household trash unless your community guidelines permit this. Do not recycle your used sharps disposal container.
This Instructions for Use has been approved by the U.S. Food and Drug Administration.
Manufactured by:
Hospira, Inc.,
a Pfizer Company
Lake Forest, IL 60045 USA
US License No. 1974
Distributed by Pfizer Labs,
division of Pfizer Inc.,
New York, NY 10001 USA

LAB-0938-6.0
For more information go to www.pfizer.com or call 1-800-438-1985.
Revised: February 2024
Instructions for Use
NIVESTYM (Neye-ves-tim)
(filgrastim-aafi)
injection
Single-Dose Vial
Important
Read the Patient Information for important information you need to know about NIVESTYM before using these Instructions for Use.
Before you use a NIVESTYM vial, read this important information:
Storing your NIVESTYM vial
- •
- Store the vial in the refrigerator between 36˚F to 46˚F (2˚C to 8˚C).
- •
- Do not freeze.
- •
- Keep the vial in the original carton to protect from light or physical damage.
- •
- Take the vial out of the refrigerator 30 minutes before use and allow it to reach room temperature before preparing an injection.
- •
- Throw away (dispose of) any vial that has been left at room temperature for longer than 24 hours.
- •
- After you inject your dose, throw away (dispose of) any unused NIVESTYM left in the vial. Do not save unused NIVESTYM in the vial for later use.
Keep NIVESTYM and all medicines out of the reach of children.
Using your vial
- •
- It is important that you do not try to give the injection unless you or your caregiver has received training from your healthcare provider.
- •
- Make sure the name NIVESTYM appears on the carton and vial label.
- •
- Only use the vial 1 time. Discard (throw away) the vial with any remaining NIVESTYM liquid.
- •
- Do not use a vial after the expiration date on the label.
- •
- Do not shake the vial.
- •
- Do not use the vial if the medicine is cloudy or discolored or contains flakes or particles.
Call your healthcare provider if you have any questions.
Step 1: Prepare
- A.
- Remove the vial from the refrigerator.
Find a clean, well-lit, flat work surface. Place the vial on your clean work surface for 30 minutes and allow it to reach room temperature before you give an injection.- •
- Do not try to warm the vial by using a heat source such as hot water or microwave.
- •
- Do not leave the vial in direct sunlight.
- •
- Do not shake the vial.
- •
- Use the vial only 1 time.
- B.
- Inspect the vial.
Make sure the medicine in the vial is clear and colorless.- •
- Do not use the vial if:
- o
- The medicine is cloudy or discolored or contains flakes or particles.
- o
- The expiration date printed on the label has passed.
- •
- In all cases, use a new vial and call your healthcare provider.
- C.
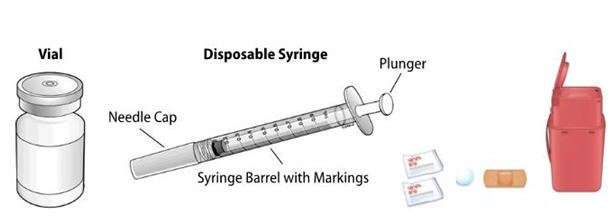
- Gather all materials needed for your injection.
Wash your hands thoroughly with soap and water. On your clean, well-lit, flat work surface, place:- •
- 1 Vial
- •
- 1 Disposable syringe and needle
- •
- 2 Alcohol wipes
- •
- 1 Cotton ball or gauze pad
- •
- 1 Adhesive bandage
- •
- Sharps disposal container
- •
- Only use the disposable syringes and needles that your healthcare provider prescribes.
- •
- Only use the syringes and needles 1 time. Throw away (dispose of) any used syringes and needles. See Step 5 Finish, for instructions about how to properly dispose of used syringes and needles.
- •
- You should only use a syringe that is marked in tenths of milliliters (mL).
- •
- Your healthcare provider will show you how to measure the correct dose of NIVESTYM. This dose will be measured in milliliters (mL).
Step 2: Get Ready
- D.
- Take the cap off the vial. Clean the rubber stopper with 1 alcohol wipe.
- E.
- Check the carton containing the needle and syringe. If the carton has been opened or damaged, do not use that needle and syringe. Dispose of (throw away) that needle and syringe in the sharps disposal container.
- F.
- Hold the syringe by the barrel with the needle cap pointing up. Carefully pull the needle cap straight off and away from your body.
Pull back on the plunger and draw air into the syringe that is the same amount (mL) as the dose of NIVESTYM that your healthcare provider prescribed.
Important: Throw away the needle cap into the sharps disposal container. Do not recap the needle.- G.
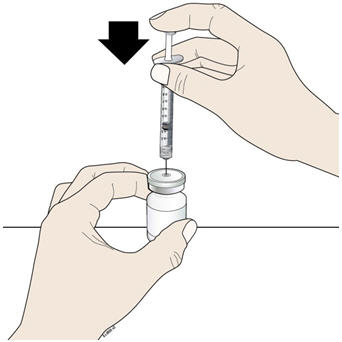
- Keep the vial on the flat work surface and insert the needle straight down through the rubber stopper. Do not insert the needle through the rubber stopper more than 1 time.
- H.
- Push the plunger down and inject all the air from the syringe into the vial of NIVESTYM.
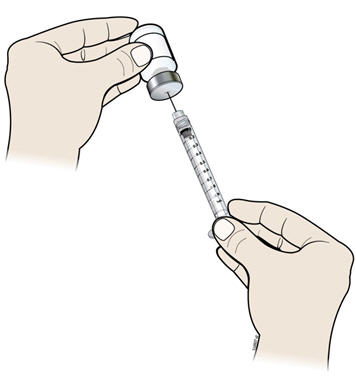
- I.
- Keep the needle in the vial and turn the vial upside down. Make sure that the NIVESTYM liquid is covering the tip of the needle.
- J.
- Keep the vial upside down and slowly pull back on the plunger to fill the syringe barrel with NIVESTYM to the correct marking amount (mL) of medicine that matches the dose your healthcare provider prescribed.
- K.
- Keep the needle in the vial and check for air bubbles in the syringe. If there are air bubbles, gently tap the syringe barrel with your finger until the air bubbles rise to the top. Slowly push the plunger up to push the air bubbles out of the syringe.
- L.
- Keep the tip of the needle in the liquid and again pull the plunger back to the number on the syringe barrel that matches your dose. Check again for air bubbles. The air in the syringe will not hurt you, but too large an air bubble can reduce your dose of NIVESTYM. If there are still air bubbles, repeat the steps above to remove them.
- M.
- Check again to make sure that you have the correct dose in the syringe. It is important that you use the exact dose prescribed by your healthcare provider. Do not remove the needle from the vial. Lay the vial down on its side with the needle still in the vial.
Step 3: Select and Prepare the Injection Site
- N.
- Prepare and clean your injection site.
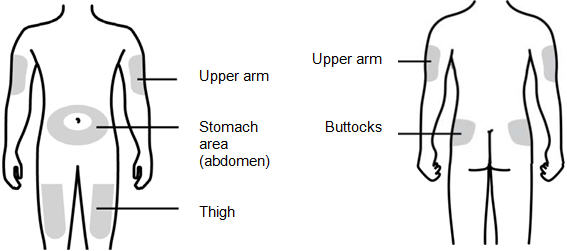
You can use:
- •
- Thigh
- •
- Stomach area (abdomen), except for a 2-inch area right around your navel (belly button)
- •
- Upper outer area of your buttocks (only if someone else is giving you the injection)
- •
- Outer area of upper arm (only if someone else is giving you the injection)
Clean your injection site with a clean alcohol wipe.
Let your skin dry. - •
- Do not touch this area again before injecting.
- •
- If you want to use the same injection site, make sure it is not the same spot on the injection site area you used for a previous injection.
- •
- Do not inject into areas where the skin is tender, bruised, red, or hard. Avoid injecting into areas with scars or stretch marks.
Step 4: Subcutaneous (under the skin) injection
- O.
- Remove the prepared syringe and needle from the vial.
- P.
- Pinch your injection site to create a firm surface.
Important: Keep skin pinched while injecting. - Q.
- Hold the pinch. Insert the needle into the skin at a 45 to 90 degree angle.
- R.
- Using slow and constant pressure, push the plunger until it reaches the bottom.
When done gently pull the needle out of the injection site at the same 45 to 90 degree angle used to insert it.
- S.
- Dispose of (throw away) the used needle and syringe.
- •
- Put your used needles and syringes in a FDA-cleared sharps disposal container right away after use. Do not throw away (dispose of) loose needles, and syringes in your household trash.
- •
- If you do not have a FDA-cleared sharps disposal container, you may use a household container that is:
- o
- made of a heavy-duty plastic,
- o
- can be closed with a tight-fitting, puncture-resistant lid, without sharps being able to come out,
- o
- upright and stable during use,
- o
- leak-resistant, and
- o
- properly labeled to warn of hazardous waste inside the container.
- •
- When your sharps disposal container is almost full, you will need to follow your community guidelines for the right way to dispose of your sharps disposal container. There may be state or local laws about how you should throw away used needles and syringes. For more information about safe sharps disposal, and for specific information about sharps disposal in the state that you live in, go to the FDA's website at: http://www.fda.gov/safesharpsdisposal.
- •
- Do not dispose of your used sharps disposal container in your household trash unless your community guidelines permit this. Do not recycle your used sharps disposal container.
- T.
- Examine the injection site.
If there is blood, press a cotton ball or gauze pad on your injection site. Do not rub the injection site. Apply an adhesive bandage if needed.
This Instructions for Use has been approved by the U.S. Food and Drug Administration.
Manufactured by:
Hospira, Inc.,
a Pfizer Company
Lake Forest, IL 60045 USA
US License No. 1974
Distributed by Pfizer Labs,
division of Pfizer Inc.,
New York, NY 10001 USA

LAB-0937-5.0
For more information go to www.pfizer.com or call 1-800-438-1985.
Revised: August 2023
Find NIVESTYM™ medical information:
Find NIVESTYM™ medical information:
NIVESTYM™ Quick Finder
Health Professional Information
Instructions For Use
Instructions for Use
NIVESTYM (Neye-ves-tim)
(filgrastim-aafi)
injection
Single-Dose Prefilled Syringe
Important
Read the Patient Information for important information you need to know about NIVESTYM before using this Instructions for Use.
Before you use a NIVESTYM prefilled syringe, read this important information.
Storing your prefilled syringe |
- •
- Store the NIVESTYM prefilled syringe in the refrigerator between 36˚F to 46˚F (2˚C to 8˚C).
- •
- Do not freeze.
- •
- Keep the NIVESTYM prefilled syringe in the original carton to protect from light or physical damage.
- •
- Take the prefilled syringe out of the refrigerator 30 minutes before use and allow it to reach room temperature before preparing an injection.
- •
- The NIVESTYM prefilled syringe may be allowed to reach room temperature for up to 24 hours. Throw away (dispose of) any NIVESTYM prefilled syringe that has been left at room temperature for longer than 24 hours.
- •
- After you inject your dose, throw away (dispose of) any unused NIVESTYM left in the prefilled syringe. Do not save unused NIVESTYM in the prefilled syringe for later use.
- •
- Keep NIVESTYM and all medicines out of the reach of children.
Using your prefilled syringe |
- •
- It is important that you do not try to give the injection unless you or your caregiver has received training from your healthcare provider.
- •
- You should not inject a dose of NIVESTYM less than 0.3 mL (180 mcg) from a NIVESTYM prefilled syringe. A dose less than 0.3 mL cannot be accurately measured using the NIVESTYM prefilled syringe.
- •
- Make sure the name NIVESTYM appears on the carton and prefilled syringe label.
- •
- Do not use a NIVESTYM prefilled syringe after the expiration date on the label.
- •
- Do not shake the NIVESTYM prefilled syringe.
- •
- The prefilled syringe has a needle guard that needs to be activated to cover the needle after the injection is given. The needle guard will help prevent needle stick injuries to anyone who handles the prefilled syringe.
- •
- Do not remove the needle cover from the prefilled syringe until you are ready to inject.
- •
- Do not use the NIVESTYM prefilled syringe if the needle cover is missing.
- •
- Do not use the prefilled syringe if the carton is open or damaged.
- •
- Do not use a prefilled syringe if it has been dropped on a hard surface. The prefilled syringe may be broken even if you cannot see the break. Use a new prefilled syringe.
Call your healthcare provider if you have any questions.
About the NIVESTYM prefilled syringe | |
NIVESTYM prefilled syringe parts (see Figure A). NIVESTYM 300 mcg/0.5 mL prefilled syringe is shown as an example. | |
Figure A | |
What you need for your injection | |
Included in the carton:
Not included in the carton (see Figure B)
| |
Figure B | |
Preparing the NIVESTYM prefilled syringe | |
Step 1: | Find a clean, well-lit flat work surface. |
Step 2: | Take the carton containing the NIVESTYM prefilled syringe out of the refrigerator and leave it unopened on your work surface for at least 30 minutes so that it reaches room temperature. Put the original carton with any unused prefilled syringes back in the refrigerator.
|
Step 3: | Wash your hands with soap and water. |
Step 4: | Remove the prefilled syringe from the carton by the needle guard only. Do not remove the prefilled syringe by its plunger or needle cover. See Figure C. Check to make sure that the needle guard is covering the barrel of the prefilled syringe. |
Figure C | |
Do not push the needle guard over the needle cover before the injection. This may activate or lock the needle guard. See Figure D that shows a needle guard that has not yet been activated. This is how the prefilled syringe looks before use. | |
Figure D | |
If the needle guard is covering the needle that means it has been activated. See Figure E that shows a needle guard that has been activated. This is how the prefilled syringe looks after use. Do not use the NIVESTYM prefilled syringe. Get another prefilled syringe that has not been activated and is ready to use. | |
Figure E | |
Step 5: | Check the expiration date on the NIVESTYM prefilled syringe. Do not use the NIVESTYM prefilled syringe if the expiration date has passed. |
Step 6: | Inspect the medicine and prefilled syringe. Turn the prefilled syringe so you can see the medicine and markings in the window. Make sure that you look at the medicine only through the viewing window on the prefilled syringe (see Figure F). Do not inspect the medicine through the plastic of the needle guard. Make sure the medicine in the prefilled syringe is clear and colorless. |
Figure F | |
| |
Step 7: | Choose the injection site
|
Figure G | |
| |
Step 8: | Clean your injection site with an alcohol wipe. See Figure H.
|
Figure H | |
Step 9: | Hold the prefilled syringe by the needle guard with the needle cover pointing up. Carefully pull the needle cover straight off and away from your body. Throw away the needle cover. Do not recap the needle. See Figure I. |
Figure I | |
Your healthcare provider has prescribed either a "full" syringe dose or a "partial" syringe dose.
| |
Partial dosing | |
Step 10: | Point the needle up and tap gently until the air rises to the top. See Figure J. |
Figure J | |
Step 11: | Holding the prefilled syringe as shown, slowly push up on the plunger rod to push out the extra air and medicine until the end of the conical base (edge) of the plunger stopper lines up with the syringe marking for your prescribed dose. See Figure K for an example of a dose of 0.3 mL. Your dose may be different than the example shown. |
Figure K | |
Giving the NIVESTYM prefilled syringe injection | |
Step 12: | With one hand, gently pinch a fold of skin at the injection site. Hold the pinch. See Figure L. |
Figure L | |
Step 13: | With your other hand, hold the prefilled syringe like you would hold a pencil. Use a quick "dart-like" motion to insert the needle at a 45 to 90 degree angle into the skin as shown. See Figure M. |
Figure M | |
Step 14: | Using slow and constant pressure, press down on the plunger rod until it reaches the bottom. See Figure N. |
Figure N | |
Step 15: | Keep the plunger rod fully pressed down while you carefully pull the needle straight out from the injection site. See Figure O. |
Figure O | |
Step 16: | As you let go of the plunger rod, the needle guard will automatically slide over the needle until the needle is completely covered and the needle guard locks into place. Do not recap the needle. See Figure P. |
Figure P | |
Step 17: | There may be a small amount of blood at the injection site. You can press a cotton ball or gauze over the injection site and hold it for 10 seconds. Do not rub the injection site. You may cover the injection site with a small adhesive bandage, if needed. See Figure Q. |
Figure Q | |
Step 18: | Throw away (dispose of) the syringe as instructed by your healthcare provider or by following the instructions below. See Figure R. |
Figure R | |
Disposing of (throw away) used NIVESTYM prefilled syringes | |
- •
- Put the used prefilled syringe in a FDA-cleared sharps disposal container right away after use. Do not throw away (dispose of) prefilled syringes in your household trash.
- •
- If you do not have a FDA-cleared sharps disposal container, you may use a household container that is:
- o
- made of a heavy-duty plastic,
- o
- can be closed with a tight-fitting, puncture-resistant lid, without sharps being able to come out,
- o
- upright and stable during use,
- o
- leak-resistant, and
- o
- properly labeled to warn of hazardous waste inside the container.
- •
- When your sharps disposal container is almost full, you will need to follow your community guidelines for the right way to dispose of your sharps disposal container. There may be state or local laws about how you should throw away used needles and syringes. For more information about safe sharps disposal, and for specific information about sharps disposal in the state that you live in, go to the FDA's website at: http://www.fda.gov/safesharpsdisposal.
- •
- Do not dispose of your used sharps container in your household trash unless your community guidelines permit this. Do not recycle your used sharps disposal container.
This Instructions for Use has been approved by the U.S. Food and Drug Administration.
Manufactured by:
Hospira, Inc.,
a Pfizer Company
Lake Forest, IL 60045 USA
US License No. 1974
Distributed by Pfizer Labs,
division of Pfizer Inc.,
New York, NY 10001 USA
LAB-0938-6.0
For more information go to www.pfizer.com or call 1-800-438-1985.
Revised: February 2024
Instructions for Use
NIVESTYM (Neye-ves-tim)
(filgrastim-aafi)
injection
Single-Dose Vial
Important
Read the Patient Information for important information you need to know about NIVESTYM before using these Instructions for Use.
Before you use a NIVESTYM vial, read this important information:
Storing your NIVESTYM vial
- •
- Store the vial in the refrigerator between 36˚F to 46˚F (2˚C to 8˚C).
- •
- Do not freeze.
- •
- Keep the vial in the original carton to protect from light or physical damage.
- •
- Take the vial out of the refrigerator 30 minutes before use and allow it to reach room temperature before preparing an injection.
- •
- Throw away (dispose of) any vial that has been left at room temperature for longer than 24 hours.
- •
- After you inject your dose, throw away (dispose of) any unused NIVESTYM left in the vial. Do not save unused NIVESTYM in the vial for later use.
Keep NIVESTYM and all medicines out of the reach of children.
Using your vial
- •
- It is important that you do not try to give the injection unless you or your caregiver has received training from your healthcare provider.
- •
- Make sure the name NIVESTYM appears on the carton and vial label.
- •
- Only use the vial 1 time. Discard (throw away) the vial with any remaining NIVESTYM liquid.
- •
- Do not use a vial after the expiration date on the label.
- •
- Do not shake the vial.
- •
- Do not use the vial if the medicine is cloudy or discolored or contains flakes or particles.
Call your healthcare provider if you have any questions.
Step 1: Prepare
- A.
- Remove the vial from the refrigerator.
Find a clean, well-lit, flat work surface. Place the vial on your clean work surface for 30 minutes and allow it to reach room temperature before you give an injection.- •
- Do not try to warm the vial by using a heat source such as hot water or microwave.
- •
- Do not leave the vial in direct sunlight.
- •
- Do not shake the vial.
- •
- Use the vial only 1 time.
- B.
- Inspect the vial.
Make sure the medicine in the vial is clear and colorless.- •
- Do not use the vial if:
- o
- The medicine is cloudy or discolored or contains flakes or particles.
- o
- The expiration date printed on the label has passed.
- •
- In all cases, use a new vial and call your healthcare provider.
- C.
- Gather all materials needed for your injection.
Wash your hands thoroughly with soap and water. On your clean, well-lit, flat work surface, place:- •
- 1 Vial
- •
- 1 Disposable syringe and needle
- •
- 2 Alcohol wipes
- •
- 1 Cotton ball or gauze pad
- •
- 1 Adhesive bandage
- •
- Sharps disposal container
- •
- Only use the disposable syringes and needles that your healthcare provider prescribes.
- •
- Only use the syringes and needles 1 time. Throw away (dispose of) any used syringes and needles. See Step 5 Finish, for instructions about how to properly dispose of used syringes and needles.
- •
- You should only use a syringe that is marked in tenths of milliliters (mL).
- •
- Your healthcare provider will show you how to measure the correct dose of NIVESTYM. This dose will be measured in milliliters (mL).
Step 2: Get Ready
- D.
- Take the cap off the vial. Clean the rubber stopper with 1 alcohol wipe.
- E.
- Check the carton containing the needle and syringe. If the carton has been opened or damaged, do not use that needle and syringe. Dispose of (throw away) that needle and syringe in the sharps disposal container.
- F.
- Hold the syringe by the barrel with the needle cap pointing up. Carefully pull the needle cap straight off and away from your body.
Pull back on the plunger and draw air into the syringe that is the same amount (mL) as the dose of NIVESTYM that your healthcare provider prescribed.
Important: Throw away the needle cap into the sharps disposal container. Do not recap the needle.- G.
- Keep the vial on the flat work surface and insert the needle straight down through the rubber stopper. Do not insert the needle through the rubber stopper more than 1 time.
- H.
- Push the plunger down and inject all the air from the syringe into the vial of NIVESTYM.
- I.
- Keep the needle in the vial and turn the vial upside down. Make sure that the NIVESTYM liquid is covering the tip of the needle.
- J.
- Keep the vial upside down and slowly pull back on the plunger to fill the syringe barrel with NIVESTYM to the correct marking amount (mL) of medicine that matches the dose your healthcare provider prescribed.
- K.
- Keep the needle in the vial and check for air bubbles in the syringe. If there are air bubbles, gently tap the syringe barrel with your finger until the air bubbles rise to the top. Slowly push the plunger up to push the air bubbles out of the syringe.
- L.
- Keep the tip of the needle in the liquid and again pull the plunger back to the number on the syringe barrel that matches your dose. Check again for air bubbles. The air in the syringe will not hurt you, but too large an air bubble can reduce your dose of NIVESTYM. If there are still air bubbles, repeat the steps above to remove them.
- M.
- Check again to make sure that you have the correct dose in the syringe. It is important that you use the exact dose prescribed by your healthcare provider. Do not remove the needle from the vial. Lay the vial down on its side with the needle still in the vial.
Step 3: Select and Prepare the Injection Site
- N.
- Prepare and clean your injection site.
You can use:
- •
- Thigh
- •
- Stomach area (abdomen), except for a 2-inch area right around your navel (belly button)
- •
- Upper outer area of your buttocks (only if someone else is giving you the injection)
- •
- Outer area of upper arm (only if someone else is giving you the injection)
Clean your injection site with a clean alcohol wipe.
Let your skin dry. - •
- Do not touch this area again before injecting.
- •
- If you want to use the same injection site, make sure it is not the same spot on the injection site area you used for a previous injection.
- •
- Do not inject into areas where the skin is tender, bruised, red, or hard. Avoid injecting into areas with scars or stretch marks.
Step 4: Subcutaneous (under the skin) injection
- O.
- Remove the prepared syringe and needle from the vial.
- P.
- Pinch your injection site to create a firm surface.
Important: Keep skin pinched while injecting. - Q.
- Hold the pinch. Insert the needle into the skin at a 45 to 90 degree angle.
- R.
- Using slow and constant pressure, push the plunger until it reaches the bottom.
When done gently pull the needle out of the injection site at the same 45 to 90 degree angle used to insert it.
- S.
- Dispose of (throw away) the used needle and syringe.
- •
- Put your used needles and syringes in a FDA-cleared sharps disposal container right away after use. Do not throw away (dispose of) loose needles, and syringes in your household trash.
- •
- If you do not have a FDA-cleared sharps disposal container, you may use a household container that is:
- o
- made of a heavy-duty plastic,
- o
- can be closed with a tight-fitting, puncture-resistant lid, without sharps being able to come out,
- o
- upright and stable during use,
- o
- leak-resistant, and
- o
- properly labeled to warn of hazardous waste inside the container.
- •
- When your sharps disposal container is almost full, you will need to follow your community guidelines for the right way to dispose of your sharps disposal container. There may be state or local laws about how you should throw away used needles and syringes. For more information about safe sharps disposal, and for specific information about sharps disposal in the state that you live in, go to the FDA's website at: http://www.fda.gov/safesharpsdisposal.
- •
- Do not dispose of your used sharps disposal container in your household trash unless your community guidelines permit this. Do not recycle your used sharps disposal container.
- T.
- Examine the injection site.
If there is blood, press a cotton ball or gauze pad on your injection site. Do not rub the injection site. Apply an adhesive bandage if needed.
This Instructions for Use has been approved by the U.S. Food and Drug Administration.
Manufactured by:
Hospira, Inc.,
a Pfizer Company
Lake Forest, IL 60045 USA
US License No. 1974
Distributed by Pfizer Labs,
division of Pfizer Inc.,
New York, NY 10001 USA
LAB-0937-5.0
For more information go to www.pfizer.com or call 1-800-438-1985.
Revised: August 2023
Health Professional Information
{{section_name_patient}}
{{section_body_html_patient}}
Resources
Didn’t find what you were looking for? Contact us.
Chat online with Pfizer Medical Information regarding your inquiry on a Pfizer medicine.
*Speak with a Pfizer Medical Information Professional regarding your medical inquiry. Available 9AM-5Pm ET Monday to Friday; excluding holidays.
Submit a medical question for Pfizer prescription products.
Report Adverse Event
To report an adverse event related to the Pfizer-BioNTech COVID-19 Vaccine, and you are not part of a clinical trial* for this product, click the link below to submit your information:
Pfizer Safety Reporting Site*If you are involved in a clinical trial for this product, adverse events should be reported to your coordinating study site.
If you cannot use the above website, or would like to report an adverse event related to a different Pfizer product, please call Pfizer Safety at (800) 438-1985.
You may also contact the U.S. Food and Drug Administration (FDA) directly to report adverse events or product quality concerns either online at www.fda.gov/medwatch or call (800) 822-7967.