DEPO-SUBQ PROVERA 104® Dosage and Administration
(medroxyprogesterone acetate)
2 DOSAGE AND ADMINISTRATION
2.1 Important Dosage and Administration Instructions
Depo-subQ provera 104 is only for subcutaneous administration and is only to be administered by a healthcare professional.
Use for longer than 2 years is not recommended (unless other birth control methods or medical therapies for endometriosis-associated pain are considered inadequate) due to the impact of long-term depo-subQ provera 104 treatment on bone mineral density (BMD) [see Warnings and Precautions (5.1)].
Prior to the first injection confirm that the patient is not pregnant. For women who are sexually active and who have regular menses, administer the first injection only during the first 5 days of a normal menstrual period. For women who are breast-feeding, administer the first injection during or after the sixth postpartum week.
The recommended dosage of depo-subQ provera 104 is 104 mg given subcutaneously every 12 to 14 weeks. If more than 14 weeks elapse between injections, confirm that the patient is not pregnant before the next injection. Instruct the patient that if they are unable to receive an injection within 12–14 weeks, another contraceptive method should be used until the next depo-subQ provera 104 injection. The dosage does not need to be adjusted for body weight.
Inject the entire contents of the pre-filled syringe using strict aseptic technique into the upper anterior thigh or abdomen, rotating the sites with every injection [see Dosage and Administration (2.3)].
2.2 Switching from Another Method of Contraception
When switching from another contraceptive method to depo-subQ provera 104, administer depo-subQ provera 104 in a manner that ensures continuous contraceptive coverage. Follow the respective recommendations when switching from the contraceptive methods listed below:
- Combined hormonal contraceptives: administer the first injection of depo-subQ provera 104 within 7 days after the last day of using the combined hormonal contraceptive method (i.e., within 7 days after taking the last active pill).
- An implant: administer the first injection of depo-subQ provera 104 on the day of implant removal.
- A contraceptive vaginal ring or transdermal system: administer the first injection of depo-subQ provera 104 on the day the patient would have inserted the next ring or applied the next transdermal system.
- An Intrauterine Device (IUD) or Intrauterine System (IUS): administer the first injection of depo-subQ provera 104 on the day of IUD/IUS removal. If the IUD/IUS is not removed on the first day of the patient's menstrual cycle, instruct patients to use a non-hormonal back-up method of birth control for the first 7 days after administration of depo-subQ provera 104.
- Depot medroxyprogesterone acetate injectable suspension for intramuscular use (DMPA-IM): inject depo-subQ provera 104 12 to 14 weeks after the last dose of DMPA-IM.
2.3 Preparation and Administration Instructions
Prior to injection:
- Ensure all the components in Figure A are available and that depo-subQ provera 104 is at room temperature.
- Shake the pre-filled syringe vigorously prior to injection to ensure appropriate viscosity of the suspension.
- Inspect depo-subQ provera 104 visually for particulate matter and discoloration.
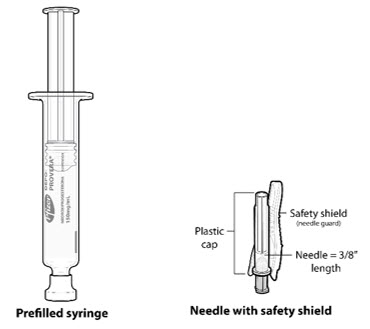
Figure A. Components in the Package
| Step 1: Select & Prepare the Injection Area | |
| Figure B. Preferred injection areas: 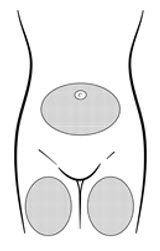 Left or right upper thigh or abdomen |
| Step 2: Prepare Syringe | |
| Figure C.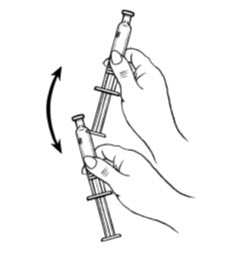 Shake vigorously for 1 minute |
| Figure D. |
| Figure E.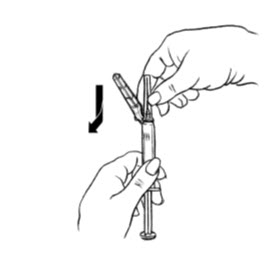 |
| Figure F.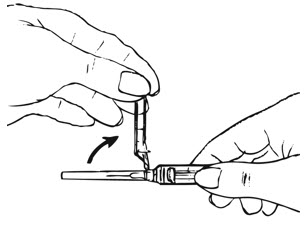 |
| Figure G.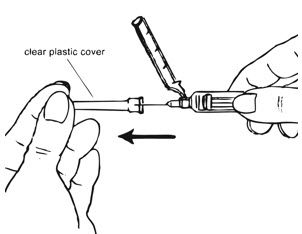 |
| Figure H.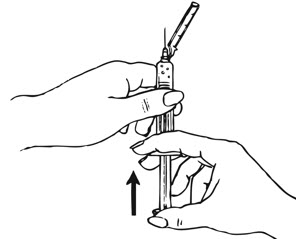 |
| Step 3: Injecting depo-Sub Q provera 104 | |
| Figure I.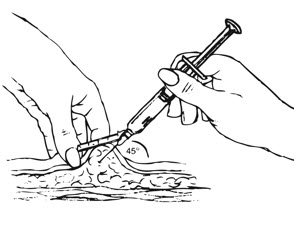 |
Inject slowly until the syringe is empty (Figure J).
| Figure J. Inject slowly (5–7 seconds)  |
| Step 4: Remove the Needle and Activate the Safety Shield | |
| Figure K.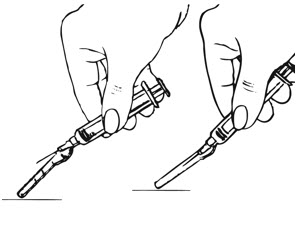 |
| Figure L.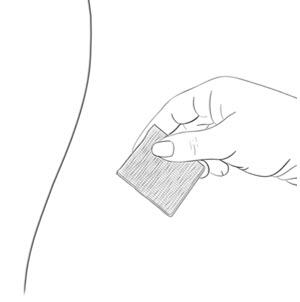 |
Find DEPO-SUBQ PROVERA 104® medical information:
Find DEPO-SUBQ PROVERA 104® medical information:
DEPO-SUBQ PROVERA 104® Quick Finder
Health Professional Information
Dosage and Administration
2 DOSAGE AND ADMINISTRATION
2.1 Important Dosage and Administration Instructions
Depo-subQ provera 104 is only for subcutaneous administration and is only to be administered by a healthcare professional.
Use for longer than 2 years is not recommended (unless other birth control methods or medical therapies for endometriosis-associated pain are considered inadequate) due to the impact of long-term depo-subQ provera 104 treatment on bone mineral density (BMD) [see Warnings and Precautions (5.1)].
Prior to the first injection confirm that the patient is not pregnant. For women who are sexually active and who have regular menses, administer the first injection only during the first 5 days of a normal menstrual period. For women who are breast-feeding, administer the first injection during or after the sixth postpartum week.
The recommended dosage of depo-subQ provera 104 is 104 mg given subcutaneously every 12 to 14 weeks. If more than 14 weeks elapse between injections, confirm that the patient is not pregnant before the next injection. Instruct the patient that if they are unable to receive an injection within 12–14 weeks, another contraceptive method should be used until the next depo-subQ provera 104 injection. The dosage does not need to be adjusted for body weight.
Inject the entire contents of the pre-filled syringe using strict aseptic technique into the upper anterior thigh or abdomen, rotating the sites with every injection [see Dosage and Administration (2.3)].
2.2 Switching from Another Method of Contraception
When switching from another contraceptive method to depo-subQ provera 104, administer depo-subQ provera 104 in a manner that ensures continuous contraceptive coverage. Follow the respective recommendations when switching from the contraceptive methods listed below:
- Combined hormonal contraceptives: administer the first injection of depo-subQ provera 104 within 7 days after the last day of using the combined hormonal contraceptive method (i.e., within 7 days after taking the last active pill).
- An implant: administer the first injection of depo-subQ provera 104 on the day of implant removal.
- A contraceptive vaginal ring or transdermal system: administer the first injection of depo-subQ provera 104 on the day the patient would have inserted the next ring or applied the next transdermal system.
- An Intrauterine Device (IUD) or Intrauterine System (IUS): administer the first injection of depo-subQ provera 104 on the day of IUD/IUS removal. If the IUD/IUS is not removed on the first day of the patient's menstrual cycle, instruct patients to use a non-hormonal back-up method of birth control for the first 7 days after administration of depo-subQ provera 104.
- Depot medroxyprogesterone acetate injectable suspension for intramuscular use (DMPA-IM): inject depo-subQ provera 104 12 to 14 weeks after the last dose of DMPA-IM.
2.3 Preparation and Administration Instructions
Prior to injection:
- Ensure all the components in Figure A are available and that depo-subQ provera 104 is at room temperature.
- Shake the pre-filled syringe vigorously prior to injection to ensure appropriate viscosity of the suspension.
- Inspect depo-subQ provera 104 visually for particulate matter and discoloration.
Figure A. Components in the Package
| Step 1: Select & Prepare the Injection Area | |
| Figure B. Preferred injection areas: Left or right upper thigh or abdomen |
| Step 2: Prepare Syringe | |
| Figure C. Shake vigorously for 1 minute |
| Figure D. |
| Figure E. |
| Figure F. |
| Figure G. |
| Figure H. |
| Step 3: Injecting depo-Sub Q provera 104 | |
| Figure I. |
Inject slowly until the syringe is empty (Figure J).
| Figure J. Inject slowly (5–7 seconds) |
| Step 4: Remove the Needle and Activate the Safety Shield | |
| Figure K. |
| Figure L. |
Health Professional Information
{{section_name_patient}}
{{section_body_html_patient}}
Resources
Didn’t find what you were looking for? Contact us.
Chat online with Pfizer Medical Information regarding your inquiry on a Pfizer medicine.
*Speak with a Pfizer Medical Information Professional regarding your medical inquiry. Available 9AM-5Pm ET Monday to Friday; excluding holidays.
Submit a medical question for Pfizer prescription products.
Report Adverse Event
To report an adverse event related to the Pfizer-BioNTech COVID-19 Vaccine, and you are not part of a clinical trial* for this product, click the link below to submit your information:
Pfizer Safety Reporting Site*If you are involved in a clinical trial for this product, adverse events should be reported to your coordinating study site.
If you cannot use the above website, or would like to report an adverse event related to a different Pfizer product, please call Pfizer Safety at (800) 438-1985.
You may also contact the U.S. Food and Drug Administration (FDA) directly to report adverse events or product quality concerns either online at www.fda.gov/medwatch or call (800) 822-7967.