CAVERJECT® IMPULSE Instructions For Use
(alprostadil)
INSTRUCTIONS FOR USE
CAVERJECT [KAV-er-jeckt]®
(alprostadil)
for injection, for intracavernosal use
Before you use CAVERJECT, your doctor must train you in how to prepare and give the injection properly.
Before using CAVERJECT, talk to your doctor about what to expect when using it, possible side effects, and what to do if side effects occur. Your dose has been selected for your individual needs. Do not change your dose without consulting your doctor. If you are not sure of the volume or dose to be used, talk to your doctor or pharmacist.
Follow these instructions exactly to properly prepare the syringe for use, and to correctly inject a sterile (germ-free) dose of CAVERJECT.
Supplies Needed
The CAVERJECT IMPULSE carton contains two (2) sealed plastic trays, with one dose of Caverject in each tray.
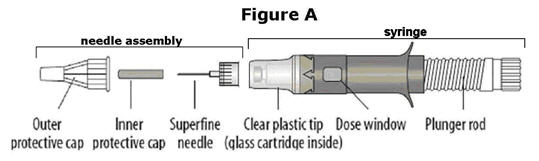
Each tray contains: (a) a syringe, (b) a separate needle assembly and (c) two alcohol swabs. The syringe and the needle assembly are shown in Figure A (below). Please note that the needle assembly is packaged as a single piece and is sealed with a paper cover on the bottom.
DO NOT try to assemble the syringe until you have read ALL of the instructions.
First-read through ALL of the instructions (Step 1 through Step 12) before trying to assemble the syringe. Then go back to Step 1 and begin to prepare the syringe for use.
CAVERJECT IMPULSE is available in two versions: the 10 mcg strength (white plunger) and the 20 mcg strength (blue plunger). Each syringe is designed to be used only one time, but you can select the dose that will be delivered:
- •
- The 10 mcg strength syringe (white plunger) can deliver 10 mcg (the full dose), or one of three partial doses: 7.5 mcg, or 5 mcg, or 2.5 mcg.
- •
- The 20 mcg strength syringe (blue plunger) can deliver 20 mcg (the full dose), or one of three partial doses: 15 mcg, or 10 mcg, or 5 mcg.
If you deliver a partial dose there will be left-over solution in the syringe – this is normal.
MAKE SURE YOU HAVE THE CORRECT STRENGTH OF CAVERJECT IMPULSE to deliver your assigned dose
INSTRUCTIONS for PREPARING the SYRINGE (Step 1 through Step 12)
Wash your hands thoroughly and dry them with a clean towel. | |
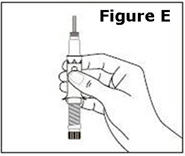
STEP 1. | Open the sealed plastic tray. Remove the syringe, the needle assembly, and the alcohol swabs from the tray. All items should be present. |
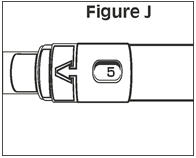
Look at the needle assembly. The needle assembly is a sealed unit that contains the outer protective cap, the inner protective cap, and the superfine needle, as shown in Figure A. It is sealed with a small round paper cover (not shown in Figure A). | |
Do not open the needle assembly at this point – leave it sealed inside the outer protective cap. | |
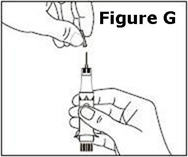
Next, examine the syringe. Find the location of the dose window. Right now you will not see anything in this window, but at a later Step, a number will appear in this window (the dose to be delivered). | |
Finally, look at the Plunger, but do not move it at this time. During the assembly process, some Steps may ask you to ROTATE the plunger and other steps may ask you to PUSH the plunger. | |
It is important to only rotate the plunger – or only push – as directed in each Step, but DO NOT do both at the same time. |
|

 |
|
| |
 |
|
| |
 |
|
| |
 |
|
| |
 |
|
| |
 |
| ||
 |
| ||
|
| ||
 |
|
| |
 |
|
| |
 |
| ||
 |
| ||
 |
| ||
 |
| ||
| |||

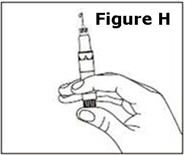
STEP 12. | The syringe is now ready for use. |
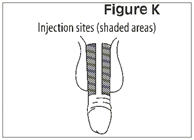
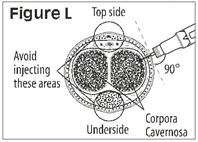
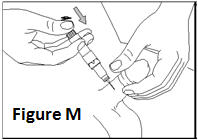
How to give the injection
- •
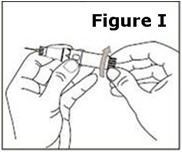
- Make yourself comfortable. Take some time to relax yourself and your partner. If your doctor has recommended you use an alcohol cleansing swab, open one now.
- •
- Make sure that the needle is not bent. If it is, do not use it. Do not attempt to straighten the needle out. Properly discard it.
 |
|
 | |
 |
|
Some liquid will remain in the syringe if you delivered a PARTIAL dose. This is expected. Do not try to inject left-over liquid from a partial dose. Syringes used to inject a partial dose must be discarded since each syringe can only be used one time. Discard syringes with left-over liquid.
- o
- A partial dose is 5 mcg, 10 mcg or 15 mcg for the BLUE plunger syringe.
- o
- A partial dose is 2.5 mcg, 5 mcg, or 7.5 mcg for the WHITE plunger syringe.
Do not keep any solution in the cartridge to use for a second injection. When you have finished with the syringe, discard it carefully as recommended by your doctor, so no one will use it or stick themselves with it.
After your injection:
Dispose of your used CAVERJECT IMPULSE syringes and needle.
- •
- Put your used CAVERJECT IMPULSE syringe and needle in a FDA-cleared sharps disposal container right away after use. Do not throw away (dispose of) loose needles and syringes in your household trash.
- •
- If you do not have a FDA-cleared sharps disposal container, you may use a household container that is:
- o
- made of a heavy-duty plastic
- o
- can be closed with a tight-fitting, puncture-resistant lid, without sharps being able to come out
- o
- upright and stable during use
- o
- leak-resistant
- o
- properly labeled to warn of hazardous waste inside the container
- •
- When your sharps disposal container is almost full, you will need to follow your community guidelines for the right way to dispose of your sharps disposal container. There may be state or local laws about how you should throw away used needles and syringes. Do not reuse or share your needles or syringes with other people. For more information about the safe sharps disposal, and for specific information about sharps disposal in the state that you live in, go to the FDA's website at: http://www.fda.gov/safesharpsdisposal.
- •
- Do not dispose of your used sharps disposal container in your household trash unless your community guidelines permit this. Do not recycle your used sharps disposal container.
How should I store CAVERJECT IMPULSE?
- 1.
- Store unmixed CAVERJECT IMPULSE at room temperature between 68°F to 77°F (20°C to 25°C).
- 2.
- Store mixed CAVERJECT IMPULSE between 36°F to 77°F (2°C to 25°C). Do not freeze.
- 3.
- CAVERJECT IMPULSE should be used within 24 hours after it is mixed.
Keep CAVERJECT IMPULSE and all medicines out of the reach of children.
This Patient Information and Instructions for Use has been approved by the U.S Food and Drug Administration.

LAB-1504-2.0
Revised January 2023
Find CAVERJECT® IMPULSE medical information:
Find CAVERJECT® IMPULSE medical information:
CAVERJECT® IMPULSE Quick Finder
Health Professional Information
Instructions For Use
INSTRUCTIONS FOR USE
CAVERJECT [KAV-er-jeckt]®
(alprostadil)
for injection, for intracavernosal use
Before you use CAVERJECT, your doctor must train you in how to prepare and give the injection properly.
Before using CAVERJECT, talk to your doctor about what to expect when using it, possible side effects, and what to do if side effects occur. Your dose has been selected for your individual needs. Do not change your dose without consulting your doctor. If you are not sure of the volume or dose to be used, talk to your doctor or pharmacist.
Follow these instructions exactly to properly prepare the syringe for use, and to correctly inject a sterile (germ-free) dose of CAVERJECT.
Supplies Needed
The CAVERJECT IMPULSE carton contains two (2) sealed plastic trays, with one dose of Caverject in each tray.
Each tray contains: (a) a syringe, (b) a separate needle assembly and (c) two alcohol swabs. The syringe and the needle assembly are shown in Figure A (below). Please note that the needle assembly is packaged as a single piece and is sealed with a paper cover on the bottom.
DO NOT try to assemble the syringe until you have read ALL of the instructions.
First-read through ALL of the instructions (Step 1 through Step 12) before trying to assemble the syringe. Then go back to Step 1 and begin to prepare the syringe for use.
CAVERJECT IMPULSE is available in two versions: the 10 mcg strength (white plunger) and the 20 mcg strength (blue plunger). Each syringe is designed to be used only one time, but you can select the dose that will be delivered:
- •
- The 10 mcg strength syringe (white plunger) can deliver 10 mcg (the full dose), or one of three partial doses: 7.5 mcg, or 5 mcg, or 2.5 mcg.
- •
- The 20 mcg strength syringe (blue plunger) can deliver 20 mcg (the full dose), or one of three partial doses: 15 mcg, or 10 mcg, or 5 mcg.
If you deliver a partial dose there will be left-over solution in the syringe – this is normal.
MAKE SURE YOU HAVE THE CORRECT STRENGTH OF CAVERJECT IMPULSE to deliver your assigned dose
INSTRUCTIONS for PREPARING the SYRINGE (Step 1 through Step 12)
Wash your hands thoroughly and dry them with a clean towel. | |
STEP 1. | Open the sealed plastic tray. Remove the syringe, the needle assembly, and the alcohol swabs from the tray. All items should be present. |
Look at the needle assembly. The needle assembly is a sealed unit that contains the outer protective cap, the inner protective cap, and the superfine needle, as shown in Figure A. It is sealed with a small round paper cover (not shown in Figure A). | |
Do not open the needle assembly at this point – leave it sealed inside the outer protective cap. | |
Next, examine the syringe. Find the location of the dose window. Right now you will not see anything in this window, but at a later Step, a number will appear in this window (the dose to be delivered). | |
Finally, look at the Plunger, but do not move it at this time. During the assembly process, some Steps may ask you to ROTATE the plunger and other steps may ask you to PUSH the plunger. | |
It is important to only rotate the plunger – or only push – as directed in each Step, but DO NOT do both at the same time. |
|
|
|
| |
|
|
| |
|
|
| |
|
|
| |
|
|
| |
|
| ||
|
| ||
|
| ||
|
|
| |
|
|
| |
|
| ||
|
| ||
|
| ||
|
| ||
| |||
STEP 12. | The syringe is now ready for use. |
How to give the injection
- •
- Make yourself comfortable. Take some time to relax yourself and your partner. If your doctor has recommended you use an alcohol cleansing swab, open one now.
- •
- Make sure that the needle is not bent. If it is, do not use it. Do not attempt to straighten the needle out. Properly discard it.
|
|
| |
|
|
Some liquid will remain in the syringe if you delivered a PARTIAL dose. This is expected. Do not try to inject left-over liquid from a partial dose. Syringes used to inject a partial dose must be discarded since each syringe can only be used one time. Discard syringes with left-over liquid.
- o
- A partial dose is 5 mcg, 10 mcg or 15 mcg for the BLUE plunger syringe.
- o
- A partial dose is 2.5 mcg, 5 mcg, or 7.5 mcg for the WHITE plunger syringe.
Do not keep any solution in the cartridge to use for a second injection. When you have finished with the syringe, discard it carefully as recommended by your doctor, so no one will use it or stick themselves with it.
After your injection:
Dispose of your used CAVERJECT IMPULSE syringes and needle.
- •
- Put your used CAVERJECT IMPULSE syringe and needle in a FDA-cleared sharps disposal container right away after use. Do not throw away (dispose of) loose needles and syringes in your household trash.
- •
- If you do not have a FDA-cleared sharps disposal container, you may use a household container that is:
- o
- made of a heavy-duty plastic
- o
- can be closed with a tight-fitting, puncture-resistant lid, without sharps being able to come out
- o
- upright and stable during use
- o
- leak-resistant
- o
- properly labeled to warn of hazardous waste inside the container
- •
- When your sharps disposal container is almost full, you will need to follow your community guidelines for the right way to dispose of your sharps disposal container. There may be state or local laws about how you should throw away used needles and syringes. Do not reuse or share your needles or syringes with other people. For more information about the safe sharps disposal, and for specific information about sharps disposal in the state that you live in, go to the FDA's website at: http://www.fda.gov/safesharpsdisposal.
- •
- Do not dispose of your used sharps disposal container in your household trash unless your community guidelines permit this. Do not recycle your used sharps disposal container.
How should I store CAVERJECT IMPULSE?
- 1.
- Store unmixed CAVERJECT IMPULSE at room temperature between 68°F to 77°F (20°C to 25°C).
- 2.
- Store mixed CAVERJECT IMPULSE between 36°F to 77°F (2°C to 25°C). Do not freeze.
- 3.
- CAVERJECT IMPULSE should be used within 24 hours after it is mixed.
Keep CAVERJECT IMPULSE and all medicines out of the reach of children.
This Patient Information and Instructions for Use has been approved by the U.S Food and Drug Administration.
LAB-1504-2.0
Revised January 2023
Health Professional Information
{{section_name_patient}}
{{section_body_html_patient}}
Resources
Didn’t find what you were looking for? Contact us.
Chat online with Pfizer Medical Information regarding your inquiry on a Pfizer medicine.
*Speak with a Pfizer Medical Information Professional regarding your medical inquiry. Available 9AM-5Pm ET Monday to Friday; excluding holidays.
Submit a medical question for Pfizer prescription products.
Report Adverse Event
To report an adverse event related to the Pfizer-BioNTech COVID-19 Vaccine, and you are not part of a clinical trial* for this product, click the link below to submit your information:
Pfizer Safety Reporting Site*If you are involved in a clinical trial for this product, adverse events should be reported to your coordinating study site.
If you cannot use the above website, or would like to report an adverse event related to a different Pfizer product, please call Pfizer Safety at (800) 438-1985.
You may also contact the U.S. Food and Drug Administration (FDA) directly to report adverse events or product quality concerns either online at www.fda.gov/medwatch or call (800) 822-7967.