diltiazem hydrochloride for injection Instructions For Use
INSTRUCTIONS FOR USE
To Use Vial in ADD-Vantage Flexible Diluent Container
To Open:
Peel overwrap at corner and remove solution container. Some opacity of the plastic due to moisture absorption during the sterilization process may be observed. This is normal and does not affect the solution quality or safety. The opacity will diminish gradually.
To Assemble Vial and Flexible Diluent Container:
(Use Aseptic Technique)
- Remove the protective covers from the top of the vial and the vial port on the diluent container as follows:
- To remove the breakaway vial cap, swing the pull ring over the top of the vial and pull down far enough to start the opening (SEE FIGURE 1.), then pull straight up to remove the cap. (SEE FIGURE 2.) NOTE: Do not access vial with syringe.
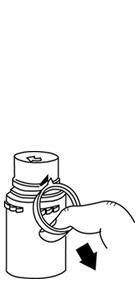
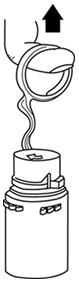
Fig. 1 Fig. 2 - To remove the vial port cover, grasp the tab on the pull ring, pull up to break the tie membrane, then pull back to remove the cover. (SEE FIGURE 3.)
- To remove the breakaway vial cap, swing the pull ring over the top of the vial and pull down far enough to start the opening (SEE FIGURE 1.), then pull straight up to remove the cap. (SEE FIGURE 2.) NOTE: Do not access vial with syringe.
- Screw the vial into the vial port until it will go no further. THE VIAL MUST BE SCREWED IN TIGHTLY TO ASSURE A SEAL. This occurs approximately 1/2 turn (180°) after the first audible click. (SEE FIGURE 4.) The clicking sound does not assure a seal; the vial must be turned as far as it will go.
NOTE: Once vial is seated, do not attempt to remove. (SEE FIGURE 4.) - Recheck the vial to assure that it is tight by trying to turn it further in the direction of assembly.
- Label appropriately.
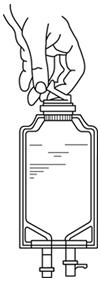
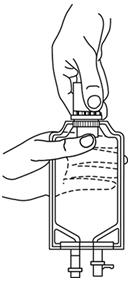
Fig. 3 Fig. 4
To Reconstitute the Drug:
- Squeeze the bottom of the diluent container gently to inflate the portion of the container surrounding the end of the drug vial.
- With the other hand, push the drug vial down into the container telescoping the walls of the container. Grasp the inner cap of the vial through the walls of the container. (SEE FIGURE 5.)
- Pull the inner cap from the drug vial. (SEE FIGURE 6.) Verify that the rubber stopper has been pulled out, allowing the drug and diluent to mix.
- Mix container contents thoroughly and use within the specified time.
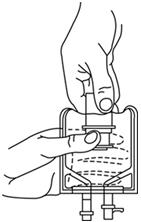
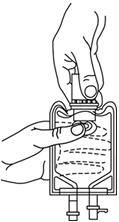
Fig. 5 Fig. 6
Preparation for Administration:
(Use Aseptic Technique)
- Confirm the activation and admixture of vial contents.
- Check for leaks by squeezing container firmly. If leaks are found, discard unit as sterility may be impaired.
- Close flow control clamp of administration set.
- Remove cover from outlet port at bottom of container.
- Insert piercing pin of administration set into port with a twisting motion until the pin is firmly seated. NOTE: See full directions on administration set carton.
- Lift the free end of the hanger loop on the bottom of the vial, breaking the two tie strings. Bend the loop outward to lock it in the upright position, then suspend container from hanger.
- Squeeze and release drip chamber to establish proper fluid level in chamber.
- Open flow control clamp and clear air from set. Close clamp.
- Attach set to venipuncture device. If device is not indwelling, prime and make venipuncture.
- Regulate rate of administration with flow control clamp.
WARNING: Do not use flexible containers in series connections.
Compatibility: Diltiazem hydrochloride injection and diltiazem hydrochloride for injection were tested for compatibility with three commonly used intravenous fluids at a maximal concentration of 1 mg diltiazem hydrochloride per milliliter. Diltiazem hydrochloride injection and diltiazem hydrochloride for injection were found to be physically compatible and chemically stable in the following parenteral solutions for at least 24 hours when stored in glass (diltiazem hydrochloride injection only) or polyvinylchloride (PVC) bags at controlled room temperature 20° to 25°C (68° to 77°F) [see USP] or under refrigeration 2° to 8°C (36° to 46°F).
- dextrose (5%) injection USP
- sodium chloride (0.9%) injection USP
- dextrose (5%) and sodium chloride (0.45%) injection USP
Physical Incompatibilities:
Because of potential physical incompatibilities, it is recommended that diltiazem hydrochloride injection or diltiazem hydrochloride for injection not be mixed with any other drugs in the same container. If possible, it is recommended that diltiazem hydrochloride injection or diltiazem hydrochloride for injection not be co-infused in the same intravenous line. Parenteral drug products should be inspected visually for particulate matter and discoloration prior to administration whenever solution and container permit.
Diltiazem hydrochloride injection. Physical incompatibilities (precipitate formation or cloudiness) were observed when diltiazem hydrochloride injection was infused in the same intravenous line with the following drugs: acetazolamide, acyclovir, aminophylline, ampicillin, ampicillin sodium/sulbactam sodium, cefamandole, cefoperazone, diazepam, furosemide, hydrocortisone sodium succinate, insulin, (regular: 100 units/mL), methylprednisolone sodium succinate, mezlocillin, nafcillin, phenytoin, rifampin, and sodium bicarbonate.
Diltiazem hydrochloride for injection. Physical incompatibilities (precipitate formation or cloudiness) were observed when diltiazem hydrochloride for injection at a concentration of 1 mg/mL diluted in normal saline was infused in the same intravenous line with the following drugs: acetazolamide, acyclovir, cefoperazone sodium, diazepam, furosemide, phenytoin and rifampin.
NOTE: Diltiazem hydrochloride for injection at a concentration of 1 mg/mL diluted in normal saline was infused in the same intravenous line and was found to be compatible with the following drugs: aminophylline, ampicillin sodium, ampicillin sodium/sulbactam sodium, cefamandole, hydrocortisone sodium succinate, regular insulin (100 units/mL), methylprednisolone sodium succinate, mezlocillin sodium, nafcillin sodium and sodium bicarbonate.
Transition to Further Antiarrhythmic Therapy.
Transition to other antiarrhythmic agents following administration of diltiazem hydrochloride injection is generally safe. However, reference should be made to the respective agent manufacturer's package insert for information relative to dosage and administration.
In controlled clinical trials, therapy with antiarrhythmic agents to maintain reduced heart rate in atrial fibrillation or atrial flutter or for prophylaxis of PSVT was generally started within 3 hours after bolus administration of diltiazem hydrochloride injection. These antiarrhythmic agents were intravenous or oral digoxin, Class 1 antiarrhythmics (e.g., quinidine, procainamide), calcium channel blockers, and oral beta-blockers.
Experience in the use of antiarrhythmic agents following maintenance infusion of diltiazem hydrochloride injection is limited. Patients should be dosed on an individual basis and reference should be made to the respective manufacturer's package insert for information relative to dosage and administration.
Find diltiazem hydrochloride for injection medical information:
Find diltiazem hydrochloride for injection medical information:
diltiazem hydrochloride for injection Quick Finder
Health Professional Information
Instructions For Use
INSTRUCTIONS FOR USE
To Use Vial in ADD-Vantage Flexible Diluent Container
To Open:
Peel overwrap at corner and remove solution container. Some opacity of the plastic due to moisture absorption during the sterilization process may be observed. This is normal and does not affect the solution quality or safety. The opacity will diminish gradually.
To Assemble Vial and Flexible Diluent Container:
(Use Aseptic Technique)
- Remove the protective covers from the top of the vial and the vial port on the diluent container as follows:
- To remove the breakaway vial cap, swing the pull ring over the top of the vial and pull down far enough to start the opening (SEE FIGURE 1.), then pull straight up to remove the cap. (SEE FIGURE 2.) NOTE: Do not access vial with syringe.
Fig. 1 Fig. 2 - To remove the vial port cover, grasp the tab on the pull ring, pull up to break the tie membrane, then pull back to remove the cover. (SEE FIGURE 3.)
- To remove the breakaway vial cap, swing the pull ring over the top of the vial and pull down far enough to start the opening (SEE FIGURE 1.), then pull straight up to remove the cap. (SEE FIGURE 2.) NOTE: Do not access vial with syringe.
- Screw the vial into the vial port until it will go no further. THE VIAL MUST BE SCREWED IN TIGHTLY TO ASSURE A SEAL. This occurs approximately 1/2 turn (180°) after the first audible click. (SEE FIGURE 4.) The clicking sound does not assure a seal; the vial must be turned as far as it will go.
NOTE: Once vial is seated, do not attempt to remove. (SEE FIGURE 4.) - Recheck the vial to assure that it is tight by trying to turn it further in the direction of assembly.
- Label appropriately.
Fig. 3 Fig. 4
To Reconstitute the Drug:
- Squeeze the bottom of the diluent container gently to inflate the portion of the container surrounding the end of the drug vial.
- With the other hand, push the drug vial down into the container telescoping the walls of the container. Grasp the inner cap of the vial through the walls of the container. (SEE FIGURE 5.)
- Pull the inner cap from the drug vial. (SEE FIGURE 6.) Verify that the rubber stopper has been pulled out, allowing the drug and diluent to mix.
- Mix container contents thoroughly and use within the specified time.
Fig. 5 Fig. 6
Preparation for Administration:
(Use Aseptic Technique)
- Confirm the activation and admixture of vial contents.
- Check for leaks by squeezing container firmly. If leaks are found, discard unit as sterility may be impaired.
- Close flow control clamp of administration set.
- Remove cover from outlet port at bottom of container.
- Insert piercing pin of administration set into port with a twisting motion until the pin is firmly seated. NOTE: See full directions on administration set carton.
- Lift the free end of the hanger loop on the bottom of the vial, breaking the two tie strings. Bend the loop outward to lock it in the upright position, then suspend container from hanger.
- Squeeze and release drip chamber to establish proper fluid level in chamber.
- Open flow control clamp and clear air from set. Close clamp.
- Attach set to venipuncture device. If device is not indwelling, prime and make venipuncture.
- Regulate rate of administration with flow control clamp.
WARNING: Do not use flexible containers in series connections.
Compatibility: Diltiazem hydrochloride injection and diltiazem hydrochloride for injection were tested for compatibility with three commonly used intravenous fluids at a maximal concentration of 1 mg diltiazem hydrochloride per milliliter. Diltiazem hydrochloride injection and diltiazem hydrochloride for injection were found to be physically compatible and chemically stable in the following parenteral solutions for at least 24 hours when stored in glass (diltiazem hydrochloride injection only) or polyvinylchloride (PVC) bags at controlled room temperature 20° to 25°C (68° to 77°F) [see USP] or under refrigeration 2° to 8°C (36° to 46°F).
- dextrose (5%) injection USP
- sodium chloride (0.9%) injection USP
- dextrose (5%) and sodium chloride (0.45%) injection USP
Physical Incompatibilities:
Because of potential physical incompatibilities, it is recommended that diltiazem hydrochloride injection or diltiazem hydrochloride for injection not be mixed with any other drugs in the same container. If possible, it is recommended that diltiazem hydrochloride injection or diltiazem hydrochloride for injection not be co-infused in the same intravenous line. Parenteral drug products should be inspected visually for particulate matter and discoloration prior to administration whenever solution and container permit.
Diltiazem hydrochloride injection. Physical incompatibilities (precipitate formation or cloudiness) were observed when diltiazem hydrochloride injection was infused in the same intravenous line with the following drugs: acetazolamide, acyclovir, aminophylline, ampicillin, ampicillin sodium/sulbactam sodium, cefamandole, cefoperazone, diazepam, furosemide, hydrocortisone sodium succinate, insulin, (regular: 100 units/mL), methylprednisolone sodium succinate, mezlocillin, nafcillin, phenytoin, rifampin, and sodium bicarbonate.
Diltiazem hydrochloride for injection. Physical incompatibilities (precipitate formation or cloudiness) were observed when diltiazem hydrochloride for injection at a concentration of 1 mg/mL diluted in normal saline was infused in the same intravenous line with the following drugs: acetazolamide, acyclovir, cefoperazone sodium, diazepam, furosemide, phenytoin and rifampin.
NOTE: Diltiazem hydrochloride for injection at a concentration of 1 mg/mL diluted in normal saline was infused in the same intravenous line and was found to be compatible with the following drugs: aminophylline, ampicillin sodium, ampicillin sodium/sulbactam sodium, cefamandole, hydrocortisone sodium succinate, regular insulin (100 units/mL), methylprednisolone sodium succinate, mezlocillin sodium, nafcillin sodium and sodium bicarbonate.
Transition to Further Antiarrhythmic Therapy.
Transition to other antiarrhythmic agents following administration of diltiazem hydrochloride injection is generally safe. However, reference should be made to the respective agent manufacturer's package insert for information relative to dosage and administration.
In controlled clinical trials, therapy with antiarrhythmic agents to maintain reduced heart rate in atrial fibrillation or atrial flutter or for prophylaxis of PSVT was generally started within 3 hours after bolus administration of diltiazem hydrochloride injection. These antiarrhythmic agents were intravenous or oral digoxin, Class 1 antiarrhythmics (e.g., quinidine, procainamide), calcium channel blockers, and oral beta-blockers.
Experience in the use of antiarrhythmic agents following maintenance infusion of diltiazem hydrochloride injection is limited. Patients should be dosed on an individual basis and reference should be made to the respective manufacturer's package insert for information relative to dosage and administration.
Health Professional Information
{{section_name_patient}}
{{section_body_html_patient}}
Resources
Didn’t find what you were looking for? Contact us.
Chat online with Pfizer Medical Information regarding your inquiry on a Pfizer medicine.
*Speak with a Pfizer Medical Information Professional regarding your medical inquiry. Available 9AM-5PM ET Monday to Friday; excluding holidays.
Submit a medical question for Pfizer prescription products.
Report Adverse Event
Pfizer Safety
To report an adverse event related to the Pfizer-BioNTech COVID-19 Vaccine, and you are not part of a clinical trial* for this product, click the link below to submit your information:
Pfizer Safety Reporting Site*If you are involved in a clinical trial for this product, adverse events should be reported to your coordinating study site.
If you cannot use the above website, or would like to report an adverse event related to a different Pfizer product, please call Pfizer Safety at (800) 438-1985.
FDA Medwatch
You may also contact the U.S. Food and Drug Administration (FDA) directly to report adverse events or product quality concerns either online at www.fda.gov/medwatch or call (800) 822-7967.